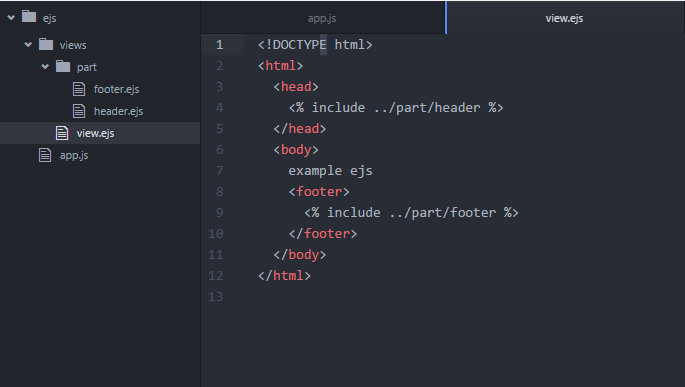
첫 번째 사진과 두 번째 사진을 보시면 공통적인 부분이 있는데요. 바로 이런 것이 바로 템플릿입니다. 사용자에 요청에 따라 응답하는 내용은 다르지만 제목, ui 가 같은 걸 알 수 있습니다. 만약 html으로 만든다면 사용자에 요청에 따라 매번 다른 html 파일로 응답해야 합니다. html을 정적이고 html템플릿은 동적이라고 알 수 있습니다. 이 글은 ejs 템플릿을 나타냅니다. ejs는 html을 안다면 아주 쉽게 알 수 있습니다. 우선 npm install express --save , npm install ejs --save 로 추가해야합니다.
node.js 에서 플랫폼 사용법
<!DOCTYPE html><html><head><% include ../part/header %></head><body>
example ejs
<footer><% include ../part/footer %></footer></body></html>
//view.ejs<!DOCTYPE html><html><head><% include ../part/header.ejs %></head><body>
example ejs
<h1><%= data %></h1><footer><% include ../part/footer %></footer></body></html>
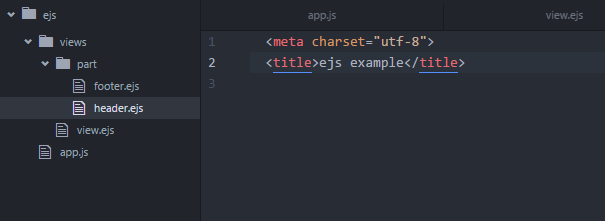
동적인 html템플릿은 어떻게 하는걸까요? 그건바로 언어로 합니다. ejs에는 자바스크립트로 합니다. <% %>,<%= %> 이 두가지 태그안에 자바스크립트 코드를 넣어 사용합니다. <% %>태그는 일반적인 자바스크립트를코드를 사용할때 사용합니다.
<%if(data)%><li><%= data %><li>
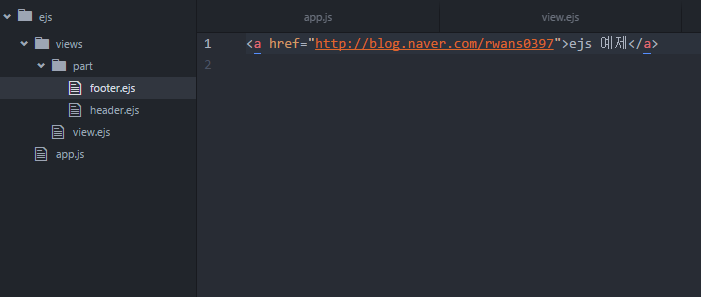
위 코드를 보시면 알수있드시 <%= %> 태그는 res.render('view',data);에서 보낸 변수를 사용할때 사용합니다.
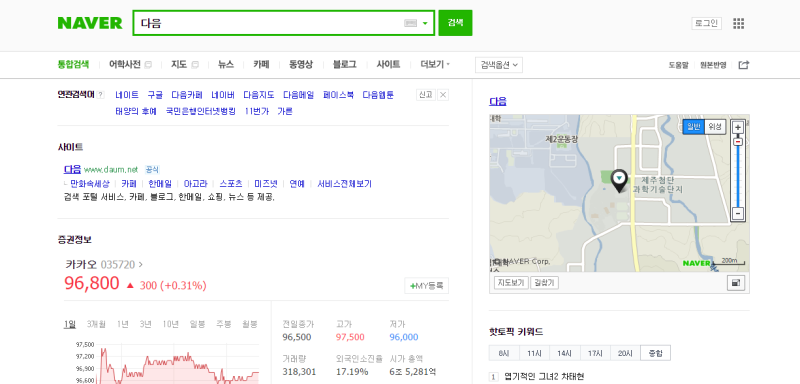
ejs 템플릿 실행 결과
ejs 템플릿 실행 결과
ejs 템플릿 실행 결과
이렇게 템플릿은 한개의 템플릿으로 여러 페이지를 나타낼수있습니다. 템플릿은 데이터베이스와 같이 사용하는데요 데이터베이스에 값을 조회해서 템플릿으로 보내 다양한 내용을 나타낼수있습니다.
함수형 뷰에서는 예제에서 볼 수 있듯 HTTP 메소드별 다른 처리가 필요할 때 if 문을 이용해야 한다. 하지만, 클래스형 뷰는 다음과 같이 코드의 구조가 훨씬 깔끔해짐을 볼 수 있다.
from django.http import HttpResponse
from django.views.generic import View
classMyView(View):defget(self, request):# 뷰 로직 작성return HttpResponse('result')
클래스형 뷰에서는 HTTP 메소드 이름으로 클래스 내의 메소드를 정의하면 된다. 단, 메소드명은 소문자로~ 이러한 처리가 가능한 것은 내부적으로 dispatch() 메소드가 어떤 HTTP 메소드로 요청되었는지 알아내고, 이를 처리해주기 때문이다.
아래의 예는 HTTP의 HEAD 메소드로 코딩하는 예를 보여준다.
from django.http import HttpResponse
from django.views.generic import ListView
from books.models import Book
classBookListView(ListView):
model = Book
defhead(self, *args, **kwargs):
last_book = self.get_queryset().latest('publication_date')
response = HttpResponse('')
response['Last-Modified'] = last_book.publication_date.strftime('%a, %d %b %y %H:%M:%S GMT')
return response
위 예제는 서점에 방문한 직후에 새롭게 출간된 책이 있는지를 문의하는 로직이다. 최근 발간된 책이 없는데도 책 리스트를 서버로부터 받아 오게되면 네트워크 대역폭이 낭비되므로, 이를 방지하기 위해 HEAD 메소드를 사용한다. HEAD 요청에 대한 응답은 바디 없이 헤더만 보내주면 된다.
"""tutorial URL Configuration

The `urlpatterns` list routes URLs to views. For more information please see:
    https://docs.djangoproject.com/en/2.2/topics/http/urls/
Examples:
Function views
    1. Add an import:  from my_app import views
    2. Add a URL to urlpatterns:  path('', views.home, name='home')
Class-based views
    1. Add an import:  from other_app.views import Home
    2. Add a URL to urlpatterns:  path('', Home.as_view(), name='home')
Including another URLconf
    1. Import the include() function: from django.urls import include, path
    2. Add a URL to urlpatterns:  path('blog/', include('blog.urls'))
"""
from django.contrib import admin
from django.urls import path, re_path
from community.views import *

urlpatterns = [
    path('admin/', admin.site.urls),
    path('write/', write, name='write'),
    path('list/', list, name='list'),
]
path('list/', list, name='list') : get list/에 응답하기 위해 새롭게 추가합니다.
첫번째 파라미터로 url주소를
두번재 파라미터로 받은 요청을 어디로 전달할지
세번재로는 내부적으로 사용되는 path명을 기입한다.
위 코드는 클라이언트로부터 받은 요청을 컨트롤러(views.py)의 list함수로 전달합니다.
3. send request
views.py
from django.shortcuts import render
from community.forms import *
# from django.views.decorators.csrf import csrf_exempt
# Create your views here.
# 사용자에게 들어온 요청을 받고, response를 반환함

def write(request):
    form = Form()
    return render(request, 'write.html', {'form':form})

# @csrf_exempt
def save(request):
    if (request.method == 'POST'):
        form = Form(request.POST)
        if form.is_valid():
            form.save()
            return render(request, 'save_complete.html')
        else:
            return render(request, 'save_not_complete.html')

def list(request):
    lArticles = Article.objects.all()

    context = {'lArticles': lArticles}
    return render(request, 'list.html', context)
def list(request) : /list/에서 오는 request를 처리하기 위해 새롭게 추가된 함수입니다.
4. get DB table object, 5. return DB table object, 6. get all data from DB table
lArticles = Article.objects.all() : 이전 포스트에서 언급한 바와같이 models.py의 class로 존재하는 class Article에는 모든 모듈에서 클래스명만으로 접근을 할 수 있습니다.
lArticles = Article.objects.all()의 문법으로 Article테이블(정확하게는 community_article테이블)의 결과값을 리스트 형태로 받아올 수 있습니다.
select * from community_article과 완전히 동일한 결과라고 보시면 됩니다.
7. parsing list to html, 8. return parsed html, 9. rendering html as response
views.py
from django.shortcuts import render
from community.forms import *
# from django.views.decorators.csrf import csrf_exempt
# Create your views here.
# 사용자에게 들어온 요청을 받고, response를 반환함

def write(request):
    form = Form()
    return render(request, 'write.html', {'form':form})

# @csrf_exempt
def save(request):
    if (request.method == 'POST'):
        form = Form(request.POST)
        if form.is_valid():
            form.save()
            return render(request, 'save_complete.html')
        else:
            return render(request, 'save_not_complete.html')

def list(request):
    lArticles = Article.objects.all()

    context = {'lArticles': lArticles}
    return render(request, 'list.html', context)
href="/view/{{ article.id }}" : 이때 리스트에서 각 id를 클릭하면, 게시글로 이동할 수 있도록, /view/[idNum]의 url을 동적으로 만들어줍니다.
get /view 개발
get /view작성을 위한 시퀀스도
1. get: /view/, 2. dispatch url
urls.py
"""tutorial URL Configuration

The `urlpatterns` list routes URLs to views. For more information please see:
    https://docs.djangoproject.com/en/2.2/topics/http/urls/
Examples:
Function views
    1. Add an import:  from my_app import views
    2. Add a URL to urlpatterns:  path('', views.home, name='home')
Class-based views
    1. Add an import:  from other_app.views import Home
    2. Add a URL to urlpatterns:  path('', Home.as_view(), name='home')
Including another URLconf
    1. Import the include() function: from django.urls import include, path
    2. Add a URL to urlpatterns:  path('blog/', include('blog.urls'))
"""
from django.contrib import admin
from django.urls import path, re_path
from community.views import *

urlpatterns = [
    path('admin/', admin.site.urls),
    path('write/', write, name='write'),
    path('list/', list, name='list'),
    re_path(r'^view/(?P<num>[0-9]+)/$', view, name='list'),
]
re_path(r'^view/(?P<num>[0-9]+)/$', view, name='list') : view/이후에 숫자가 들어온 부분을 파라미터로 인정하여, controller에게 전달합니다. 가령 view/15가 urls.py로 들어왔다면, num = 15 라는 파라미터로 넣어 controller인 views.py의 view함수로 넘겨줍니다.
첫번째 파라미터로 url주소를
두번재 파라미터로 받은 요청을 어디로 전달할지
세번재로는 내부적으로 사용되는 path명을 기입한다.
위 코드는 클라이언트로부터 받은 요청을 컨트롤러(views.py)의 list함수로 전달합니다.
3. send request
views.py
from django.shortcuts import render
from community.forms import *
# from django.views.decorators.csrf import csrf_exempt
# Create your views here.
# 사용자에게 들어온 요청을 받고, response를 반환함

def write(request):
    form = Form()
    return render(request, 'write.html', {'form':form})

# @csrf_exempt
def save(request):
    if (request.method == 'POST'):
        form = Form(request.POST)
        if form.is_valid():
            form.save()
            return render(request, 'save_complete.html')
        else:
            return render(request, 'save_not_complete.html')

def list(request):
    lArticles = Article.objects.all()

    context = {'lArticles': lArticles}
    return render(request, 'list.html', context)

def view(request, num):
    article = Article.objects.get(id=num)
    context = {'article': article}
    return render(request, 'view.html', context)
def view(request, num) : urls.py에서 로 념겨준 부분을 controller의 함수에서 파라미터를 통해서 받습니다. 이 부분 중요합니다.
4. get DB table object, 5. return DB table object, 6. get all data from DB table
article = Article.objects.get(id=num) : 이번에는 Article테이블(정확하게는 community_article테이블)의 모든 row를 가져오는게 아니고, 조건을 걸어줬네요. select * from community_articl where id=num와 동일한 결과를 가져온다고 생각하시면 됩니다.
select * from community_article과 완전히 동일한 결과라고 보시면 됩니다.
7. parsing list to html, 8. return parsed html, 9. rendering html as response
views.py
from django.shortcuts import render
from community.forms import *
# from django.views.decorators.csrf import csrf_exempt
# Create your views here.
# 사용자에게 들어온 요청을 받고, response를 반환함

def write(request):
    form = Form()
    return render(request, 'write.html', {'form':form})

# @csrf_exempt
def save(request):
    if (request.method == 'POST'):
        form = Form(request.POST)
        if form.is_valid():
            form.save()
            return render(request, 'save_complete.html')
        else:
            return render(request, 'save_not_complete.html')

def list(request):
    lArticles = Article.objects.all()
    context = {'lArticles': lArticles}
    return render(request, 'list.html', context)

def view(request, num):
    article = Article.objects.get(id=num)
    context = {'article': article}
    return render(request, 'view.html', context)
"""tutorial URL Configuration

The `urlpatterns` list routes URLs to views. For more information please see:
    https://docs.djangoproject.com/en/2.2/topics/http/urls/
Examples:
Function views
    1. Add an import:  from my_app import views
    2. Add a URL to urlpatterns:  path('', views.home, name='home')
Class-based views
    1. Add an import:  from other_app.views import Home
    2. Add a URL to urlpatterns:  path('', Home.as_view(), name='home')
Including another URLconf
    1. Import the include() function: from django.urls import include, path
    2. Add a URL to urlpatterns:  path('blog/', include('blog.urls'))
"""
from django.contrib import admin
from django.urls import path, re_path
from community.views import *

urlpatterns = [
    path('admin/', admin.site.urls),
    path('write/', write, name='write'),
]
클라이언트로부터 write/로 요청이 들어오면 가장 먼저, urls.py를 보고 url을 dispatch합니다. 위 코드에서 path('write/', write, name='write') 의 부분으로
첫번째 파라미터로 url주소를
두번재 파라미터로 받은 요청을 어디로 전달할지
세번재로는 내부적으로 사용되는 path명 을 기입한다.
위 코드는 클라이언트로부터 받은 요청을 컨트롤러(views.py)의 write함수로 전달합니다.
3. send request
views.py
from django.shortcuts import render
from community.forms import *
# from django.views.decorators.csrf import csrf_exempt
# Create your views here.
# 사용자에게 들어온 요청을 받고, response를 반환함

def write(request):
    form = Form()
    return render(request, 'write.html', {'form':form})
path('write/', write, name='write') 에 따라 urls.py에서 dispatch한 request가 도착하는 곳이 바로 write게 되겠네요.
4. create form, 5. call models to create form, 6.return form, 7. return form
views.py
from django.shortcuts import render
from community.forms import *
# from django.views.decorators.csrf import csrf_exempt
# Create your views here.
# 사용자에게 들어온 요청을 받고, response를 반환함

def write(request):
    form = Form()
    return render(request, 'write.html', {'form':form})
forms.py
from django.forms import ModelForm
from community.models import *

class Form(ModelForm):
    class Meta:
        model = Article
        fields = ['name', 'title', 'contents', 'url', 'email']
models.py
from django.db import models

# Create your models here.
class Article(models.Model):
    # Override Fields
    # 이게 데이터베이스에서 테이블의 컬럼을 만드는 것임
    name = models.CharField(max_length=50)
    title = models.CharField(max_length=50)
    contents = models.TextField()
    url = models.URLField()
    email = models.EmailField()
    cDate = models.DateTimeField(auto_now_add=True)
write함수 내의 form = Form() 을 보도록 합시다.
forms.py의 Form 클래스가 하는 일은, ModelForm을 상속받아 딱히 리턴이 없어도 생성한 db에 맞는 input form을 생성해 주는 모양입니다.. 디버깅을 해본 결과 form = Form()은 form object입니다. 다해주네요 장고는..
forms.py의 Form 클래스에서 주목할 부분이, model = Article 인데요. Article은 models.py에서 생성한 적이 있는, 테이블 정보에 관한 클래스입니다. 모든 모듈에서 models내부에 있는 클래스명들은 딱히 import하지 않아도 불리는 모양이더라구요.
너무 다해주네요.
다음으로 넘어가기 전에 templates폴더를 생성하고 그 아래 view가 될 html들을 생성해 줍시다
자동으로 생성된 디렉토리 트리에서 templates라는 디렉토리를 앱명으로 만들어진 디렉토리 직하에 생성한 후
그 아래 view를 구성하게될 html파일들을 넣어줍니다.
templates디렉토리 안에 write.html을 생성해주세요.
8. parsing form to html, 9. return parsed html, 10. render html as response
자그럼 이제 생성된 form을 html에 어떻게 넣냐.
views.py
from django.shortcuts import render
from community.forms import *
# from django.views.decorators.csrf import csrf_exempt
# Create your views here.
# 사용자에게 들어온 요청을 받고, response를 반환함

def write(request):
    form = Form()
    return render(request, 'write.html', {'form':form})
"""tutorial URL Configuration

The `urlpatterns` list routes URLs to views. For more information please see:
    https://docs.djangoproject.com/en/2.2/topics/http/urls/
Examples:
Function views
    1. Add an import:  from my_app import views
    2. Add a URL to urlpatterns:  path('', views.home, name='home')
Class-based views
    1. Add an import:  from other_app.views import Home
    2. Add a URL to urlpatterns:  path('', Home.as_view(), name='home')
Including another URLconf
    1. Import the include() function: from django.urls import include, path
    2. Add a URL to urlpatterns:  path('blog/', include('blog.urls'))
"""
from django.contrib import admin
from django.urls import path, re_path
from community.views import *

urlpatterns = [
    path('admin/', admin.site.urls),
    path('write/', write, name='write'),
    path('save/', save, name='save'),
]
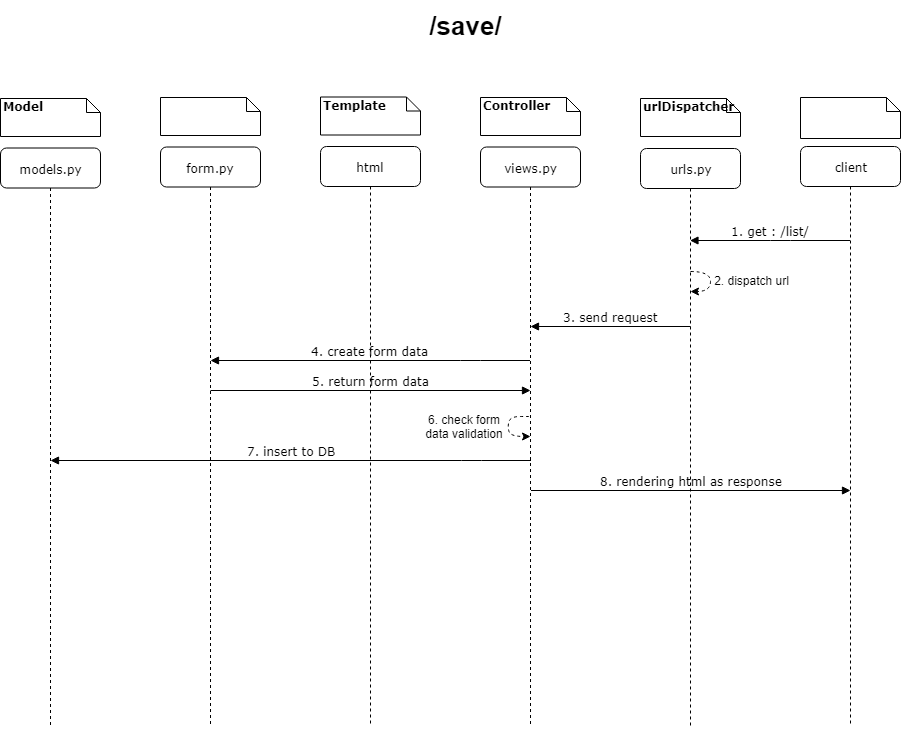
path('save/', save, name='save'): urlpatterns리스트에추가합니다. path안의 각 파라미터 갖는 의미는 write때와 동일합니다.
첫번째 파라미터로 url주소를
두번재 파라미터로 받은 요청을 어디로 전달할지
세번재로는 내부적으로 사용되는 path명 을 기입한다.
위 코드는 클라이언트로부터 받은 요청을 컨트롤러(views.py)의 save함수로 전달합니다.
3. send request
views.py
from django.shortcuts import render
from community.forms import *
# from django.views.decorators.csrf import csrf_exempt
# Create your views here.
# 사용자에게 들어온 요청을 받고, response를 반환함

def write(request):
    form = Form()
    return render(request, 'write.html', {'form':form})

# @csrf_exempt
def save(request):
    if (request.method == 'POST'):
        form = Form(request.POST)
        if form.is_valid():
            form.save()
            return render(request, 'save_complete.html')
        else:
            return render(request, 'save_not_complete.html')
def save(request) : /save/에서 오는 request를 처리하기 위해 새롭게 추가된 함수입니다.
django는 시큐리티쪽도 알아서 해줍니다. post송신을 할때, csrf토큰을 html로부터 받아 안전하게 post처리를 하게 하는데요. 안전하게 라는 단어의 의미가 애매하므로 csrf토큰이 무슨일을 하는지 다음의 블로그에서 확인해주세요.
{% csrf_token %} 이 라인을 통해 csrf토큰을 발행해 save로 포트스할 수 있었던 겁니다!
만약 html쪽에서 csrf토큰을 발행하지 않으면, 렌더링 오류 페이지가 발생하는데요. csrf토큰이 없어서 페이지를 렌더링 못하겠다는 오류가 발생합니다. 이때의 해결방법은 다음과 같습니다.
controller의 해당 함수에 @csrf_exempt 어노테이션을 추가하여 csrf토큰이 없어도 렌더링 할 수 있도록한다.(현재 소스코드에서 코멘트아웃되어 있는부분)
4. create form data, 5. return form data
views.py
from django.shortcuts import render
from community.forms import *
# from django.views.decorators.csrf import csrf_exempt
# Create your views here.
# 사용자에게 들어온 요청을 받고, response를 반환함

def write(request):
    form = Form()
    return render(request, 'write.html', {'form':form})

# @csrf_exempt
def save(request):
    if (request.method == 'POST'):
        form = Form(request.POST)
        if form.is_valid():
            form.save()
            return render(request, 'save_complete.html')
        else:
            return render(request, 'save_not_complete.html')
forms.py
from django.forms import ModelForm
from community.models import *

class Form(ModelForm):
    class Meta:
        model = Article
        fields = ['name', 'title', 'contents', 'url', 'email']
form = Form(request.POST) : request로 받아온 post정보를 Form의 인자로 넘기면 form오브젝트를 반환합니다. form오브젝트는 ModelForm은 상속하고 있으므로 그 아래있는 다양함 함수에 접근할 수 있는 인스턴스입니다.
6. check form data validation
form.is_valid() : 인스턴스가 접근할 수 있는 편리한 함수중 하나가 is_valid()함수입니다. post로 가져온 request 정보가 Article DB에 insert되게 적합한 정보를 모두 가지고 있는지 아닌지 validation을 수행합니다..
7. insert to DB
form.save() : 장고에선 sql을 전혀 사용할 필요가 없다는 걸 깨닳았습니다. 이 라인하나로 post로 가져온 request 정보를 Article DB에 inser해주게 됩니다.
편리하게 생성해주긴 하는데, nodejs나 java를 통해 웹개발은 해온 개발자라면, 직접 db를 보지 않고서는 영 찜찜하다.. python manage.py migrate커맨드를 실행했다면, root디렉토리에 db.sqlite3라는 파일이 생성되는데, 이 파일이 있는 루트디렉토리로 이동을 하자.
Has anyone had issues setting up a debug configuration for Django project in PyCharm Community Edition? Community Edition of the IDE is lacking the project type option on project setup and then when I am setting up Debug or Run config it asks me for a script it should run. What script would it be for Django, manage.py? Thanks in advance
I notice that server breakpoints are masked when client breakpoints are present. Try removing all client breakpoints to see your server breakpoints get hit. – Steve ElmerApr 12 '17 at 14:56
Judicious use of sleep() in the client code prevents the browser from breaking the connection while you're in the debugger on the server. – Steve ElmerApr 12 '17 at 15:08
Great thanks @Zlatko Rončević, I worked out the answer shortly after I posted the question but never updated it here - yours is exactly what worked for me. I am sorry I won't be able to vote it up as I have too small reputation :( But I would if I had it. Other people viewing this question please do so. – emkorybskiFeb 23 '15 at 22:15
1
If you have environment variables, you should run PyCharm with the constants set from command line. – anizzomcApr 24 '15 at 13:51
@ZlatkoRončevi same thing I followed debugger is starting but when I open browser and debugger is not bringing cursor to the break points – niranApr 26 '16 at 3:22
프로그램을 구조적으로 잘 만들기 위해 number, string, structure, boolean 등 가장 간단한 데이터 단위로 작업을 할 수 있어야합니다. TypeScript에서는 이러한 타입들을 JavaScript와 거의 같은 형태로 지원합니다.
Boolean
JavaScript/TypeScript의 가장 기본적인 데이터 타입은 true/false 값을 가지는 boolean 입니다.
let isDone: boolean = false;
Number
JavaScript에서와 마찬가지로 TypeScript의 모든 숫자는 부동 소수점 값이고 number 타입을 가집니다. TypeScript는 16 진수 및 10 진수 리터럴 외에도 ECMAScript 2015에 도입된 바이너리 및 8 진수를 지원합니다.
let decimal: number = 6;
let hex: number = 0xf00d;
let binary: number = 0b1010;
let octal: number = 0o744;
String
웹 페이지와 서버용 JavaScript에서 프로그램을 생성할 때 흔히 문자열 데이터를 많이 사용합니다. 다른 언어에서와 마찬가지로, TypeScript에서 이러한 문자 데이터 유형을 나타 내기 위해 string 타입 문자열을 사용합니다. JavaScript와 마찬가지로 TypeScript는 문자열 데이터를 표현하기 위해 큰 따옴표(“) 또는 작은 따옴표(‘)를 사용합니다.
let color: string = "blue";
color = 'red';
문자열이 여러 행에 걸쳐 있고 표현식을 포함할 수있는 template string을 사용할 수도 있습니다. 이러한 문자열은 백틱/백 쿼트(` ) 문자로 둘러싸여 있있고, ${expr}를 이용하여 표현식을 포함할 수 있습니다.
let fullName: string = `Bob Bobbington`;
let age: number = 37;
let sentence: string = `Hello, my name is ${fullName}.
I'll be ${ age + 1 } years old next month.`;
위 코드는 String 변수를 다음과 같이 선언하는 것과 같습니다.
let sentence: string = "Hello, my name is " + fullName + ".\n\n" +
    "I'll be " + (age + 1) + " years old next month.";
Array
TypeScript는 JavaScript와 마찬가지로 배열을 사용할 수있습니다. 배열 타입은 두 가지 방법 중 하나로 작성할 수 있습니다. 첫 번째로, 각 타입에 []를 붙여 해당 타입의 배열을 나타냅니다
let list: number[] = [1, 2, 3];
두 번째 방법은 일반적인 배열 타입 Array을 사용합니다.
let list: Array<number> = [1, 2, 3];
Tuple
튜플 타입을 사용하면 고정된 수의 요소 타입은 알고 있지만, 값의 종류가 다른 배열을 표현할 수 있습니다. 예를 들어, 문자열과 숫자의 쌍을 아래와 같이 표현할 수 있습니다.
// Declare a tuple type
let x: [string, number];
// Initialize it
x = ["hello", 10]; // OK
// Initialize it incorrectly
x = [10, "hello"]; // Error
변수 선언에 포함된 인덱스 요소의 타입은 인덱스를 이용하여 정확한 타입으로 액세스가 가능합니다. 하지만, 타입이 서로 다를수 있기 때문에 액세스한 데이터의 처리는 달라질 수 있습니다.
console.log(x[0].substr(1)); // OK
console.log(x[1].substr(1)); // Error, 'number' does not have 'substr'
변수 선언에 포함되지 않는 요소에 대한 액세스는 Tuple 선언에 사용된 타입의 Union 타입으로 사용됩니다.
x[3] = "world"; // OK, 'string' can be assigned to 'string | number'
console.log(x[5].toString()); // OK, 'string' and 'number' both have 'toString'
x[6] = true; // Error, 'boolean' isn't 'string | number'
Union 타입은 이후 장에서 다룰 고급 주제중 하나 입니다.
Enum
JavaScript의 표준 데이터 타입에서 유용한 기능중 하나는 enum입니다. C# 언어와 마찮가지로 enum은 숫자값 데이터 셋에 사람이 더 친숙한 이름을 지정하는 방법입니다.
enum Color {Red, Green, Blue}
let c: Color = Color.Green;
기본적으로 enum은 0부터 시작하여 멤버의 번호 매기기를 시작합니다. 멤버 중 하나의 값을 수동으로 설정하여 변경할 수 있습니다. 예를 들어 이전 예제를 0 대신 1로 시작할 수 있습니다.
enum Color {Red = 1, Green, Blue}
let c: Color = Color.Green;
또는 enum의 모든 값을 수동으로 설정할 수 있습니다.
enum Color {Red = 1, Green = 2, Blue = 4}
let c: Color = Color.Green;
enum의 편리한 기능은 숫자 값에서 enum의 값 이름으로 이동할 수 있다는 것입니다. 예를 들어 값이 2이지만 위의 색상 enum에 매핑된 것이 확실하지 않은 경우 해당 이름을 찾을 수 있습니다.
enum Color {Red = 1, Green, Blue}
let colorName: string = Color[2];
alert(colorName);
Any
값을 자신 또는 타사 라이브러리의 동적 콘텐츠에서 가져오는 것과 같이 프로그램을 작성할 때 알지 못하는 변수 유형을 설명해야 할 수도 있습니다. 이 경우 컴파일시 타입 검사를 하지 않고 지나가도록 해야 합니다. 이런 방법을 위해 any 타입을 사용합니다.
let notSure: any = 4;
notSure = "maybe a string instead";
notSure = false; // okay, definitely a boolean
any 타입은 기존 JavaScript와 같이 작업하는 강력한 방법중 하나 입니다. 컴파일하는 동안 타입 검사를 옵트 인 (opt-in)하거나 옵트 아웃 (opt-out) 할 수 있습니다. 다른 언어도 비슷하지만 JavaScript의 Object 타입이 비슷한 역할을 합니다. 그러나 Object 타입의 변수는 값을 할당할 수만 있습니다. 실제 존재하는 메소드라도 임의의 메소드를 호출할 수는 없습니다 :
let notSure: any = 4;
notSure.ifItExists(); // okay, ifItExists might exist at runtime
notSure.toFixed(); // okay, toFixed exists (but the compiler doesn't check)
let prettySure: Object = 4;
prettySure.toFixed(); // Error: Property 'toFixed' doesn't exist on type 'Object'.
any 타입은 타입의 일부분을 알고 있다면 편리하지만 그렇지 않을 수도 있습니다. 예를 들어 배열이 있고, 배열에 있는 값은 다른 타입이 혼합되어 있을 수 있습니다.
let list: any[] = [1, true, "free"];
list[1] = 100;
Void
void는 타입이 전혀 없다는 것에서 any의 반대 의미와 비슷합니다. 일반적으로 값을 반환하지 않는 함수의 반환 유형으로 이 타입을 사용합니다.
function warnUser(): void {
    alert("This is my warning message");
}
void 타입의 변수 선언은undefined 또는null 만 할당할 수 있기 때문에 그다지 유용하지 않습니다.
let unusable: void = undefined;
Null 과 Undefined TypeScript에서 undefined와 null은 실제로 각각 undefined와 null이라는 이름의 타입을 가지고 있습니다. void와 매우 비슷하게, 이 타입들은 그 자체로 매우 유용하지는 않습니다.
// Not much else we can assign to these variables!
let u: undefined = undefined;
let n: null = null;
기본적으로 null과 undefined는 다른 모든 유형의 하위 유형입니다. 즉,null과 undefined를 number와 같은 것에 할당할 수 있습니다.
--strictNullChecks 플래그를 사용할 경우 null과 undefined는 void와 각각의 타입 변수에만 할당 가능합니다. 이렇게하면 많은 일반적인 오류를 피할 수 있습니다. string 또는 null 또는 undefined를 전달 하고자하는 경우, union 타입 string|null|undefined을 사용할 수 있습니다. 다시 한번, Union 타입은 후반부에 자세히 설명합니다.
가능하면 --strictNullChecks의 사용을 권장합니다. 그러나이 핸드북의 목적 상 우리는 플래그가 꺼져 있다고 가정 합니다.
Never
never 타입은 절대로 발생하지 않는 값의 타입을 나타냅니다. 예를 들어, never는 함수 표현식의 리턴 타입이거나, 항상 예외를 던지는 화살표 함수 표현식이거나, 리턴하지 않는 표현식입니다. 변수는 결코 true가 될 수없는 어떤 타입의 가드에 의해 좁혀 질 때 타입 never를 획득합니다.(?)
never 타입은 모든 타입의 서브 타입이며, 모든 타입에 assign 가능합니다. 하지만 어떤 타입도 never (never 자체 제외)의 하위 타입이 아니고 assign 할 수 없습니다. 어떤 타입도 ‘never’에 assign되지 않습니다.
‘never’를 반환하는 함수의 몇 가지 예는 다음과 같습니다.
// Function returning never must have unreachable end point
function error(message: string): never {
    throw new Error(message);
}
// Inferred return type is never
function fail() {
    return error("Something failed");
}
// Function returning never must have unreachable end point
function infiniteLoop(): never {
    while (true) {
    }
}
Object
object는 non-primitive 타입, 즉 number, string, boolean, symbol, null 또는undefined가 아닌 타입을 나타내는 타입입니다.
object 타입을 사용하면 Object.create와 같은 API를보다 잘 표현할 수 있습니다.
declare function create(o: object | null): void;
create({ prop: 0 }); // OK
create(null); // OK
create(42); // Error
create("string"); // Error
create(false); // Error
create(undefined); // Error
Type assertions
어떤 값에 대해 프로그래머는 때때로 TypeScript보다 더 많은 정보를 알수 있습니다. 보통 이런 경우는 어떤 엔티티의 타입이 현재 타입보다 더 구체적인 타입을 알고 있을 때입니다.
타입 어설션은 컴파일러에게 “나를 믿어. 내가 하고 있는 일을 잘 알아.”라고 말하는 방법입니다. 타입 어설션은 다른 언어의 타입 변환과 비슷하지만 특별한 검사 나 데이터 재구성을 수행하지 않습니다. 런타임에 영향을 미치지 않으며 컴파일러에서만 사용됩니다. TypeScript는 프로그래머가 필요한 특수 검사를 수행했다고 가정합니다.
타입 어설션에는 두 가지 형식이 있습니다. 하나는 “angle-bracket(<>)”구문입니다.
let someValue: any = "this is a string";
let strLength: number = (<string>someValue).length;
그리고 다른 하나는 as 구문입니다 :
let someValue: any = "this is a string";
let strLength: number = (someValue as string).length;
두가지 방법은 동일한 역할을 하기 때문에 어떤것을 사용하는지는 단지 선택의 문제입니다. 그러나 TypeScript를 JSX와 함께 사용할 경우는 as 스타일의 어설션만 허용됩니다.
let에 대해
지금까지 우리는 기존에 알고있는 JavaScript의 var 키워드 대신 let 키워드를 사용했습니다. let 키워드는 실제로 TypeScript에서 사용할 수있는 더 새로운 JavaScript 구문입니다. 나중에 자세한 내용을 다루 겠지만, 자바 스크립트의 많은 일반적인 문제는 let을 사용하여 완화되므로 가능할 때마다 var 대신 사용하십시오.
{
  "compilerOptions": {
    "target": "ES2017", // 사용할 ECMAScript 버전 설정

    /////////// module ///////////
    "module": "CommonJS", // 모듈 설정
    "moduleResolution": "node", // 모듈 (검색)해석 방식 설정
    "allowSyntheticDefaultImports": true, // export default 를 export 한 값들을 가지는 객체로 설정
    "esModuleInterop": true, // https://www.typescriptlang.org/docs/handbook/release-notes/typescript-2-7.html

    /////////// path ///////////
    "baseUrl": ".", // Non-relativ 모듈 혹은 paths 옵션의 기준 디렉토리
    "paths": { // baseUrl 옵션을 기준디렉토리로 불러올 모듈의 위치 설정이 가능
      "*": ["*"]
    },
    // "rootDirs": [ ], // 가상 디덱토리를 설정
    // "rootDir": "./", // 입력파일의 rootDir 설정
    // outDir옵션을 사용할때만 사용
    // "outDir": "dest", // 출력할 디덱토리
    // "outFile": "", // 단일파일로 출력시 파일명

    /////////// declaration ///////////
    "declaration": false, // .d.ts 파일의 생성 여부
    // "declarationDir": "", // .d.ts 파일이 생성되는 디렉토리 설정

    /////////// log ///////////
    "diagnostics": false, // Show diagnostic information.
    "traceResolution": false, // 모듈 검색에 대한 로그메세지 출력 여부
    "listEmittedFiles": false, // 컴파일된 결과 파일들 이름을 터미널에 출력
    "listFiles": true, // 컴파일된 파일들 이름을 터미널에 출력
    "locale": "ko", // 에러메세지 출력 언어 설정
    "pretty": true, // 에러 메시지를 예쁘게 설정
    // @TODO 테스트 필요

    /////////// React ///////////
    "jsx": "react", // jsx 지원
    "jsxFactory": "React.createElement", // jsx 팩토리 함수 설정,

    /////////// JS ///////////
    // "allowJs": false, // 자바스크립트 파일 컴파일 허용 여부.
    // "checkJs": false, // allowJs 옵션이 true여서 js파일 모듈을 사용시 js파일의 오류 검사 여부
    // "maxNodeModuleJsDepth": 0, // js 모듈을 검색할 최대 깊이

    /////////// Lint ///////////
    "strict": true, // 모든 엄격한 타입 검사 옵션을 활성화
    // noImplicitAny, noImplicitThis, alwaysStrict, strictNullChecks, strictFunctionTypes
    "allowUnreachableCode": false, // 도달 불가능한 코드에 대한 허용 여부.
    "allowUnusedLabels": false, // 사용하지 않는 라벨에 대한 허용 여부
    "noFallthroughCasesInSwitch": true, // 잘못 적혔다고 판단되는 switch문에 대한 에러 발생
    "noImplicitReturns": true, // 함수의 모든 경로가 값을 반환하지 않으면 에러 발생
    "suppressExcessPropertyErrors": false, // 객체 리터럴에 대한 초과 속성 검사 억제 여부
    "suppressImplicitAnyIndexErrors": false, // 인덱스 서명이없는 개체를 인덱싱하는 경우 --noImplicitAny 오류 억제여부
    // 자세한 내용은 문제 #1232를 참조
    "noStrictGenericChecks": true, // 함수에서 generic의 엄격한 검사 해제 여부
    "noUnusedLocals": true, // 사용안된 지역변수에 대한 오류 보고 여부
    "noUnusedParameters": true,  // 사용안된 파라미터에 대한 오류 보고 여부

    /////////// edit outfile ///////////
    "charset": "utf8", // 입력파일의 문자집합 형식
    "emitBOM": false,// 출력 파일의 시작 부분에 UTF-8 바이트 순서표 (BOM) 추가여부
    // "newLine": "lf", // end of line sequence 설정
    "removeComments": true, // 주석 삭제
    "disableSizeLimit": false, // Disable size limitation on JavaScript project.
    "noEmit": false, // 결과파일을 저장하지 않음
    "noEmitOnError": false, // 에러 발생시 결과파일을 저장하지 않음
    "preserveConstEnums": false, // const enum형 선언을 지우지 않을건지 여부

    /////////// more spec ///////////
    // "lib": [], // 컴파일에 포함될 라이브러리 파일 목록
    "downlevelIteration": false, // target이 ES3 및 ES5 일때도 for..of, spread, destructuring 문법 지원
    "experimentalDecorators": true, // ES Decorator에 대한 실험적 기능 사용 여부
    "stripInternal": false, // /** @ internal * /JSDoc annotation이 있는 코드에 대한 선언을 내 보내지 않을지 여부

    /////////// optimization ///////////
    "importHelpers": true, // tslib에서 helpers (e.g. __extends, __rest, etc..)를 가져온다.

    /////////// sourceMap ///////////
    // "inlineSourceMap": false, // 소스맵을 결과코드에 추가
    // @TODO 테스트 필요
    // "mapRoot": "./map", // "source map 파일을 저장할 root 디렉토리 지정
    // 지정하지 않으면 변환된 파일과 동일한 디렉토리에 저장된다.
    "sourceMap": true, // 소스맵(*.map) 파일 생성 여부
    // "sourceRoot": "", // 디버거가 알아야될 .ts파일 root 위치. 소스맵(*.map)에 적용된다.
    // @TODO 테스트 필요
    // "inlineSources": false, // 변환전 파일 .ts 코드를 결과코드에 추가
    // @TODO 테스트 필요

    /////////// etc ///////////

    // "noImplicitUseStrict": false, // @TODO 테스트 필요

    // "noLib": false, // 기본 라이브러리(lib.d.ts)를 가져오지 않는다.

    // "plugins": [ ], // 편집환경을 더 좋게 변경하기 위한 플러그인 기능

    // "preserveSymlinks": false, // Symlink파일에서 다른 모듈을 import시 기준경로를 Symlink 경로로 설정
    // 기존에는 Symlink파일에서 다른 모듈을 import시
    // Symlink파일의 실제 경로에서 모듈을 가져왔다.
    // https://nodejs.org/api/cli.html#cli_preserve_symlinks

    // "skipLibCheck": false, // 모든 선언파일(*.d.ts)의 유형검사를 건너뛸지 여부

    // "watch": false, // 파일 변경시 컴파일

    /////////// ??? ///////////
    // "isolatedModules": false, // @TODO 뭘까...
    // https://github.com/Microsoft/TypeScript/issues/2499
    // "emitDecoratorMetadata": false, // @TODO 테스트 필요
    // Emit design-type metadata for decorated declarations in source. See issue #2577 for details.
    // "noResolve": false // @TODO 테스트 필요
  }
}
디테일버전
{
    // https://github.com/Microsoft/TypeScript/tree/master/tests/cases/compiler
    // https://github.com/Microsoft/TypeScript/tree/master/tests/baselines/reference
    // 공식문서 외에도 위 테스트 코드를 참고시 도움이 됩니다.

    "compilerOptions": {
        "allowJs": false, // 자바스크립트 파일 컴파일 허용 여부.
        // import add from './add.js' 와 같이 js파일 import 허용

        "allowSyntheticDefaultImports": false, // export default 를 export 한 값들을 가지는 객체로 설정
        // export class Foo { member: string; } 을 할시 (b.ts)
        // export default { Foo } 가 기본으로 설정된다.

        "allowUnreachableCode": false, // 도달 불가능한 코드에 대한 허용 여부.
        /*
        function foo() {
            if (true) {
                return 42;
            }
            else {
                return "42"; // 도달 불가능
            }
        };
        */

        "allowUnusedLabels": false, // 사용하지 않는 라벨에 대한 허용 여부
        /*
        target1:
        target2: // 사용하지 않는 라벨
        while (true) {
            break target1;
        }
        */

        "alwaysStrict": false, // 항상 strict mode로 분석할지 여부
        // 모든 코드를 strict mode로 분석함
        // "use strict"; 를 컴파일된 js파일에 추가
        // @TODO noImplicitUseStrict 와 비교 필요

        "baseUrl": ".", // Non-relativ 모듈 혹은 paths 옵션의 기준 디렉토리

        "charset": "utf8", // 입력파일의 문자집합 형식

        "checkJs": false, // allowJs 옵션이 true여서 js파일 모듈을 사용시 js파일의 오류 검사 여부

        "declaration": false, // .d.ts 파일의 생성 여부

        "declarationDir": "", // .d.ts 파일이 생성되는 디렉토리 설정

        "diagnostics": false, // @TODO 테스트 필요
        // Show diagnostic information.

        "disableSizeLimit": false, // @TODO 테스트 필요
        // Disable size limitation on JavaScript project.

        "downlevelIteration": false, // target이 ES3 및 ES5 일때도 for..of, spread, destructuring 문법 지원
        // TypeScript 2.3 이전에는 target이 ES6/ES2015 이후 버전일때만 지원함

        "emitBOM": false,// 출력 파일의 시작 부분에 UTF-8 바이트 순서표 (BOM) 추가여부
        // 윈도우 스토어 인증을 통과하기 위해 필요
        // https://stackoverflow.com/questions/33722915/typescript-generated-js-files-encoding

        "emitDecoratorMetadata": false, // @TODO 테스트 필요
        // Emit design-type metadata for decorated declarations in source. See issue #2577 for details.

        "experimentalDecorators": false, // ES Decorator에 대한 실험적 기능 사용 여부
        // vue에서는 vue와 Typescript를 같이 쓸때는 활성화를 권장하고 있다.

        "forceConsistentCasingInFileNames": false, // 파일명에 대소문자 구분하지 않아도 되는 기능 사용 여부
        // 직역: 파일 이름에 일관된 casing 강제 적용

        "importHelpers": false, // tslib에서 helpers (e.g. __extends, __rest, etc..)를 가져온다.
        // 중복코드를 없애기 위한 최적화용 옵션
        // https://github.com/Microsoft/tslib

        "inlineSourceMap": false, // 소스맵을 결과코드에 추가
        // @TODO 테스트 필요

        "inlineSources": false, // 변환전 파일 .ts 코드를 결과코드에 추가
        // @TODO 테스트 필요

        "isolatedModules": false, // @TODO 뭘까...
        // https://github.com/Microsoft/TypeScript/issues/2499

        "jsx": false, // jsx 지원

        "jsxFactory": "React.createElement", // jsx 팩토리 함수 설정,

        "lib": [], // 컴파일에 포함될 라이브러리 파일 목록
        // target 옵션 값에 따라 기본으로 포함되는 라이브러리가 있다.
        // lib 옵션 설정시 그 라이브러리 파일만 포함된다.
        // target ES5 -> DOM,ES5,ScriptHost
        // target ES6 -> DOM,ES6,DOM.Iterable,ScriptHost
        /*
        ES5
        ES6
        ES2015
        ES7
        ES2016
        ES2017
        ESNext
        DOM
        DOM.Iterable
        WebWorker
        ScriptHost
        ES2015.Core
        ES2015.Collection
        ES2015.Generator
        ES2015.Iterable
        ES2015.Promise
        ES2015.Proxy
        ES2015.Reflect
        ES2015.Symbol
        ES2015.Symbol.WellKnown
        ES2016.Array.Include
        ES2017.object
        ES2017.SharedMemory
        ES2017.TypedArrays
        esnext.asynciterable
        */

        "listEmittedFiles": false, // 컴파일된 결과 파일들 이름을 터미널에 출력

        "listFiles": false, // 컴파일된 파일들 이름을 터미널에 출력

        "locale": "ko", // 에러메세지 출력 언어 설정

        "mapRoot": "", // "source map 파일을 저장할 root 디렉토리 지정
        // 지정하지 않으면 변환된 파일과 동일한 디렉토리에 저장된다.

        "maxNodeModuleJsDepth": 0, // js 모듈을 검색할 최대 깊이
        // allowJs 옵션이 활성화 되있을때만 적용
        // https://github.com/Microsoft/TypeScript/tree/master/tests/cases/projects/NodeModulesSearch/maxDepthIncreased

        "module": "es3", // 모듈 설정
        // "AMD", "System" 사용시 outFile 옵션을 설정하면 여러개의 모듈이 포함된 단일파일로 출력
        // "ES6", "ES2015"는 target값이 "ES5" 이하일때 사용 가능

        "moduleResolution": "node", // 모듈 (검색)해석 방식 설정

        "newLine": "lf", // end of line sequence 설정
        // 기본적으로 플랫폼에 따라 "crlf" (windows) or "lf" (unix) 가 설정됨

        "noEmit": false, // 결과파일을 저장하지 않음
        // @TODO 테스트 필요

        "noEmitHelpers": false, // helpers (e.g. __extends, __rest, etc..)를 결과파일에 포함시키지 않음
        // https://github.com/ngParty/ts-helpers
        // 이 옵션 대신 importHelpers 옵션을 사용시 더 깔끔하게 최적화 가능

        "noEmitOnError": false, // 에러 발생시 결과파일을 저장하지 않음

        "noFallthroughCasesInSwitch": false, // 잘못 적혔다고 판단되는 switch문에 대한 에러 발생
        // 예를 들어 case문에 break가 없으면 오류 발생

        "noImplicitAny": false, // any타입 금지

        "noImplicitReturns": false, // 함수의 모든 경로가 값을 반환하지 않으면 에러 발생

        "noImplicitThis": false, // this 타입을 명시적으로 지정하지 않으면 에러 발생

        "noImplicitUseStrict": false, // @TODO 테스트 필요

        "noLib": false, // 기본 라이브러리(lib.d.ts)를 가져오지 않는다.
        // @TODO 옵션 사용처

        "noResolve": false, // @TODO 테스트 필요

        "noStrictGenericChecks": false, // 함수에서 generic의 엄격한 검사 해제 여부
        /*
        type A = <T, U>(x: T, y: U) => [T, U];
        type B = <S>(x: S, y: S) => [S, S];

        function f(a: A, b: B) {
            a = b;  // 엄격한 검사시 Error
            b = a;  // Ok
        }
        */

        "noUnusedLocals": false, // 사용안된 지역변수에 대한 오류 보고 여부

        "noUnusedParameters": false,  // 사용안된 파라미터에 대한 오류 보고 여부

        "outDir": "", // 출력할 디덱토리
        // @TODO 테스트 필요

        "outFile": "", // 단일파일로 출력시 파일명
        // @TODO 테스트 필요

        "paths": { }, // baseUrl 옵션을 기준디렉토리로 불러올 모듈의 위치 설정이 가능
        // https://www.typescriptlang.org/docs/handbook/module-resolution.html#path-mapping

        "plugins": [ ], // 편집환경을 더 좋게 변경하기 위한 플러그인 기능
        // 새로운 구문이나 다른 형식 검사 동작등 새로운 언어 기능을 추가할수는 없음
        // https://github.com/Microsoft/TypeScript/wiki/Writing-a-Language-Service-Plugin

        "preserveConstEnums": false, // const enum형 선언을 지우지 않을건지 여부
        // 본래 컴파일 하는동안 완전히 제거되어 성능과 메모리상 이점을 얻기위해
        // const enum형 선언은 지우고 코드상에 직접 맵핑되는데 이 옵션을 활성화시
        // const enum형 선언을 지우지 않는다
        /*
        // js파일
        const enum E {
            Value = 1, Value2 = Value
        }
        console.log(E.value)
        console.log(E.value2)

        // 비활성화시 결과파일
        console.log(1 /* Value * /);
        console.log(1 /* Value2 * /);


        // 활성화시 결과파일
        var E;
        (function (E) {
            E[E["Value"] = 1] = "Value";
            E[E["Value2"] = 1] = "Value2";
        })(E || (E = {}));

        console.log(E.value)
        console.log(E.value2)
        */

        "preserveSymlinks": false, // Symlink파일에서 다른 모듈을 import시 기준경로를 Symlink 경로로 설정
        // 기존에는 Symlink파일에서 다른 모듈을 import시
        // Symlink파일의 실제 경로에서 모듈을 가져왔다.
        // https://nodejs.org/api/cli.html#cli_preserve_symlinks

        "pretty": false, // 에러 메시지를 예쁘게 설정
        // @TODO 테스트 필요

        "reactNamespace": "", // React 네임스페이스 설정. 권장되지 않는 옵션.
        // jsxFactory 옵션을 사용하십시오

        "removeComments": false, // 주석 삭제
        // @TODO '/*!' 주석 테스트 필요

        "rootDir": "", // 입력파일의 rootDir 설정
        // outDir옵션을 사용할때만 사용

        "rootDirs": [ ], // 가상 디덱토리를 설정
        // https://www.typescriptlang.org/docs/handbook/module-resolution.html#virtual-directories-with-rootdirs

        "skipDefaultLibCheck": false, // 사용을 권장하지 않음 skipLibCheck 옵션을 사용

        "skipLibCheck": false, // 모든 선언파일(*.d.ts)의 유형검사를 건너뛸지 여부

        "sourceMap": false, // 소스맵(*.map) 파일 생성 여부

        "sourceRoot": "", // 디버거가 알아야될 .ts파일 root 위치. 소스맵(*.map)에 적용된다.
        // @TODO 테스트 필요

        "strict": false, // 모든 엄격한 타입 검사 옵션을 활성화
        // noImplicitAny, noImplicitThis, alwaysStrict, strictNullChecks, strictFunctionTypes

        "strictFunctionTypes": false, //@TODO 테스트 필요

        "strictNullChecks": false, // null과 undefined 타입 구분 여부
        // https://basarat.gitbooks.io/typescript/docs/options/strictNullChecks.html

        "stripInternal": false, // /** @ internal * /JSDoc annotation이 있는 코드에 대한 선언을 내 보내지 않을지 여부
        // @TODO 부가설명 필요

        "suppressExcessPropertyErrors": false, // 객체 리터럴에 대한 초과 속성 검사 억제 여부
        // @TODO 부가설명 필요

        "suppressImplicitAnyIndexErrors": false, // 인덱스 서명이없는 개체를 인덱싱하는 경우 --noImplicitAny 오류 억제여부
        // 자세한 내용은 문제 #1232를 참조
        // @TODO 부가설명 필요

        "target": "es3", // 코드에서 사용할 ECMAScript 버전 설정

        "traceResolution": false, // 모듈 검색에 대한 로그메세지 출력 여부

        "typeRoots": [ ], // 타입(*.d.ts)파일을 가져올 디렉토리 설정
        // 설정 안할시 기본적으로 ./node_modules/@types

        "types": [ ], // 타입을 가져올 패키지목록 (따른 패키지는 (*.d.ts)파일을 가져오지 않음)
        // ["node", "lodash", "express"] 설정시
        // ./node_modules/@types/node, ./node_modules/@types/lodash, ./node_modules/@types/express
        // 위 3개를 가져오고 node_modules/@types/* 의 다른 패키지는 가져오지 않음

        "watch": false // 파일 변경시 컴파일
    }
}