https://raspi.taneyats.com/entry/home-electronics-2


Raspberry Piで電子工作する (2 - DHT11で気温・湿度を取得する)


f:id:ibuquicallig:20190606141530p:plain

この記事では電子部品のDHT11を使用して、Raspberry Piでの気温と湿度の取得方法と例などについて解説しています。

この記事でできること

  • DHT11を使用して温度と湿度を数値型で取得できる
  • モジュールから値を取得することができる
  • ループ処理で複数回値処理を実行することができる

前の記事

前回はPythonでLEDをチカチカさせるスクリプトを作成しました。

必要なもの

基本セット

まだRaspberry Pi用の電子工作アイテムをそろえていない場合は、以下の記事を参考に買い揃える必要があります。

DHT11

今回使用する温度と湿度を計測するためのモジュールはDHT11というものを使用します。単品で購入するよりもいろんなものが入っているモジュールのセットをAmazonなどで購入するほうが格段に安くなります。

以下のリンク先のセットにDHT11が含まれています。

DHT11単品だと4つのピンが飛び出ていますが、リンク先のものだと3ピンしか出ていません。データシートを見てみると3番目のピンは使われていない(null)ようなので特に問題ありません。

かつ、うれしいことにDHT11の乗っかっている基板で既にVCCピンとDATAピンを抵抗でつないでくれています。これで何も考えずにRaspberry Piとつないでも大丈夫となっています!

手順

それではさっそく作っていきましょう!今回も既に作成されているライブラリを使用してサクッと作っていきます。

ライブラリを取得

まずはライブラリを取得します。以下のGithubのページから取得します。PCでダウンロードしてRaspberry Piに転送というのは二度手間なので、URLだけ取得します。

取得するURLはリンク先の緑のClone or downloadをクリックして、Download ZIPで取得できるURLです(以下)。

https://github.com/szazo/DHT11_Python/archive/master.zip

このアドレスをwgetでRaspberry Pi上で取得します。

$ wget https://github.com/szazo/DHT11_Python/archive/master.zip
$ unzip master.zip
$ ls 
DHT11_Python-master ...

取得できたmaster.zipというアーカイブをunzipコマンドで解凍するとDHT11_Python-masterというディレクトリとして解凍されます。今回作成するスクリプトはこのディレクトリの中に置きます。

ここまで進めたら一旦回路作成に移りましょう。

回路を作成

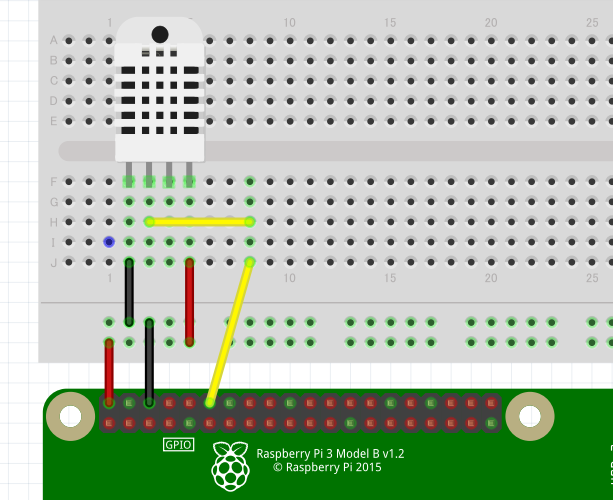
ブレッドボードで回路を作成していきます。前回作成したLEDの回路のようにRaspberry Piのピン > モジュール > Raspberry PiのGNDと電気が回るようにとりあえず作ります。

モジュールの基板にはGNDDATAVCCと書いてあると思います。Raspberry PiのGNDと基板のGND5VピンとVCCをつなぎます。そして、18番ピンをDATAとつないでデータを取得します。
f:id:ibuquicallig:20190606141600p:plain

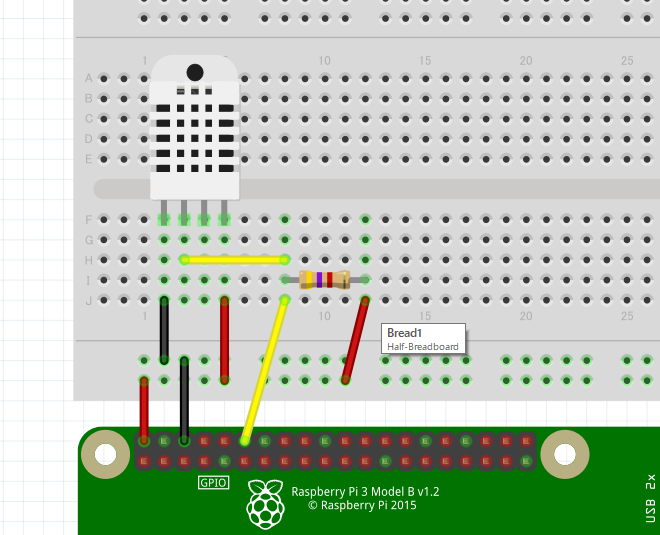
作成しているソフトの関係上、基板に乗っていないDHT11しか描画できません。。左から3番目のピンは無視してください。

もし基板に乗っていないモジュールを使用する場合には、DATAピンとVCCピンを5.1kΩの抵抗でつなぎます。
f:id:ibuquicallig:20190606141607p:plain

電源と繋いでいるので、回路が作成された段階でモジュールのLEDが光ります。光っていれば成功です。

プログラムを作成

データを受け取ってコンソールに表示するプログラムを作成します。先ほどのライブラリがPythonなのでPythonで作成していきます。

$ cd DHT11_Python-master
vim get_temp_and_humid.py

ファイル名はget_temp_and_humid.pyとしておきます。内容は以下のような感じです。とりあえず体裁は気にせずに表示だけしてみます。

#!/usr/bin/env python
#coding:utf-8

import RPi.GPIO as GPIO
import dht11
import time
from datetime import datetime

# initialize GPIO
GPIO.setwarnings(False)
GPIO.setmode(GPIO.BCM)
GPIO.cleanup()

module = dht11.DHT11(pin=18)

while True:
    result = module.read()
    if result.is_valid():
        print(datetime.now().strftime("%Y/%m/%d %H:%M:%S"))
        print("気温: " + str(result.temperature) + "℃")
        print("湿度: " + str(result.humidity) + "%")
        break
    time.sleep(1)

実行結果は以下のような感じになります。もしコードが間違っていたり、ピンが間違っていてループから抜けられなくなった場合にはCtrl + Cで処理を強制終了してください。

python get_temp_and_humid.pyを実行して表示される内容はこんな感じです。

$ python get_temp_and_humid.py
2019/06/06 21:34:19
気温: 25℃
湿度: 61%


少しコードを見ていきましょう。

#!/usr/bin/env python
#coding:utf-8

シバンと呼ばれるものとエンコードの指定です。エンコードを指定していないと日本語などの全角文字を表示できません。

import RPi.GPIO as GPIO
import dht11
import time
from datetime import datetime

必要なモジュールをインポート(読み込み)しています。import dht11で先ほどダウンロードしたライブラリを使えるようになります。

# initialize GPIO
GPIO.setwarnings(False)
GPIO.setmode(GPIO.BCM)
GPIO.cleanup()

GPIOの初期化を行います。この部分は前回のLチカでも同じようなことをしました!

module = dht11.DHT11(pin=18)

moduleという変数にインスタンスを代入します。引数で指定している値(pin=18)のピンでインスタンス化します。18ピンを指定します。

while True:
    result = module.read()
    if result.is_valid():
        print(datetime.now().strftime("%Y/%m/%d %H:%M:%S"))
        print("気温: " + str(result.temperature) + "℃")
        print("湿度: " + str(result.humidity) + "%")
        break
    time.sleep(1)

肝心の値を取得して表示する部分です。まずはwhile True:で無限ループします。一番最後にtime.sleep(1)を入れることによって1秒ごとにループを実行するようになります。

データの読み取りは、先ほどインスタンス化した変数のread()という関数を実行することで取得できます。 取得できた値にはtemperaturehumidityといった形で温度などの値が格納されています。

取得した値が正常なものかどうかをis_valid()という関数で判定できるので、それをIF文の条件に突っ込みます。正常な時(True)だけコンソールに表示して、そうでない場合は次のループへ進みます。

以上で値を取得して表示することができます!

試しにDHT11を指で温めたり、息を吹きかけてみて温度と湿度が変わることが確認出来たらOKです!

最終的なコード

#!/usr/bin/env python
#coding:utf-8

import RPi.GPIO as GPIO
import dht11
import time
from datetime import datetime

# initialize GPIO
GPIO.setwarnings(False)
GPIO.setmode(GPIO.BCM)
GPIO.cleanup()

module = dht11.DHT11(pin=18)

while True:
    result = module.read()
    if result.is_valid():
        print(datetime.now().strftime("%Y/%m/%d %H:%M:%S"))
        print("気温: " + str(result.temperature) + "℃")
        print("湿度: " + str(result.humidity) + "%")
        break
    time.sleep(1)

最後に

前回はLEDをチカチカさせるだけでしたが、今回はライブラリを使用しながらモジュールからデータを取得することができました。

アナログをデジタルの値に変えるモジュールのライブラリなどは、製品名で探せばいくらでも転がっているので同じように使い方を調べながら進めることができるでしょう。あとはそのライブラリの言語をどれぐらい知っているかと、面白いアイデアを思いつくかどうかです(笑)

今回はPythonを使用しましたが、個人的にはNode.js(JavaScript)で動かすほうが好きだったりします。

次の記事

Node.js(JavaScript)でLチカしてみる

[:embed]

参考

以下のサイトの情報を引用・参考にしました。

DHT11のデータシート


https://maker.pro/raspberry-pi/tutorial/how-to-connect-a-raspberry-pi-to-a-laptop-display


The below image shows entire structure we gonna do.


How Does It Work?

To connect a Raspberry Pi to a laptop display, you can simply use an ethernet cable. The Raspberry Pi’s desktop GUI (Graphical User Interface) can be viewed through the laptop display using a 100Mbps ethernet connection between the two. There are many software programs available that can establish a connection between a Raspberry Pi and your laptop. We used VNC server software to Connect the Pi to our laptop.

Installing the VNC server on your Pi allows you to see the Raspberry Pi’s desktop remotely, using the mouse and keyboard as if you were sitting right in front of your Pi. It also means that you can put your Pi anywhere else in your home and still control it. Also, the internet can be shared from your laptop’s WiFi over Ethernet. This also lets you access the internet on the Pi and connect it to your laptop display.


Sharing Internet Over Ethernet

This step explains how you can share your laptop internet with the Raspberry Pi via Ethernet cable.

In Windows: To share internet with multiple users over Ethernet, go to Network and Sharing Center. Then click on the WiFi network:


If you make a command, "ifconfig" on the command line you can see the ips you are connected.  the IP assigned to my laptop is 192.168.137.1. To check the IP assigned to the connected ethernet device, do the following. Considering that the IP assigned to your Laptop is 192.168.137.1 and subnet mask is 255.255.255.0: It means that the devices such as raspberry pi which connects to your ethernet gonna has IP address between 192.168.137.1 ~ 192.168.137.255 that assigned by your labtop.

  • Open command prompt
  • Ping the broadcast address of your IP. (Type) Eg: ping        192.168.137.255
  • Stop the ping after 5 seconds.
  • Check the reply from device: arp –a

Set up your raspberry pi 

This step explains how you can share your laptop internet with the Raspberry Pi via Ethernet cable.

First. go to terminal with below cmd

> sudo raspi-config

and go to Interfacting option. Next VNC enabled.


raspi-config main screen


Starting VNC Server on Pi:

To start VNC, enter the following command in the SSH terminal:

$ vncserver :1

You will be prompted to enter and confirm a password. This will be asked only once, during first time setup. Enter an 8 digit password. Note that this is the password you will need to use to connect to your Raspberry Pi remotely. You will also be asked if you want to create a separate “read-only” password – say no (n).

Yippeee!….The VNC server is now running on your Pi and we can now attempt to connect to it. First, we must switch to the laptop, from which we want to control the Pi. Then set up a VNC client to connect to the Pi.

ALSO, you can kill the vncserver with below cmd

$ vncserver -kill :1


Setting Up the Client Side (Laptop)

Download VNC client and install it. When you first run VNC viewer, you will see following:


Enter the IP address of your Raspberry Pi given dynamically by your laptop (you got the address from the earlier step) and append with :1 (denoting port number) and press connect. You will get a warning message, press ‘Continue’:


This is how to check IP addresses connected with your labtop

https://alselectro.wordpress.com/2017/02/17/raspberry-pi-3-how-to-connect-with-your-laptop/

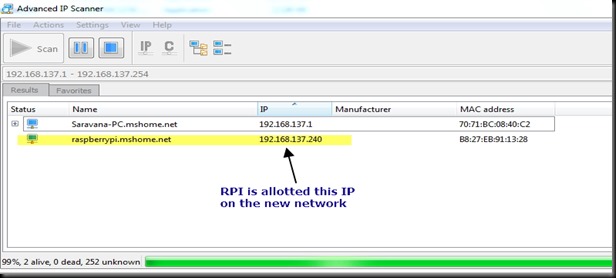
To know the IP of RPI we make use of ADVANCED IP SCANNER

Download from here & install the scanner

http://filehippo.com/download_advanced_ip_scanner/download/a518016bdff73f05b5f25826e519a493/

Open the IP Scanner program & type in the Range to scan as 192.168.137.1 to 192.168.137.254

Image 11

Click on the scan button.

The IP scanner will detect the Raspberry PI & displays its IP along with host name & MAC address.

The host name is

raspberrypi.mshome.net   & the IP is

192.168.137.240

Image 12


Enter the 8 digit password which was entered in the VNC server installation on your Raspberry Pi:


Finally, the Raspberry Pi desktop should appear as a VNC window. You will be able to access the GUI and do everything as if you were using the Pi’s keyboard, mouse, and monitor directly. As with SSH, since this is working over your network, your Pi can be situated anywhere as long as it is connected to your network.


wifi연결은 처음 인스톨할때 알아서 해줌

  • Connect to your WiFi network by selecting its name, entering the password, and clicking Next.

pi wizard wifi

Note: if your Raspberry Pi model doesn’t have wireless connectivity, you won’t see this screen.


noobs으로 인스톨한건 raspbian 리눅스여서 그에때른 리눅스 코맨드가 존재

apt-get : 외부 소프트웨어 다운 명령어


raspbian에서 한글어 설정

raspbian에서 한글어 설정 :http://www.rasplay.org/?p=3786


팬을 꼽을 수 있는 위치가 정해져있음

usb포트를 오른쪽에 둔 상태에서, 1행 2열에 빨간선, 1행 3열에 검정선을 꼽으니 팬이 작동함


sudo shutdown -h now

content


title

content


title

content


title

content


title

content


title

content


title

content


title

content


title

content


title

content


title

content


https://qiita.com/GuitarBuilderClass/items/d6d2798bebf7b916c5c6


Raspberry Pi に Python 3.7.0 をインストールする

思いつき

職場でCIツールのアラートやSlack、メールの未読に気づかない私です。
できないことがあるなら道具に頼ってしまいたいと考えて、遠く以前に購入してニキシー管チカ1をして遊んだきりの Raspberry Pi 2 Model B を使って LED の視覚的なアラートと音声ブザーを使いたいのです。

環境

  • Windows 10
    • micro SD カードが読み書きできれば、当然 Mac などでも構わないと思います。
  • Raspberry Pi 2 Model B
    • 主役

使用したもの


作業手順

  1. NOOBS を解凍して SD カードに入れる2
  2. Raspberry Pi にSD カードを挿入し、インストールする
    • 今回は Raspbian を選択
    • この際、元あった中身のファイルは消える
  3. apt-get 周辺のサーバがメンテされなくなったのか使えない
    そこで apt を利用することにする3
# 儀式
$ sudo apt update
$ sudo apt upgrade

# ARM 用の準備や SSL や Git や色々
$ sudo apt install -y libffi-dev libbz2-dev liblzma-dev libsqlite3-dev libncurses5-dev libgdbm-dev zlib1g-dev libreadline-dev libssl-dev tk-dev build-essential libncursesw5-dev libc6-dev openssl git


$ Python3 --version
Python 3.5.3

# Python が 3.5.3 だったので 3.7.0 をビルドする
$ wget https://www.python.org/ftp/python/3.7.0/Python-3.7.0.tar.xz
$ tar -xf Python-3.7.0.tar.xz 
$ cd Python-3.7.0

# ここで ./configure のあとにオプションを指定しているサイトがあるが
# https://bugs.pytho.org/issue29712 を見る限り不要っぽい?
$ ./configure
$ make
$ sudo make altinstall
$ pip3 install --upgrade pip

$ pip3 --version
pip3 10.0.1


'Server > Raspberry pi' 카테고리의 다른 글

DHT11으로 기온 습도 취득하기!  (0) 2019.09.30
Connects Raspberry pi with your laptop  (2) 2019.07.21
raspberry pi program diary  (0) 2019.07.20
Check ip of raspbian linux  (0) 2019.07.20
한글 키보드 및 언어설정 하기  (0) 2019.07.20

https://raspberrypi.stackexchange.com/questions/1409/easiest-way-to-show-my-ip-address


The if family of tools including ifconfig are being deprecated and replaced by the newer ip commands so you can use any one of the following from the command line to determine your IP address:

sudo ip addr show

or

sudo hostname --ip-address

or if you still want to use ifconfig, and it is not already installed

sudo apt-get install wireless-tools
sudo ifconfig -a


http://www.rasplay.org/?p=3786


안녕하세요 산딸기마을 이장 나무꾼 입니다.


오늘은 X-Windows 를 사용하시는 분들 중 한글 사용을 원하시는 분들이 계셔서 X-Windows 에 한글키보드 설치와 설정 법을 포스팅 해 보려 합니다.


1. Raspbian system keyboard 및 locale 설정하기.


X-Windows 에서 한글키보드를 설치하기 전에 현재 설정된 keyboard locale 설정을 수정 또는 확인 합니다.

Raspbian 환경설정 메뉴 진입을 위해 아래 명령어를 입력하자.

sudo raspi-config

key_1

그림 1)


1-1 locale 설정하기.


Raspbian 메뉴 중 가장 먼저 locale 을 설정 해 보자.

Change_locale 을 선택하면 그림 1-1)과 같이 사용되어질 언어 선택화면이 나타 날 것 이다.

메뉴 중 그림 1-2)와 같이 en_GB.UTF-8 UTF-8, en_US.UTF-8 UTF-8, ko_kr.UTF-8 UTF-8 세가지 언어를 체크선택(space bar) 합니다.

세 가지 메뉴를 모두 선택하는 이유는 Owncloud(참조: 클라우드 설치하기 ) 와 같은 프로그램 이용 시에나 터미널에서 한글을 사용하기 위함이다.


그럼 계속해서 아래 그림을 보면서 천천히 locale 설정을 진행 해 보자.


key_2

그림 1-1) Raspbian locale 설정 첫 화면


key_3

그림 1-2) en_GB.UTF-8 UTF-8, en_US.UTF-8 UTF-8, ko_kr.UTF-8 UTF-8 선택하기


터미널에서 한글을 보려면 ko_KR.UTF-8 을 저 처럼 별도의 한글 표기없이 영어를 사용하려면 en_GB 나 en_US 를 선택하기 바란다.

추가로 ko_KR… 을 선택 시에 일부 명령어들 실행 시에 관련 내용이 한글로 표현이 되니 참고하기 바란다.

key_4

그림 1-3)  en_GB.UTF-8 또는 en_US.UTF-8 을 선택 후, <OK> 를 누르자.


key_5

그림 1-4) system locale 환경저장 화면


1-2. Raspbian keyboard 설정하기


1-1. locale 설정이 완료되었으니, 키보드를 설정 해 보자


key_6

그림 1-5) Generic 105 key (Intl) PC 를 선택하자

* Tip : Slim 키보드 또는 파이 랩독 사용유저는 Generic 102 key (Intl) PC 를 선택하자.


key_7

그림 1-6) Other 를 선택하자


key_9

그림 1-7) Korean 을 선택하자


key_10

그림 1-9) Korean 아래 Korean – Korean (101/104 key compatibale)을 선택하자


key_11

그림 1-11) The default for the keyboard layout 을 선택하자


key_12

그림 1-12) No compose key 를 선택하자


key_13

그림 1-13) X-windows에서 단축키를 이용하여 terminal을 실행여부를 묻는 화면이다 저는  “no” 를 선택하자.


key_14

그림 1-14) keyboard 환경설정 저장화면
자 이제  기본적인 라즈비안 시스템에서 키보드 설정이 마무리 되었다.

그럼 다음은 X-Windows 상에서 한글폰트와 한글키보드를 사용 할 수있다록 해 보자.


2. X-Windows 에서 한글(두벌식) 입력기 사용하기 


1번 항목을 모두 완료 했다고 하여도 X-Windows 에서 한글을 볼 수는 있겠지만 한글을 입력 할 수는 없다.

X-Windows 상에서 한글을 입력하기 위해서 제공되는 “ibus” 를  설치해 보도록 하자


2.1  ibus 설치하기 


apt-get install 명령어를 이용하여 ibus 패키지를 설치하자

sudo apt-get install ibus ibus-hangul

key_15

그림 2) ibus 설치하기


  • Tip : 기본 debian의 경우, inavi 나 ibus를 설치 시에 위와 같이 ibus-hangul 이라는 추가 명령어를 입력하지 않아도 됩니다.

    하지만, 라즈비안(Raspbian)의 경우 입력기의 변경을 위해 hangul 이라는 추가 명령어를 삽입하시어 설정 시 혼선이 없도록 해 주시는 것이 좋습니다.


2-2. ibus 한글(두벌식) 입력기 설정하기 


터미널에서  X-Windows 를 실행 합니다.

startx

X_1

그림 2-1)


ibus 아이콘 에서 마우스 오른쪽을 클릭하여 설정메뉴로 진입을 합니다.

X_2

그림 2-2) 설정 메뉴 진입하기


X_3

그림 2-3) 한글 키보드 등록하기

Tip : 한글 영문 전환은 기본이 Atl + 왼쪽 Shift 키로 설정되어 있습니다.


X_4

그림 2-4) 한/영 전환키 변경하기


+ Recent posts