【初心者向け】SwaggerとAWS SAMを使ってWebAPIを簡単に作ってみた

AWS SAMとSwaggerを使って、WebAPIを簡単に作ってみました。初心者向けの内容です。 Swaggerを使うことで、ドキュメント内容とWebAPI仕様の一致が期待できます(齟齬がない)。


サーバーレス開発部の藤井元貴です。インフルエンザに怯えてます。(予防接種はしてる)

API Gatewayでは、WebAPIの作成にSwaggerを使用できます。 Swaggerを使うことで、ドキュメント内容とWebAPI仕様の一致が期待できます(齟齬がない)。

私にとってSwaggerは初めて使うため、ひとまず下記を試してみました。

  • Swaggerを使ってWebAPIを作る
  • AWS SAMを使う

まずはシンプルに試すため、最低限の内容です。 例えば、開発環境と本番環境(devとprod)のように分けていません。

おすすめ

  • SwaggerでAPI Gatewayを定義したい人
  • AWS SAMを使いたい人
  • サーバーレスなWebAPIに興味がある人

環境

項目バージョン
macOSHigh Sierra 10.13.6
AWS CLIaws-cli/1.16.89 Python/3.6.1 Darwin/17.7.0 botocore/1.12.79
AWS SAM0.10.0
Docker for Mac18.09.1
Python3.6

全体概要

WebAPIを作成します。裏側にはLambdaを配置するサーバーレスな構成です。

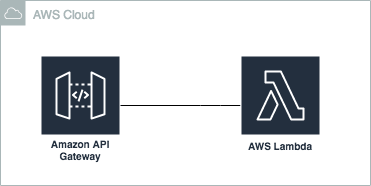
API Gatewayの定義にSwaggerを使用し、デプロイにAWS SAMを使用します。
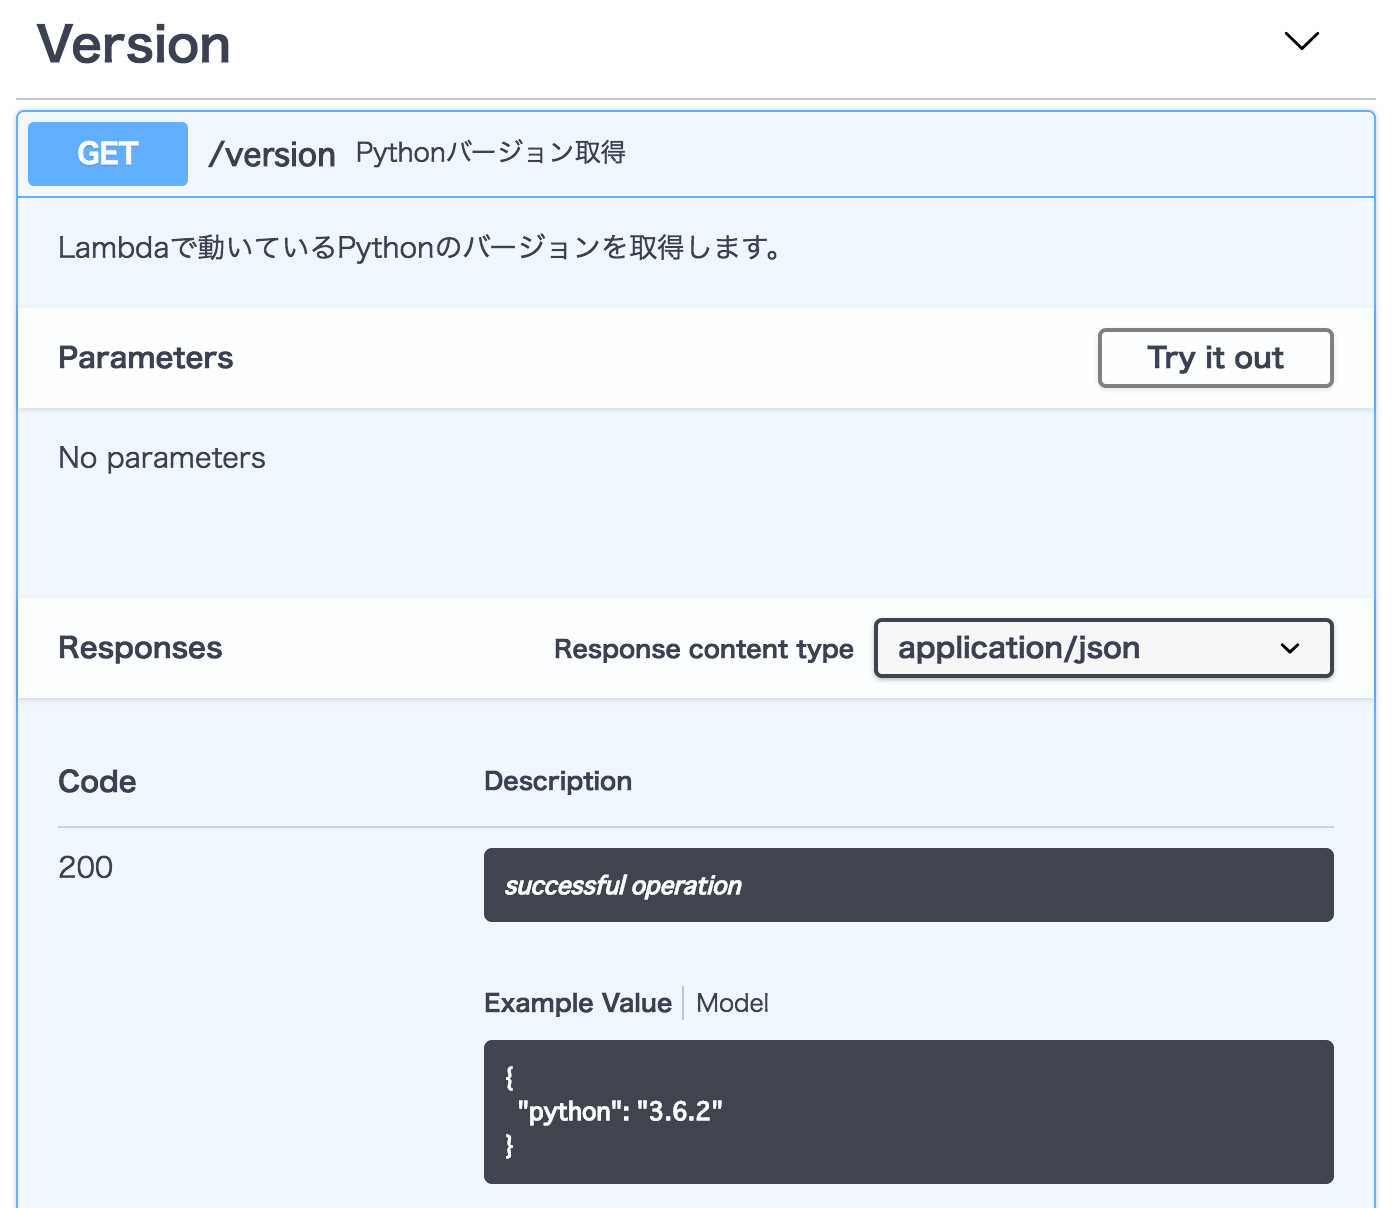
WebAPIの仕様

Swaggerを使う前に、まずはWebAPIの仕様を考えます。

PathMethod概要
/versionGETLambdaのPythonバージョンを取得する

応答パラメータの例は下記とします。

{
  "python": "3.6.2"
}

AWS SAMプロジェクトの準備

下記コマンドでプロジェクト一式を作成します。

sam init --runtime python3.6 --name SwaggerSample

Swagger Editor

導入

こちらを参考に導入します。Dockerは便利ですね。

API定義

Swagger Editorで下記を作成しました。この内容をswagger.yamlとして、AWS SAMプロジェクトフォルダに保存します。

swagger.yaml

swagger: "2.0"
info:
  description: "SwaggerとAPI Gatewayのサンプルです。"
  version: "1.0.0"
  title: "Swagger Sample"
basePath: "/Prod"
tags:
  - name: "Version"
schemes:
  - "https"
paths:
  /version:
    get:
      tags:
        - "Version"
      summary: "Pythonバージョン取得"
      description: "Lambdaで動いているPythonのバージョンを取得します。"
      consumes:
        - "application/json"
      produces:
        - "application/json"
      responses:
        200:
          description: "successful operation"
          schema:
            $ref: "#/definitions/Version"
      x-amazon-apigateway-integration:
        uri:
          Fn::Sub: arn:aws:apigateway:${AWS::Region}:lambda:path/2015-03-31/functions/${PythonVersionFunction.Arn}/invocations
        passthroughBehavior: when_no_templates
        httpMethod: POST
        type: aws_proxy
definitions:
  Version:
    type: "object"
    required:
      - "python"
    properties:
      python:
        type: "string"

API Gatewayで必要となるx-amazon-apigateway-integrationを記載しています。詳細はこちらへ。

なお、下記のようなドキュメントになります。参考まで。

AWS SAM

Lambda関数

Lambda関数のコードは下記です。Pythonバージョンの文字列を返却します。

app.py

import sys
import json


def lambda_handler(event, context):
    version = f'{sys.version_info.major}.{sys.version_info.minor}.{sys.version_info.micro}'

    return {
        "statusCode": 200,
        "body": json.dumps(
            {"python": version},
        ),
    }

templateファイル

AWS SAMのtemplate.yamlは下記です。

template.yaml

AWSTemplateFormatVersion: '2010-09-09'
Transform: AWS::Serverless-2016-10-31
Description: >
    SwaggerSample

    Sample SAM Template for SwaggerSample

Globals:
    Function:
        Timeout: 3

Resources:
    PythonVersionApi:
        Type: AWS::Serverless::Api
        Properties:
            StageName: Prod
            DefinitionBody:
                Fn::Transform:
                    Name: AWS::Include
                    Parameters:
                        Location: s3://cm-fujii.genki-sam-test-bucket/swagger.yaml

    PythonVersionFunction:
        Type: AWS::Serverless::Function
        Properties:
            CodeUri: hello_world/
            Handler: app.lambda_handler
            Runtime: python3.6
            Events:
                HelloWorld:
                    Type: Api
                    Properties:
                        Path: /version
                        Method: get
                        RestApiId: !Ref PythonVersionApi

Outputs:
  PythonVersionApiUrl:
      Description: "API Gateway endpoint URL for Prod stage for Python Version Function"
      Value: !Sub "https://${PythonVersionApi}.execute-api.${AWS::Region}.amazonaws.com/Prod/version"

Type: AWS::Serverless::ApiでAPIを明示的に定義し、S3に格納してあるyamlファイル(swagger.yaml)を指定します。

S3

コード等を格納するためのS3バケットを作成します。作成済みの場合は飛ばします。

aws s3 mb s3://cm-fujii.genki-sam-test-bucket

Swaggerファイルを格納

SwaggerファイルをS3バケットに格納します。

aws s3 cp swagger.yaml s3://cm-fujii.genki-sam-test-bucket/swagger.yaml

ビルド

下記コマンドでビルドします。

sam build

動作確認(ローカル)

まずはAPIを準備します。

sam local start-api

続いてcurlでAPIを叩きます。

$ curl http://localhost:3000/version
{"python": "3.6.1"}

OKですね!

package

続いてコード一式をS3バケットにアップロードします。

sam package \
    --output-template-file packaged.yaml \
    --s3-bucket cm-fujii.genki-sam-test-bucket

deploy

最後にデプロイします。

sam deploy \
    --template-file packaged.yaml \
    --stack-name SwaggerSample \
    --capabilities CAPABILITY_IAM

動作確認

作成したWebAPIのエンドポイントを確認します。

Web画面ポチポチでも良いですが、せっかくなのでコマンドを使います。

$ aws cloudformation describe-stacks --stack-name SwaggerSample --query 'Stacks[].Outputs'
[
    [
        {
            "OutputKey": "PythonVersionApiUrl",
            "OutputValue": "https://hogehoge.execute-api.ap-northeast-1.amazonaws.com/Prod/version",
            "Description": "API Gateway endpoint URL for Prod stage for Python Version Function"
        }
    ]
]

では、作成したWebAPIを叩いてみましょう!

$ curl https://hogehoge.execute-api.ap-northeast-1.amazonaws.com/Prod/version
{"python": "3.6.8"}

Python3系で最新の3.6.8が使用されていました。

ハマったこと

Swaggerの記載で下記にハマりました。

  • definitionsexampleを記載すると、sam deployが失敗する
  • WebAPIのMethodがGETでも、x-amazon-apigateway-integrationhttpMethodはPOSTを指定する

どちらもAWS(AWS SAM、API Gateway、Lambda)との連携部分です。辛かった……。

Swagger Editorですべて頑張らずに、AWSのWeb画面でAPI Gatewayをポチポチ作成したあと、Swagger形式でエクスポートするのも有効です。むしろこのほうが効率良さそう。

さいごに

SwaggerとAWSの組み合わせは、使い倒すほどハマる点が増えそうに感じましたが、Infrastructure as Codeは良いですね!! 楽しいです!


'DevOps > swagger' 카테고리의 다른 글

openapi의 yaml파일 작성법  (0) 2020.01.15

https://swagger.io/docs/specification/basic-structure/


Basic Structure

You can write OpenAPI definitions in YAML or JSON. In this guide, we use only YAML examples but JSON works equally well. A sample OpenAPI 3.0 definition written in YAML looks like:

  1. openapi: 3.0.0
  2. info:
  3. title: Sample API
  4. description: Optional multiline or single-line description in [CommonMark](http://commonmark.org/help/) or HTML.
  5. version: 0.1.9
  6. servers:
  7. - url: http://api.example.com/v1
  8. description: Optional server description, e.g. Main (production) server
  9. - url: http://staging-api.example.com
  10. description: Optional server description, e.g. Internal staging server for testing
  11. paths:
  12. /users:
  13. get:
  14. summary: Returns a list of users.
  15. description: Optional extended description in CommonMark or HTML.
  16. responses:
  17. '200': # status code
  18. description: A JSON array of user names
  19. content:
  20. application/json:
  21. schema:
  22. type: array
  23. items:
  24. type: string

All keyword names are case-sensitive.

Metadata

Every API definition must include the version of the OpenAPI Specification that this definition is based on:

  1. openapi: 3.0.0

The OpenAPI version defines the overall structure of an API definition – what you can document and how you document it. OpenAPI 3.0 uses semantic versioning with a three-part version number. The available versions are 3.0.03.0.1, and 3.0.2; they are functionally the same.

The info section contains API information: titledescription (optional), version:

  1. info:
  2. title: Sample API
  3. description: Optional multiline or single-line description in [CommonMark](http://commonmark.org/help/) or HTML.
  4. version: 0.1.9

title is your API name. description is extended information about your API. It can be multiline and supports the CommonMark dialect of Markdown for rich text representation. HTML is supported to the extent provided by CommonMark (see HTML Blocks in CommonMark 0.27 Specification). version is an arbitrary string that specifies the version of your API (do not confuse it with file revision or the openapi version). You can use semantic versioning like major.minor.patch, or an arbitrary string like 1.0-beta or 2017-07-25info also supports other keywords for contact information, license, terms of service, and other details.

Reference: Info Object.

Servers

The servers section specifies the API server and base URL. You can define one or several servers, such as production and sandbox.

  1. servers:
  2. - url: http://api.example.com/v1
  3. description: Optional server description, e.g. Main (production) server
  4. - url: http://staging-api.example.com
  5. description: Optional server description, e.g. Internal staging server for testing

All API paths are relative to the server URL. In the example above, /users means http://api.example.com/v1/users or http://staging-api.example.com/users, depending on the server used. For more information, see API Server and Base Path.

Paths

The paths section defines individual endpoints (paths) in your API, and the HTTP methods (operations) supported by these endpoints. For example, GET /users can be described as:

  1. paths:
  2. /users:
  3. get:
  4. summary: Returns a list of users.
  5. description: Optional extended description in CommonMark or HTML
  6. responses:
  7. '200':
  8. description: A JSON array of user names
  9. content:
  10. application/json:
  11. schema:
  12. type: array
  13. items:
  14. type: string

An operation definition includes parameters, request body (if any), possible response status codes (such as 200 OK or 404 Not Found) and response contents. For more information, see Paths and Operations.

Parameters

Operations can have parameters passed via URL path (/users/{userId}), query string (/users?role=admin), headers (X-CustomHeader: Value) or cookies (Cookie: debug=0). You can define the parameter data types, format, whether they are required or optional, and other details:

  1. paths:
  2. /user/{userId}:
  3. get:
  4. summary: Returns a user by ID.
  5. parameters:
  6. - name: userId
  7. in: path
  8. required: true
  9. description: Parameter description in CommonMark or HTML.
  10. schema:
  11. type : integer
  12. format: int64
  13. minimum: 1
  14. responses:
  15. '200':
  16. description: OK

For more information, see Describing Parameters.

Request Body

If an operation sends a request body, use the requestBody keyword to describe the body content and media type.

  1. paths:
  2. /users:
  3. post:
  4. summary: Creates a user.
  5. requestBody:
  6. required: true
  7. content:
  8. application/json:
  9. schema:
  10. type: object
  11. properties:
  12. username:
  13. type: string
  14. responses:
  15. '201':
  16. description: Created

For more information, see Describing Request Body.

Responses

For each operation, you can define possible status codes, such as 200 OK or 404 Not Found, and the response body schema. Schemas can be defined inline or referenced via $ref. You can also provide example responses for different content types:

  1. paths:
  2. /user/{userId}:
  3. get:
  4. summary: Returns a user by ID.
  5. parameters:
  6. - name: userId
  7. in: path
  8. required: true
  9. description: The ID of the user to return.
  10. schema:
  11. type: integer
  12. format: int64
  13. minimum: 1
  14. responses:
  15. '200':
  16. description: A user object.
  17. content:
  18. application/json:
  19. schema:
  20. type: object
  21. properties:
  22. id:
  23. type: integer
  24. format: int64
  25. example: 4
  26. name:
  27. type: string
  28. example: Jessica Smith
  29. '400':
  30. description: The specified user ID is invalid (not a number).
  31. '404':
  32. description: A user with the specified ID was not found.
  33. default:
  34. description: Unexpected error

Note that the response HTTP status codes must be enclosed in quotes: "200" (OpenAPI 2.0 did not require this). For more information, see Describing Responses.

Input and Output Models

The global components/schemas section lets you define common data structures used in your API. They can be referenced via $ref whenever a schema is required – in parameters, request bodies, and response bodies. For example, this JSON object:

  1. {
  2. "id": 4,
  3. "name": "Arthur Dent"
  4. }

can be represented as:

  1. components:
  2. schemas:
  3. User:
  4. properties:
  5. id:
  6. type: integer
  7. name:
  8. type: string
  9. # Both properties are required
  10. required:
  11. - id
  12. - name

and then referenced in the request body schema and response body schema as follows:

  1. paths:
  2. /users/{userId}:
  3. get:
  4. summary: Returns a user by ID.
  5. parameters:
  6. - in: path
  7. name: userId
  8. required: true
  9. type: integer
  10. responses:
  11. '200':
  12. description: OK
  13. content:
  14. application/json:
  15. schema:
  16. $ref: '#/components/schemas/User'
  17. /users:
  18. post:
  19. summary: Creates a new user.
  20. requestBody:
  21. required: true
  22. content:
  23. application/json:
  24. schema:
  25. $ref: '#/components/schemas/User'
  26. responses:
  27. '201':
  28. description: Created

Authentication

The securitySchemes and security keywords are used to describe the authentication methods used in your API.

  1. components:
  2. securitySchemes:
  3. BasicAuth:
  4. type: http
  5. scheme: basic
  6. security:
  7. - BasicAuth: []

Supported authentication methods are:

For more information, see Authentication.

Full Specification

The full OpenAPI 3.0 Specification is available on GitHub: https://github.com/OAI/OpenAPI-Specification/blob/master/versions/3.0.2.md

+ Recent posts