DECLARE CURSOR CUR_HOGE1 IS SELECT column01, column02 FROM tbl_hoge WHERE hoge_flg=1;-- カーソルの宣言 REC_HOGE1 CUR_HOGE1%ROWTYPE; BEGIN OPEN CUR_HOGE1;-- カーソルを開く
LOOP-- ぐ~る、ぐ~る FETCH CUR_HOGE1 INTO REC_HOGE1;-- フェッチする EXIT WHEN CUR_HOGE1%NOTFOUND;-- 終わりだったら、ぐるぐるを抜ける
In this lesson, you will learn how toimplement a MySQL connection poolin Python. Also, learn the benefits of using connection pooling.
This article provides information intended to help developers to implement database connection pooling for Python database-centric applications.
First, this article provides an overview of the MySQL Database connection pooling. Next, it gives examples of using themysql.connector.poolingclass to implements connection pooling in your Python applications.
Finally, we will see an example showing the performance benefits you can achieve by using MySQL connection pooling in Python.
Note: We are using theMySQL connector Pythonmodule to implement connection pooling.
Connection pooling means connections are reused rather than creating each time when requested.
Establishing MySQL connection through python is resource-expensive and time-consuming, primarily when the MySQL connector Python API is used in a middle-tier server environment. i.e., Middleware that maintains multiple connections to multiple MySQL servers and requires connections to be readily available.
For Example, Your application uses a database very frequently may be for data retrieving or data updations. To handle every new request application is creating a new MySQL database connection, and after completion of a request, the connection gets closed. Again for a new request, the application establishes a new connection, and this process repeats for every new request.
If you analyze this situation, you can easily find that the application spends most of the time creating and closing the database connection object. In this type of environment, we can improve application performance using connection pooling.
python database connection pooling working
A memory cache of database connections, called a connection pool, is maintained by a connection pooling module as a layer on top of any Database driver product to facilitate connection reuse. Connection pooling is performed in the background and does not affect how an application is coded.
Configuring the connection pool in Python with MySQL
To configure a connection pool, you need to consider the followingfactors: –
The maximum connections a Database module can support. For example, the MySQL Connector Python supports a maximum of 32.
The size and nature of your application also how database-intensive your application is.
The size of the connection pool is configurable. You need to provide a connection pool size at the time of its creation. You cannot change the size once created.
The number of connection objects depends on the above factors. For many cases, one connection per thread handling a single HTTP request is sufficient. Alternatively, you may need fewer if not every HTTP request needs to access the database. You can check the previous request history, analyze your application nature and then decide how to configure the connection pool.
How to use the connection pool in Python
Let’s see how to use a connection pool in Python in four simple steps: –
Create a Connection Pool.
Get Connection from a connection pool
Perform some database operations on it
Close the connection instance (return it to the connection pool)
Create a Connection pool in Python using MySQL Connector Python
Let see how to create a connection pool using the MySQL Connector Python module to handle the MySQL database from the Python application.
Use MySQL Connector Python’spooling.MySQLConnectionPoolandpooling.PooledMySQLConnectionclass to create and manage connection pools.
pooling.MySQLConnectionPool class constructor instantiates an object that manages a connection pool.
As you can see using a MySQLConnectionPool class, we can create a connection pool. mysql.connector.pooling.MySQLConnectionPool return a connection pool object.
This class constructor takes pool_name, pool_size, database, username,and passwordfor creating a connection pool.
So let see how to configure a connection pool using these arguments.
Arguments required to create a connection pool
pool_name: The pool name. As you can see, we have given a pynative_pool as a connection pool name. If this argument is not given, MySQL connector Python automatically sets the name using host, user, and database name. The application must create each pool with a different name.
pool_size: a pool size is a number of the connection objects that the pool can support. If this argument is not given, the default is 5. The pool size cannot be 0 or less than 0.
pool_reset_session: Reset session variables when the connection is returned to the pool.
Auser,password, anddatabaseare additional connection arguments to connect MySQL.
Adds a new or existing MySQL Connection to the pool
Now, Let’s see how to get a connection object from the connection pool and add new connection objects to the connection pool.
Using aMySQLConnectionPool.add_connection()method we can add a new or existing MySQL Connection to the pool. If the pool is full OR exceeding its limit, it raises a PoolError.
Example of adding the MySQL Connection object to the pool.
Theconnection_objis the MySQL Connection object we want to add to the pool. If this argument is missing and the pool is not full, the pool creates a new connection and adds it.
Get Connection object from a connection pool
To request a connection from the pool, use MySQLConnectionPool.get_connection() method. Using this method application can get the connection object from a connection pool.
Example to get get connection object from a connection pool.
This method returns a connection from the pool. If all connections are in use or pool is empty it raises aPoolError.
Get Connection pool name
Use MySQLConnectionPool.pool_name property to get the pool name. Example to get the connection pool name:
pool_name = connection_pool.pool_name
Change Configuration parameters for connections in the pool
Using MySQLConnectionPool.set_config()method we can set the configuration parameters for connections in the pool. i.e., we can reconfigure the connection object.
When this method is called pool configuration is overridden, any new connection requested from a connection pool starts using the new parameters mentioned in the MySQLConnectionPool.set_config() method.
Already running connections have no impact. Now, Let see how to use the pooled connection instance.
Manage pooled connection instance
Using the pooling.PooledMySQLConnection class, you can manage pooled connection instances. MySQLConnectionPool uses this class to return a pooled connection instance.
Get a pooled connection
Using the pooling.PooledMySQLConnection class constructor, we can get a pooled connection. This constructor takes connection pool and connection arguments and returns a pooled connection instance.
As you can see we have passed two arguments to get the pooled connection instance
connection_pool: A MySQL Connection Pool instance. here in our case connection pool name ispynative_pool
connection_object: A MySQL Connection instance.
Close the pooled MySQL connection instance
we can use a PooledMySQLConnection.close() method to close the pooled connection instance.
This method doesn’t close the connection but returns the connection to the connection pool to serve the next request. i.e., it returns a pooled connection to its connection pool.
Python Example to Create, manage and use a Connection pool with MySQL
Let see how to use all the methods that I mentioned in this article.
from mysql.connector import Error
from mysql.connector import pooling

try:
    connection_pool = pooling.MySQLConnectionPool(pool_name="pynative_pool",
                                                  pool_size=5,
                                                  pool_reset_session=True,
                                                  host='localhost',
                                                  database='python_db',
                                                  user='pynative',
                                                  password='pynative@#29')

    print("Printing connection pool properties ")
    print("Connection Pool Name - ", connection_pool.pool_name)
    print("Connection Pool Size - ", connection_pool.pool_size)

    # Get connection object from a pool
    connection_object = connection_pool.get_connection()

    if connection_object.is_connected():
        db_Info = connection_object.get_server_info()
        print("Connected to MySQL database using connection pool ... MySQL Server version on ", db_Info)

        cursor = connection_object.cursor()
        cursor.execute("select database();")
        record = cursor.fetchone()
        print("Your connected to - ", record)

except Error as e:
    print("Error while connecting to MySQL using Connection pool ", e)
finally:
    # closing database connection.
    if connection_object.is_connected():
        cursor.close()
        connection_object.close()
        print("MySQL connection is closed")
Output:
Printing connection pool properties
Connection Pool Name -  pynative_pool
Connection Pool Size -  5
Connected to MySQL database using connection pool ... MySQL Server version on  5.7.19
Your connected to -  ('python_db',)
MySQL connection is closed
Understand the connection pool example
As you can see in the first statement, we have imported two classes from MySQL Connector Python to create and manage the connection pool.
Error: This class helps us to debug any database exception that may occur during this process.
pooling: Using this class, we can create, manage and use the connection pool
Also we set connection pool name to “pynative_pool” andpool size=5,pool_reset_session=True. Next, we Printed connection pool properties.
After this, we got a connection object from a pool and executed a MySQL query to fetch the MySQL database name using a cursor object.
In the end, we closed the connection instance.
Next Steps:
To practice what you learned in this article, Please solve a Python Database Exercise project to Practice and master the Python Database operations.
테이블 만들기 글에서 TablePlus를 이용해서 users 테이블을 만들었던것을 기억하실겁니다. 이글에서 제가 나중에 설명한다고 했던 부분이 있습니다. 바로, 아래 그림처럼 TablePlus에서 테이블을 만들때 id라고 기본 설정되어있는 Primary 라는 필드입니다. 당시에는 설명을 쉽게하기 위해서 삭제하라고 말씀드렸지만, 이 부분은 데이터베이스를 이해하는데 있어서 매우 중요한 부분입니다. 오늘은 이 Priarmy 혹은 Primary Key라고 부르는 기본키에 대해서 이해해보도록 하겠습니다.
기본키 개념
DBMS는 데이터를 일관성있게 관리할 수 있도록 테이블에 다양한 제약 조건들을 설정할 수 있도록 합니다. 기억하시겠지만, 열에 데이터 타입을 설정해서 적절한 데이터 타입이 아닌 데이터가 추가되는 것을 막게하는 것도 일종의 제약 조건입니다. 테이블을 생성할때, 열에 is_nullable 을 설정을 통해 null 값을 허용할지 말지 결정했던 것도 하나의 제약 조건입니다.
기본키 역시 DBMS에서 테이블에 설정하는 하나의 제약 조건 중 하나입니다. 기본키 제약 조건은 테이블 내에서 유일하게 존재하는 값의 조합을 설정해서 중복된 데이터가 테이블에 삽입되는 것을 방지하는 제약 조건입니다. 예시를 통해 알아보도록 합시다.
우리가 만들었던 사용자 정보 테이블 users에서는 하나의 행이 한명의 사용자를 의미합니다. users 테이블에는 사용자가 새로 회원가입을 할때마다 한 행씩 추가될 것입니다. 사용자가 해당 서비스에 가입했던 것을 기억하면 좋겠지만, 잊어버리는 경우가 매우 많습니다. 이때, 중복 삽입을 막는 제약 조건을 설정하지 않았다면 어떤 일이 발생할까요? 동일한 사용자인데, 여러개의 행이 추가 될 수 있을 것입니다. 통계값을 구할때, 몇명의 사용자가 가입했는지 확인하는 과정에서, 이러한 중복 가입 때문에 실제보다 더 많은 사용자가 가입자가 있는 것으로 잘못된 통계값이 구해지게 될 것입니다. users 테이블에 주민등록번호 열을 추가하고 주민등록번호 열을 기본키로 설정해두면 이러한 문제를 방지 할 수 있습니다. 대한민국에 있는 모든 사람은 각자 하나의 주민등록번호를 가지고 있기 때문에, users 테이블에 동일한 주민등록번호가 있다면 이미 가입한 것으로 생각할 수 있기 때문입니다.
기본키는 여러개의 열의 조합으로 설정되기도 합니다. 예를 들어, 날짜별 영업 사원의 판매 실적을 저장하는 sales 테이블이 있다고 합시다. 테이블의 열은 날짜(date), 사원번호(sr), 판매처(customer), 제품명(sku), 수량(qty)로 구성되어있습니다. 6월 1일 날짜 데이터는 여러개 존재할 수 있기에 기본키가 아닙니다. 날짜와 사원번호를 조합 해보아도, 같은 날짜에 동일한 사원이 여러개의 판매처에 제품을 팔 수 있기 때문에 기본 키가 될 수 없습니다. 이 테이블에서 기본 키는 날짜, 사원번호, 판매처, 제품명 이렇게 4개의 조합입니다. 이 4개의 조합을 기본키 제약조건으로 만든다면, sales 테이블은 중복된 데이터가 생기는 것을 방지할 수 있게 되는 것입니다.
기본키 연습
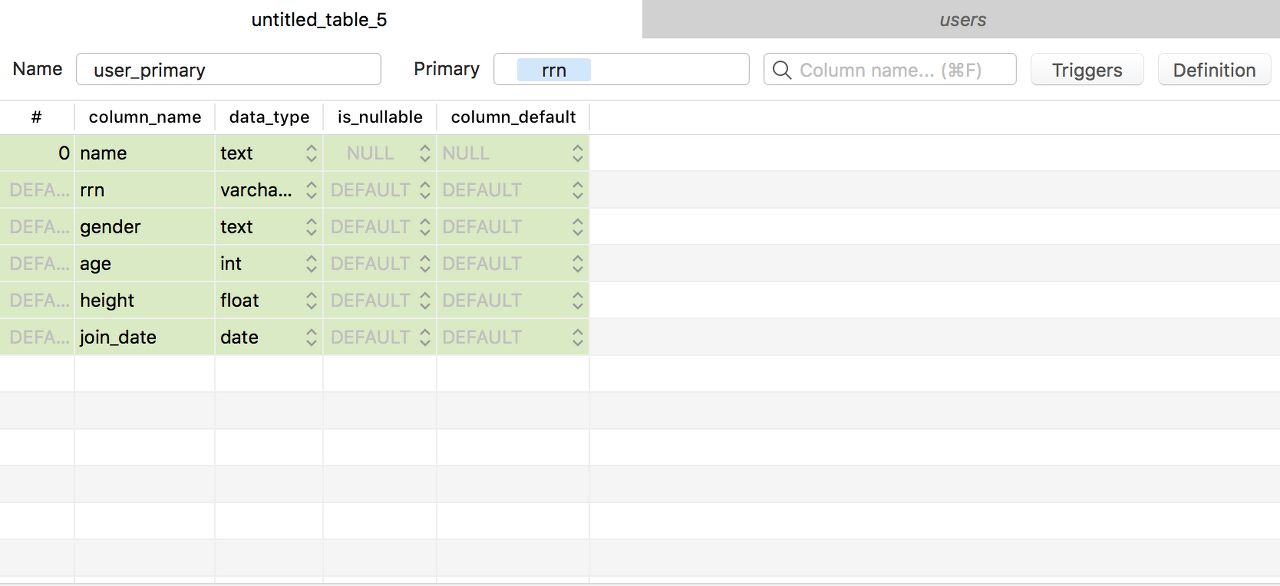
이제 우리가 전에 만들었던 users 테이블을 기본 키 제약조건을 추가해서 다시 만들어 보도록 합시다. 이 데이터 에서는 주민번호(rrn)이 기본 키기 때문에 아래와 같이 primary 입력창에 rrn 열을 입력해서 만드시면 됩니다. users 테이블은 이미 만들어져 있기 때문에, users_primary 라는 이름으로 만들도록 하겠습니다.
MySQL은 데이터 타입이 text 인 열은 기본키로 설정할 수 없습니다. text와 동일한 문자형 타입인 varchar(255)를 선택해서 만들어주세요.
기본키 유용성
TablePlus 에서 테이블을 만들때 기본으로 Primary 정보가 입력되어있는 이유는 그만큼 기본 키가 유용하기 때문입니다. 사실, DBMS 에서 테이블을 만들때 기본 키는 반드시 만드는 것을 추천합니다. 기본 키가 유용한 부분은 크게 2가지입니다.
먼저, 위에서 살펴본것처럼 데이터의 중복을 방지합니다. 데이터가 중복되어 들어가는 것은 일관성 측면에서 큰 문제를 야기합니다. 위 중복 예제에서 김사랑이라는 사람이 3월 1일에 가입했습니다. 5개월이 지나 가입한 사실을 잊어버리고 있다가 8월 2일에 다시 가입을 시도합니다. 그 사이 사랑이라는 이름이 마음에 들지 않아 개명을 했고 키도 조금 컸다고 가정합시다. 기본 키가 설정이 되어있지 않아 가입이 되었습니다. 이렇게 되면, 통계값을 뽑을때 한명의 사람인데 2명이 가입된걸로 잘 못 나올 뿐아니라, 둘중에 어떤게 제대로된 정보인지 판단하기 매우 어렵습니다.
다음으로는 데이터를 매우 빠르게 찾을 수 있게 도와줍니다. 기본 키를 설정하면 DBMS 는 인덱스를 만듭니다. 이 인덱스는 해당 데이터를 빨리 찾을 수 있는 일종의 목차입니다. 사용자 테이블에 10만명의 데이터가 저장된 것으로 가정하고 871203-2347333 주민번호를 가진 사람을 찾는다고 가정합시다. 기본 키가 설정되어있지 않으면, 10만명의 데이터를 모두 조회해야합니다. 왜냐하면, 1개를 찾아도 또 다른 데이터가 존재할 수 있기 때문에 모든 데이터를 살펴봐야합니다. 반면, 기본 키는 전체 데이터에서 유일하게 1개만 존재한다는 것을 의미하기 때문에, 1개만 찾으면 바로 해당 정보를 돌려줄 수 있는 것입니다.
마치며
오늘은 기본 키에 대해서 알아보았습니다. 기본 키는 테이블에서 하나의 데이터를 식별할 수 있는 열의 조합입니다. 모든 테이블을 만들때 기본 키를 설정하는 것을 추천하는데, 이는 데이터 중복을 방지해 일관성을 유지할 수 있을뿐 아니라 원하는 데이터를 보다 빠르게 찾을 수 있게 도와주기 때문입니다.
오늘 글 까지해서 데이터베이스에 대한 기본 이해는 끝이 났습니다. 다음 글 부터는 본격적으로 SQL 문법에 대해서 다루겠습니다.
지난 기본키 이해하기 글에서는 하나의 테이블에 중복된 데이터가 삽입되는 것을 방지하기 위한 기본키 제한조건에 대해서 배웠습니다. 기본키를 활용하면 하나의 테이블내에서 고유한 행을 선택할 수 있다는 것을 기억하실 겁니다. 예를 들어, '주민등록번호'는 사용자 한명에 하나의 고유한 값만 존재하기 때문에, 사용자 정보가 담겨있는 사용자 테이블의 기본키가 될 수 있습니다.
SQL 기반으로 데이터분석을 진행하는데 있어서 반드시 이해해야하는 2가지 '키 (Key)'가 존재합니다. 하나가 방금 전에 언급한 기본키 (Primary Key)이며, 또 다른 하나가 바로 오늘 글에서 배울 외래키 (Foriegn Key) 입니다. 외래키는 하나의 테이블을 이용해서 데이터를 분석하는 과정에서는 큰 의미가 없습니다. 하지만, 여러개의 테이블을 조합해서 데이터분석을 진행한다면 반드시 이해해야하는 개념입니다.
효율적인 테이블 구조
외래키를 활용하는 방법에 대해서 알아보기 전에, 왜 외래키가 필요한지에 대해서 알아보도록 합시다. 우리가 온라인 식료품 마트를 운영하고 있다고 가정해봅시다. 온라인 식료품 마트는 사용자로부터 주문을 받아서 배송해주는 시스템을 운영하고 있습니다. 우리는 데이터베이스를 다룰 줄 알기 때문에, 사용자의 주문 내역을 스프레드시트가 아닌 데이터베이스에 테이블을 만들어서 저장, 관리, 분석할 것 입니다.
먼저, 사용자에 대한 정보를 저장하기 위해 테이블에 기본적으로 아래와 같은 열이 필요할 것입니다.
아이디 (user_id), 비밀번호 (user_pwd), 이름 (name), 성별 (gender), 배송 주소 (address)
온라인 마켓이다보니 위의 정보만으로는 주문 정보를 저장할 수 없으므로, 아래와 같은 주문과 관련된 정보들이 추가로 필요합니다.
주문 일자 (order_date), 제품 ID (product_id), 제품명 (product_title), 수량 (qty)
위의 모든 열을 합쳐서 테이블을 만든다면 아래와 같은 테이블이 만들어 집니다. 2개의 예시 데이터를 넣어두었습니다. 예를 들어, marco117 아이디를 사용하는 사용자는 10월 1일 coke를 5개 주문했고, blondy121 아이디를 사용하는 사용자는 같은 날인 10월 1일에 sprite를 10개 주문했습니다.
위의 테이블 구조는 당장에는 큰 문제가 없어보입니다. 하지만, 사실 아주 큰 비효율을 발생시키는 테이블 구조입니다. 왜냐하면, 주문을 추가할때마다 데이터가 계속 중복해서 쌓이기 때문입니다. 예를 들어, Marco가 몇일 동안 여러개의 제품을 주문했다고 가정합시다. 주문 테이블은 아래와 같이 계속해서 빨간색으로 표시한 중복 데이터가 발생할 것입니다.
Marco는 이틀에 걸쳐 네번의 주문을 넣었습니다. 이 네번의 주문은 주문입장에서는 모두 달라져서 우측에 파란색으로 표시된 데이터는 새롭게 추가되는 것이 당연합니다. 하지만, 사용자 Marco 와 관련된 정보들 즉, 아이디, 비밀번호, 이름, 성별, 주소는 주문시 변경되는 데이터가 아닙니다. 이렇게 주문에 따라 매번 새롭게 발생하는 주문 정보와 주문을 해도 변경되지 않는 사용자 정보가 하나의 테이블에 들어있으면, 엄청난 양의 데이터 중복이 발생하는 문제가 생깁니다.
중복 데이터가 많다는 것은 하나의 데이터를 찾는데 더 많은 시간이 들며 데이터를 저장하기 위한 공간도 훨씬 많이 필요하다는 의미입니다. 어떻게 이 문제를 해결할 수 있을까요? 바로 아래와 같이 주문과 사용자 정보를 나누어서 다른 테이블로 관리하면 됩니다.
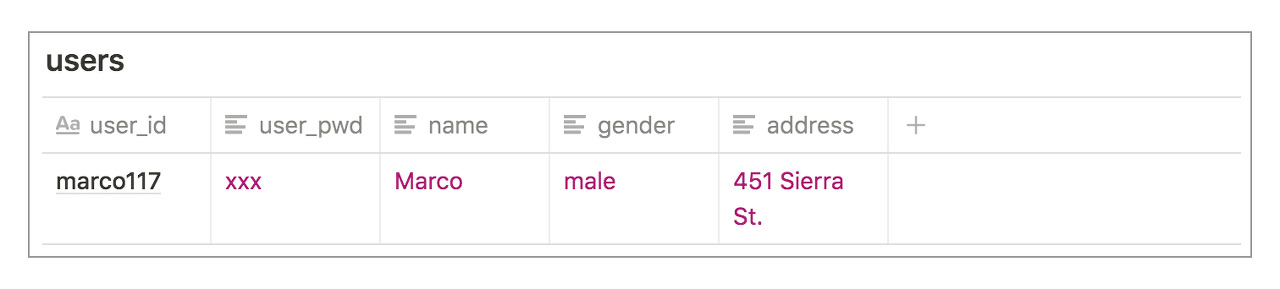
사용자 테이블
사용자 테이블은 사용자에 해당하는 정보만 가지고 있으면 됩니다. 위에서 4개의 행으로 존재했던 데이터들은 모두 중복되기 때문에 아래와 같이 하나의 행으로 데이터를 저장하면 됩니다.
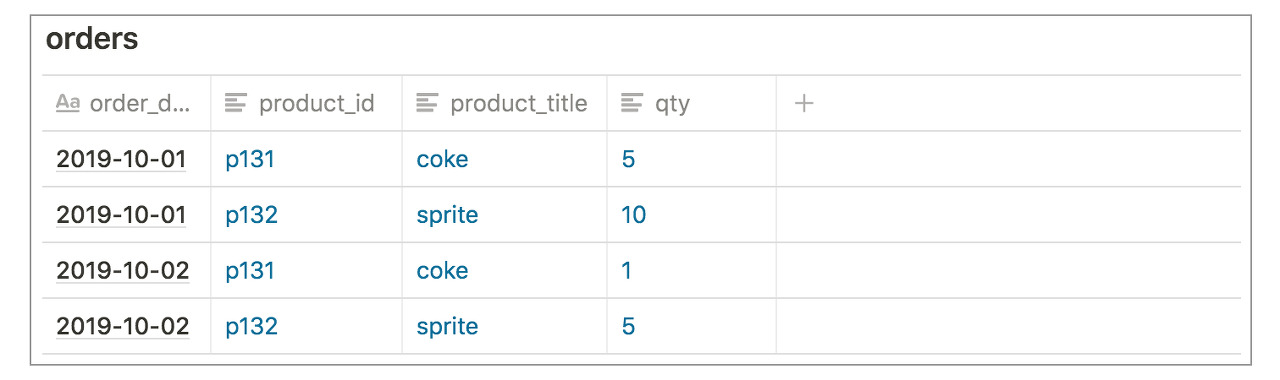
주문 테이블
주문 테이블은 주문을 관리하는 테이블로 주문과 관련된 정보만 가지고 있으면 됩니다. 위에서 파란색에 해당하는 정보들만 가지고 있으면 됩니다. 하지만, 이렇게만 테이블을 만들면 큰 문제가 발생합니다. 주문 정보는 추가되는데, 누가 주문을 했는지 알 수 있는 방법이 없다는 것입니다.
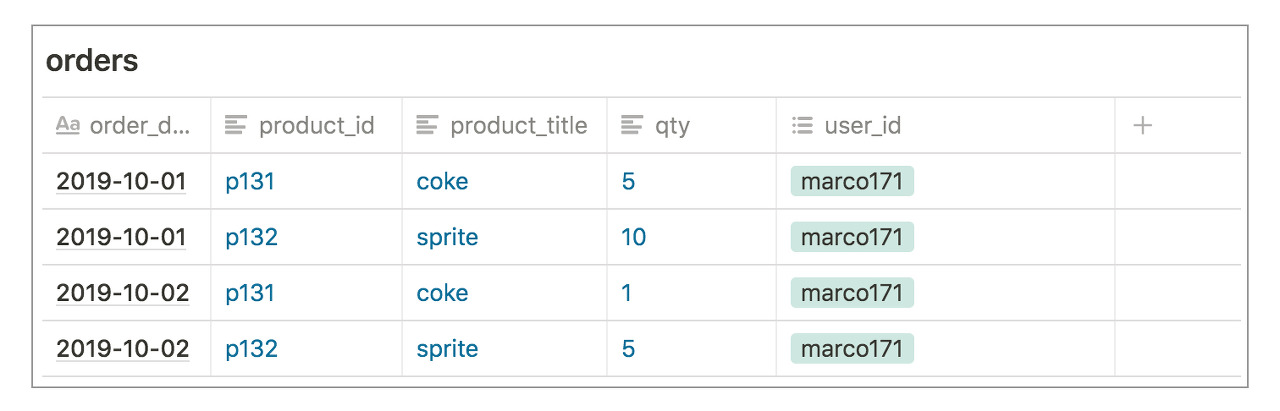
이 문제를 해결하기 위해서 orders 테이블에 주문한 사용자를 사용자 테이블에서 찾을 수 있는 정보를 추가하면 됩니다. 이때 사용하는 정보가 바로 사용자 테이블의 기본 키 (Primary Key) 입니다. 기본키는 해당 테이블에서 고유한 값을 가지는 열의 조합입니다. 다시 말해, 사용자 테이블의 기본키 정보만 주문 테이블이 가지고 있으면 사용자 테이블에서 한명의 사용자를 찾을 수 있다는 것 입니다. 위의 사용자 테이블은 사용자 아이디가 기본키 입니다. 그러므로, 아래와 같이 주문 테이블 마지막에 사용자 테이블의 기본키를 추가하면, 중복된 데이터가 없으면서도 문제 없이 데이터를 저장, 관리할 수 있게 됩니다.
주문 테이블에서 사용자 아이디 정보를 활용해 사용자 테이블의 정보를 찾을 수 있게 되었습니다. 바로, 주문 테이블에 존재하는 사용자 아이디 정보 (기본키) 를 우리는 외래키 (Foriegn Key)라고 부릅니다.
외래키 역할
앞서 살펴본바와 같이, 외래키는 두개의 테이블을 연결해주는 연결 다리 역할을 합니다. 기본키가 중복된 데이터가 하나의 테이블에 삽입되는 것을 방지하는 역할을 했던 것을 기억하실 것 입니다. 외래키 역시 비슷하게 문제를 방지하는 역할을 수행합니다. 외래키는 새롭게 추가되는 행에서 외래키에 해당하는 값이 외래키가 참조하는 테이블에 존재하는지를 체크합니다.
예를 들어, 위의 주문 테이블에 새로운 데이터를 넣고자 할때 외래키에 해당하는 사용자 아이디가 아직 가입하지 않은 사용자 아이디 정보면 DBMS 는 에러를 발생시켜서 해당 데이터 삽입을 막습니다. 이 기능은 테이블 내에 저장되어있는 데이터가 항상 참조하는 값이 있다는 것을 보장해주는 역할을 합니다.
마치며
오늘 글에서는 외래키의 개념에 대해서 이해하는 시간을 가졌습니다. 본문에서 설명했던 것처럼, 외래키는 두개의 테이블을 연결하는 연결다리 역할을 하며, 참조하는 테이블에 무결성을 높여주는 역할을 한다는 것을 기억하시기 바랍니다.
SQL은 테이블로 시작해서 테이블로 끝난다고 말씀드렸었습니다. 데이터 분석을 해나가는 과정에서 중간 중간 쿼리의 결과를 테이블 형태로 시각화해서 생각하는 것이 효율적이고 안정적인 SQL을 작성하는데 도움이 됩니다. 외래키의 경우 아래와 같이, 외래키가 다른 테이블의 기본키를 화살표로 가리키는 형태로 머릿속에 시각화해서 기억하시면 좋을 것 같습니다.
다음 글에서는 2개로 나누어진 테이블을 하나로 합치는 작업인 조인 (JOIN)에 대해서 배워보도록 하겠습니다.
원천 시스템의 데이터베이스 분석 미팅을 가지는데, 동료는 스키마라고 표현을 하다 보니 응? 이게 맞는 건가? 라는 생각이 들었습니다. 이전에도 다른 분들이 회의에서 스키마를 데이터베이스와 같은 의미로 언급을 하는 경우가 있었습니다.
하지만 그때는 대충 어떤 것을 말하는지 아니깐 넘어갔는데, 이번에는 이게 정확한건가 라는 의문이 계속 들더라고요.
가끔 그런날 있잖아요. 먼가에 확 꽂히는 날이... 그래서 이번에 스키마의 의미와 데이터베이스와의 차이를 아예 정리하자 라는 생각을 가지게 되었죠.
결론부터 말하면 DBMS마다 달랐습니다. 저는 이전에 오라클을 주로 다루고, 동료들은 mariaDB를 이전에 다루다 보니 정확한 의미에 차이가 있었습니다. 사전적인 의미는 마지막에 작성하기로 하고, DBMS별 의미가 어떻게 되는지 확인해보겠습니다.
오라클
▶ 오라클에서 스키마는 사용자(USER)가 생성한 모든 오브젝트(테이블, 인덱스, 프로시저 등)를 의미합니다. 사용자와 스키마가 같다고 보는 사람도 있는데, 엄밀히 말해서 다르다고 봐야 되겠죠. 그래서 스키마에 각각의 사용자에게 선택적인 권한을 줍니다. 오라클에서 데이터베이스는 실제 물리적인 데이터베이스를 의미합니다.
Mysql/MariaDB
▶데이터베이스와 스키마가 같은 의미로 테이블 등의 오브젝트 집합입니다.
PostgreSQL
▶Mysql의 데이터베이스가 PostgreSQL의 스키마입니다. 데이터베이스는 스키마의 상위 개념입니다.
그래서 PostgreSQL는 Mysql과 다르게 데이터베이스가 다르면 완전히 물리적인 분리로 보게 됩니다. 그래서 dblink가 아닌 일반적으로는 다른 데이터베이스의 테이블을 조회 및 조인 등을 할 수 없습니다. 다른 스키마끼리는 가능하고요.
MSSQL(SQL Server)
▶MSSQL도 스키마가 데이터베이스의 하위에 속합니다. PostgreSQL과 차이는 같은 서버의 데이터베이스를 완전히 분리하지 않는다. 그래서 다른 데이터베이스의 테이블을 조회 및 조인 가능하다.
데이터를 공부하거나 컴퓨터 자격증을 공부하면서 나오는 단어 중에 정형/비정형/반정형 데이터라는 것이 자주 등장하게 된다. 정형 데이터와 비정형 데이터의 차이점은 알겠지만 반정형이라는 말이 들어가면서 헷갈릴 수 있는데 반정형을 反으로 해석해버려서 반정형 = 비정형으로 인식하는 경우가 종종 있다.
정형 데이터(**Structured data)**
정형 데이터는 데이터베이스의 정해진 규칙(Rule)에 맞게 데이터를 들어간 데이터 중에 수치 만으로 의미 파악이 쉬운 데이터들을 보통 말한다.
예를 들어, Gender라는 컬럼이 있는데 여기서 male, female이라는 값이 들어간다면 누가 봐도 그 값은 남자, 여자라는 것을 쉽게 인식할 수 있고, Age에 25 혹은 40과 같은 숫자가 들어가도 사람들은 쉽게 그 값을 인식할 수 있다.
그래서 어떤 곳은 정형 데이터를 데이터베이스에 들어간 데이터라고 말하는 오류를 범하게 되는데 데이터베이스에는 모든 데이터가 들어갈 수 있는 것(음성이든, 비디오도 객체 방식으로 넣을 수 있다)이기에 이런 정의는 틀렸다고 볼 수 있다.
정형 데이터는 그 값이 의미를 파악하기 쉽고, 규칙적인 값으로 데이터가 들어갈 경우 정형 데이터라고 인식하면 될 것이다.
비정형 데이터(**Unstructured data)**
비정형 데이터는 정형 데이터와 반대되는 단어이다. 즉, 정해진 규칙이 없어서 값의 의미를 쉽게 파악하기 힘든 경우이다. 흔히, 텍스트, 음성, 영상과 같은 데이터가 비정형 데이터 범위에 속해있다. 그래서 빅데이터의 탄생에 비정형 데이터의 역할이 크게 한몫한 이유가, 그동안 의미를 분석하기 힘들었던 대용량에 속한 비정형 데이터를 분석함으로써 새로운 인사이트를 얻게 되기 때문이었다.
그렇다고 빅데이터가 비정형 데이터만 분석한다는 것은 당연히 아니다. 3V에 Velocity(속도), Volume(양), Variety(다양)가 있는 것처럼 비정형 데이터는 Variety에 속하며 대용량의 정형 데이터도 얼마든지 많기 때문이다.
사실 정형 데이터와 비정형 데이터를 분류하는 것은 어렵지 않으니 이제 문제의 반정형으로 가면...
반정형 데이터(Semi-**structured data)**
반정형 데이터의 반은 Semi를 말한다. 즉 완전한 정형이 아니라 약한 정형 데이터라는 것이다. 대표적으로 HTML이나 XML과 같은 포맷을 반정형 데이터의 범위에 넣을 수 있을 것이다.
일반적인 데이터 베이스는 아니지만 스키마를 가지고 있는 형태이다. 그런데 사실 반정형이라는 말이 참 까다로운 것이 데이터베이스의 데이터를 Dump하여 JSON이나 XML형태의 포맷으로 변경하면 이 순간 반정형 데이터가 된다는 것인데 쉽게 납득이 되질 않게 된다.
그래서 한가지를 더 이해하면 되는데, 데이터베이스의 구조와 JSON이나 XML 데이터의 구조를 한번 이해해보는 것이다. 일반적으로 데이터베이스는 데이터를 저장하는 장소와 스키마가 분리되어 있어서 테이블을 생성하고, 데이터를 저장한다는 매커니즘으로 되어 있다.
그러나 반정형은 한 텍스트 파일에 Column과 Value를 모두 출력하게 된다.
IRIS 데이터의 JSON 구조
결론은 반정형 데이터는 정형 데이터와 비정형 데이터와 완벽히 MECE(완벽 분리)로 구분이 되지 않는 녀석이라는 것이다.
데이터베이스에 있는 데이터의 일부를 Dump로 내려서 JSON구조로 내리는 순간 반정형이 되어 버린다. 그리고 이 데이터 안에는 위 아이리스 데이터와 같이 분석하기 쉬운 정형 데이터가 있을 수 있고, 분석하기 힘든 비정형 데이터가 포함이 되어 있을 수 있다.
그렇기에 한번 사례로 데이터를 구분해 보도록 하자
JSON 형태로 되어 있는 글 내용 본문
이럴 경우, 반정형 데이터 + 비정형 데이터가 합쳐진 모습이다.
데이터베이스에 저장되어 있는 성별 값
고민할 것 없이 정형 데이터이다
데이터베이스에 저장된 글의 제목
비정형 데이터이다.
이 처럼 스키마를 미리 생성해서 만드는 가, 아니면 텍스트 안에 모두 다 포함이 되어 있는가를 통해 반정형 여부를 판단 한 후, 정형과 비정형을 가리면 되는 것이다.
In this new era of Age, we always want to expand our business to different parts of the world to bring more sales thus more profits. Expanding the business to different parts of the world is not easy if your application is not localized. This is because, Different parts of the world have different languages, different metric systems, different formats of representing the data, different currencies etc. In this article, I am going to present different database design patterns for content localization.
First, let me give you a brief introduction to Internationalization/Localization if you are not aware of them.
Internationalization(I18N) is the process of designing a software application so that it can potentially be adapted to various languages and regions without engineering changes
Localization(L10N) is the process of adapting internationalized software for a specific region or language by adding locale-specific components and translating the text.
Localization doesn't mean content translations essentially. But supporting local
date and time formats
number format
time zones
calendars
currency presentation
tax/VAT
temperature and other measures
postal codes, telephone numbers
address formatting
country/state/region/province codes
Now let's dig into the patterns.
Separate columns for each field:-
This is the easiest approach among all others. In this approach, we will add a new column to the table for every field which needs to support localization.
In all the patterns that I am going to show I will try to localize the products table.
If you observe there are columns following column_name_languageCode. Since products need to support the name, price, description for various languages, So it has a column of every type for every language.
Pros:-
easy to implement. No complex querying.
Cons:-
Not scalable.
The number of columns in the table grows rapidly based on the number of languages your application supports.
If you miss a single column for any language your application might throw errors.
Hard to manage data formats(time for various regions), metric systems etc.
2. Separate rows for each language:-
In this approach instead of making a new column for every language, We will manage data in the rows based on a column like language_code.
Supporting Internationalizationwith a column language_code.
Sample data looks like
Pros:-
simple and efficient.
Querying becomes simple based for a specific language_code. 😃
Cons:-
Not centralized. Various tables can support various languages. So You don't know how many languages your application supports clearly.
In your analytics system, calculation metrics for the same product becomes tough since we are managing multiple entries of the same one(But region based metrics become simpler 👌).
Note:- To centralize make a languages table and use the foreign key relationships by adding all languages etc. From now, all approaches I will follow it.
3. Separate translation table:-
Under this approach, we will maintain a single translation table for all the tables in the Database which requires Internationalization. Here I am showing an example of a product and product_type.
Separate translation table approach for Internationalization.
Pros:-
More centralized localization.
Now we can manage all properties such as date format(yyyy/mm/dd, dd/mm/yyyy etc.), currency(Dollar, INR, Euro etc.) etc based on the language we are supporting.
Cons:-
Requires joining the tables to get the translations.
All language related translations under the same table for all tables in the DB.
Needs proper indexing to get efficiency.
Note:-
You can choose the above approach with the combination of Separate columns for each field approach. Doing so all translation will be under a single row but as we support a new language, requires altering table for adding a new translation column.
4. Separate translation table approach:-
In this approach Instead of putting all translation under the same table, we will write a separate translation table for each table which requires localization.
separate language translation approach for Internationalization.
Pros:-
No need for joining table for non translated data.
Since separate tables are there for translations querying becomes easy.
No discrepancies in data.
Besides content translations, Effective localization is possible by storing other localization data under languages table.
These are some of the patterns I could think off. If you know any other approach please let me know in the comments section. Will be happy read them.