https://qiita.com/Tooooomin/items/c063cee80227a5f1d95b


Linuxにユーザーを追加する

この記事は最終更新日から5年以上が経過しています。

linuxにユーザーを追加

ユーザの定義は/etc/passwdに定義があるが、セキュリティ的に直接編集はしない!

コマンド
useradd追加
usermod変更
userdel削除
passwdログイン用パスワード
コマンドオプション
-cコメント(文字列) を変更します。
-gプライマリグループ名を変更します。グループ名は/etc/groupファイルで定義したグループ名です。
-Gセカンダリーグループを変更します。(複数選択可)
-d既存のユーザ名を変更します。
-uユーザID 番号を変更します。
[root@suzuki ~]# useradd owl
[root@suzuki ~]# ls /home
owl
[root@suzuki ~]# ls /home/owl/
 -> owlユーザーのhomeディレクトリ
[root@suzuki ~]# tail /etc/passwd
operator:x:11:0:operator:/root:/sbin/nologin
games:x:12:100:games:/usr/games:/sbin/nologin
gopher:x:13:30:gopher:/var/gopher:/sbin/nologin
ftp:x:14:50:FTP User:/var/ftp:/sbin/nologin
nobody:x:99:99:Nobody:/:/sbin/nologin
vcsa:x:69:69:virtual console memory owner:/dev:/sbin/nologin
saslauth:x:499:76:"Saslauthd user":/var/empty/saslauth:/sbin/nologin
postfix:x:89:89::/var/spool/postfix:/sbin/nologin
sshd:x:74:74:Privilege-separated SSH:/var/empty/sshd:/sbin/nologin
owl:x:500:500::/home/owl:/bin/bash

->500(ユーザーID):500(アカウントID):(コメント):homeディレクトリ:使用するshell

/etc/passwdの中にはユーザーのパスワードは格納されてなく、セキュリティ上、ハッシュ化した後、/etc/shadowに格納されている

ユーザーIDを指定してuseraddする

[root@suzuki ~]# useradd -g users -u 1001 penguin
-g グループを指定
-u ユーザーIDを指定(指定しない場合は自動振り分け)

[root@suzuki ~]# grep penguin /etc/passwd
penguin:x:1001:100::/home/penguin:/bin/bash

usermodでコメントを追加する

[root@suzuki ~]# usermod -c "Linux Professional Institute Certification" penguin
[root@suzuki ~]# grep penguin /etc/passwd
penguin:x:1001:100:Linux Professional Institute Certification:/home/penguin:/bin/bash

userdelでユーザーを削除する

-rオプションでhomeディレクトリごと削除
[root@suzuki ~]# userdel -r owl

パスワードの設定

[root@suzuki ~]# passwd penguin
ユーザー penguin のパスワードを変更。
新しいパスワード:
新しいパスワードを再入力してください:
passwd: 全ての認証トークンが正しく更新できました。

-> sshでpenguinユーザーのログインが可能になります

suコマンド

サブユーザーは使える部分が限られているので、yum install等ができないため、一時的にrootユーザーになることができる

結局rootのパスワードを入力しなくてはいけない・・

[penguin@suzuki ~]$ su -
パスワード:
[root@suzuki ~]#

sudoコマンド

あるコマンドをroot権限で動かすようにするコマンド(suよりよく使う!)

追加ユーザーがsudoを使えるようにする設定

ルートでwheelグループに追加する

[root@suzuki ~]# usermod -G wheel penguin
[root@suzuki ~]# grep wheel /etc/group
wheel:x:10:penguin

/etc/sudoersを編集(直接編集はよくないのでvisudoを使用)
105行目のコメントアウトを削除

104 ## Allows people in group wheel to run all commands
105 # %wheel        ALL=(ALL)       ALL

ペンギンユーザーでログインし、sudo時もペンギンユーザーのpassで実行できる

[penguin@suzuki ~]$ sudo tail -n 1 /etc/shadow
[sudo] password for penguin:
penguin:$6$hRMVvsj3$UG0D50o5Cl95oP68DiTd.FRX7xyv8zZfGLsWxFnAAIelAnekwNL5/
GkiSQ8wIsbokxgKDC6ZYZbYNtSTumY.D1:16231:0:99999:7:::

所有者の変更

[penguin@suzuki ~]$ touch user
[penguin@suzuki ~]$ ls -l user
-rw-r--r--. 1 penguin users 0  6月 10 16:38 2014 user
// 権限. 所有者 所有グループ
[penguin@suzuki ~]$ sudo chown nobody user // 所有者の変更
[sudo] password for penguin:
[penguin@suzuki ~]$ ls -la user
-rw-r--r--. 1 nobody users 0  6月 10 16:38 2014 user

-Rオプションをつけると、すべての所有者を変更

所有グループの変更

[penguin@suzuki ~]$ chgrp nobody groups
chgrp: changing group of `groups': 許可されていない操作です
[penguin@suzuki ~]$ sudo chgrp nobody groups
[penguin@suzuki ~]$ ls -l groups
-rw-r--r--. 1 penguin nobody 0  6月 10 16:43 2014 groups

所有者と所有グループの同時変更

[penguin@suzuki ~]$ touch both
[penguin@suzuki ~]$ ls -l both
-rw-r--r--. 1 penguin users 0  6月 10 16:47 2014 both
[penguin@suzuki ~]$ sudo chown nobody:nobody both
[penguin@suzuki ~]$ ls -l both
-rw-r--r--. 1 nobody nobody 0  6月 10 16:47 2014 both
[penguin@suzuki ~]$

ファイルとアクセス権

d rwx rwx rwx
ファイル種別, 所有ユーザー, 所有グループ, その他

項目内容
r読み込み
w書き込み
x実行またはディレクトリの移動

パーミッション

ユーザーグループその他
パーミッションr w xr w xr w x
8進数4 2 14 2 14 2 1
設定値合計値合計値合計値

chmodコマンド

現状の状態を変更したい場合はu+rw-xとか書いた方がいいが、元の状態に関わらず変更したいときは数字で指定する

[penguin@suzuki ~]$ touch chownfile
[penguin@suzuki ~]$ chmod u+rw-x,go+r-wx chownfile
[penguin@suzuki ~]$ ls -l chownfile
-rw-r--r--. 1 penguin users 0  6月 10 17:00 2014 chownfile
[penguin@suzuki ~]$ chmod 664 chownfile
[penguin@suzuki ~]$ ls -l chownfile
-rw-rw-r--. 1 penguin users 0  6月 10 17:00 2014 chownfile
[penguin@suzuki ~]$ chmod 266 chownfile
[penguin@suzuki ~]$ ls -l chownfile
--w-rw-rw-. 1 penguin users 0  6月 10 17:00 2014 chownfile


ps

The ps command lists running processes. Using ps without any options causes it to list the processes running in the current shell.
To see every process that is running, use the -e (every process) option:

ps -aux  # 현재 열려있는 작업과 PID를 볼 수 있다.
ps -ef | grep node  # 노드의 상태를 볼 수 있다.

kill

The kill command allows you to terminate a process from the command line. You do this by providing the process ID (PID) of the process to kill. Don’t kill processes willy-nilly. You need to have a good reason to do so. In this example, we’ll pretend the shutter program has locked up.

To find the PID of shutter we’ll use our ps and grep trick from the section about the alias command, above. We can search for the shutter process and obtain its PID as follows:

kill -9 [pid] : #pid값을 지닌 작업을 죽인다.

pkill

pkill [service_name ]  #service명을 지닌 작업을 죽인다.
pkill -f node #모든 노드를 죽인다.

netstat

netstat -tnlp #열려있는 모든 포트를 본다

lsof

lsof -i TCP:[포트번호]  # 특정 포트에서 사용한느 프로그램 확인
lsof -i -P -n | grep LISTEN  # listen 중인 모든 포트 나타냄

fuser

fuser -k -n tcp [포트번호]  # 특정 포트를 사용하는 프로그램 죽이기
fuser 8080/tcp # 포트가 쓰이는지 확인 
fuser -k 8080/tcp # 포트 사용하고 있는 태스크 중지

mkdir

mkdir [폴더명]  #폴더만들기

rm

rm [파일명]  #파일 삭제

rmdir

rmdir [디렉토리명]  #디렉토리삭제

find

Use the find command to track down files that you know exist if you can’t remember where you put them. You must tell find where to start searching from and what it is looking for. In this example, the . matches the current folder and the -name option tells find to look for files with a name that matches the search pattern.

You can use wildcards, where * represents any sequence of characters and ? represents any single character. We’re using ones to match any file name containing the sequence “ones.” This would match words like bones, stones, and lonesome.

find . -name *ones*

histroy

histroy | grep  [찾는 키워드] #내가 입력한 cmd 중 매치하는 것을 찾아줌

service

service --status-all | grep [키워드]  #실행중인 서비스를 보여준다

wget

wget [url] # url을 get으로 request 후 response 수신

ckconfig

ckconfig

which

which [소프트웨어명] # 소프트웨어의 디렉토리를 찾아줌

top

top # 현재 컴퓨터의 메모리 cpu등의 상태를 보여준다

ssh

Use the ssh command to make a connection to a remote Linux computer and log into your account. To make a connection, you must provide your user name and the IP address or domain name of the remote computer. In this example, the user mary is logging into the computer at 192.168.4.23. Once the connection is established, she is asked for her password.

ssh –i CRT11-KeyPair ec2-user@10.11.12.132  # 리눅스에서 리눅스로 ssh가능

alternatives

alternatives --set python /usr/bin/python3.5 # 환경변수와 연결된 실행파일을 변경함

cp [옵션] [원본] [사본]

원본의 위치를 사본으로 복사해준다.

a: 원본 파일의 속성, 링크 정보들을 그대로 유지하면서 복사한다.
b: 복사할 대상이 이미 있을 경우 기존 파일을 백업하고 복사한다.
d: 만약 복사할 원본이 심볼릭 링크일 때 심볼릭 자체를 복사한다.
f: 만약 복사할 대상이 이미 있으면 강제로 지우고 복사한다.
i: 만약 복사할 대상이 이미 있으면 사용자에게 물어본다.
l: 하드링크 형식으로 복사한다.
P: 원본 파일 지정을 경로와 같이했을 경우 그 경로 그대로 복사된다.
p: 파일의 소유자, 그룹, 권한, 시간 정보들이 그대로 보존되어 복사된다.
r: 원본이 파일이면 그냥 복사되고 디렉터리라면 디렉터리 전체가 복사된다.
s: 파일을 심볼릭 링크 형식으로 복사한다. 원본 파일이름을 절대 경로로 지정해야 한다.
u: 복사할 대상이 있을 때 이 파일의 변경 날짜가 같거나 더 최근의 것이면 복사하지 않는다.
v: 복사 상태를 보여준다.
x: 원본과 대상 파일의 파일시스템이 다를 경우에는 복사하지 않는다.
R: 디렉터리를 복사할 경우 그 안에 포함된 모든 하위경로와 파일들을 모두 복사한다.

tail

파일의 마지막 부분을 출력한다.

tail -f # 파일의 마지막 10라인을 실시간으로 계속해서 출력
tail -F # 파일 변동 시 실시간으로 보여주되 로그파일처럼 특정 시간이 지난 후 파일이 변하게 되면 새로운 파일을 오픈하여 보여줌  (다시 명령을 실행할 필요가 없음)
tail -n # n 만큼의 라인을 출력

df

The df command shows the size, used space, and available space on the mounted filesystems of your computer.
 
Two of the most useful options are the -h (human readable) and -x (exclude) options. The human-readable option displays the sizes in Mb or Gb instead of in bytes. The exclude option allows you to tell df to discount filesystems you are not interested in. For example, the squashfs pseudo-filesystems that are created when you install an application with the snap command

df -h -x squashfs 

du

1k블록단위로 사용 용량. 그리고 하위 디렉토리를 볼 수 있다. 여담으로 디스크의 최소단위가 4k이기 때문에 디렉토리중 용량이 4k인것은 빈 디렉토리일 확율이 크다

du

tar

tar -cvf [파일명.tar] [폴더명] #  tar로 압축하기 
tar -xvf [파일명.tar] # tar 압축 풀기
tar -zcvf [파일명.tar.gz] [폴더명] #  tar.gz로 압축하기 
tar -zxvf [파일명.tar.gz] #  tar.gz 압축 풀기 

chmod

To set the permission to be read, write, and execute (7 from our list) for the owner; read and write (6 from our list) for the group; and read and execute (5 from our list) for the others we’d need to use the digits 765 with the chmod command:

chmod -R 765 example.txt # example.txt의 권한을 설정한다

chown

You can use chown to change the owner or group, or both of a file. You must provide the name of the owner and the group, separated by a : character. You will need to use sudo. To retain dave as the owner of the file but to set mary as the group owner, use this command:

sudo chown dave:mary example.txt

diff

The diff command compares two text files and shows the differences between them. There are many options to tailor the display to your requirements.
 
The -y (side by side) option shows the line differences side by side. The -w (width) option lets you specify the maximum line width to use to avoid wraparound lines. The two files are called alpha1.txt and alpha2.txt in this example. The --suppress-common-lines prevents diff from listing the matching lines, letting you focus on the lines which have differences.

diff -y -W 70 alpha1.txt alpha2.txt --suppress-common-lines

finger

The finger command gives you a short dump of information about a user, including the time of the user’s last login, the user’s home directory, and the user account’s full name.

finger

free

The free command gives you a summary of the memory usage with your computer. It does this for both the main Random Access Memory (RAM) and swap memory. The -h (human) option is used to provide human-friendly numbers and units. Without this option, the figures are presented in bytes.

free -h

grep

The grep utility searches for lines which contain a search pattern. When we looked at the alias command, we used grep to search through the output of another program, ps . The grep command can also search the contents of files. Here we’re searching for the word “train” in all text files in the current directory.

grep train *.txt

group

groups dave
groups django-user
groups ec2-user

history

The history command lists the commands you have previously issued on the command line. You can repeat any of the commands from your history by typing an exclamation point ! and the number of the command from the history list.

!188 # execute 188 command in bash history
!! # execute previous command

less

The less command allows you to view files without opening an editor. It’s faster to use, and there’s no chance of you inadvertently modifying the file. With less you can scroll forward and backward through the file using the Up and Down Arrow keys, the PgUp and PgDn keys and the Home and End keys. Press the Q key to quit from less.
 
To view a file provide its name to less as follows:

less views.py

man

The man command displays the “man pages” for a command in less . The man pages are the user manual for that command. Because man uses less to display the man pages, you can use the search capabilities of less.
 
For example, to see the man pages for chown, use the following command:

man chown
man less

passwd

The passwd command lets you change the password for a user. Just type passwd to change your own password.
 
You can also change the password of another user account, but you must use sudo. You will be asked to enter the new password twice.

sudo passwd mary

ping

The ping command lets you verify that you have network connectivity with another network device. It is commonly used to help troubleshoot networking issues. To use ping, provide the IP address or machine name of the other device.

ping 192.168.4.18

w

The w command lists the currently logged in users.

w

reference

https://qiita.com/magicant/items/d3bb7ea1192e63fba850


.bashrc と .bash_profile の使ひ分け

適当にググると「とにかく何でも .bash_profile に書いとけばおk」みたいな嘘を書いたブログ記事がわんさか出てくるのでここに正解を書いておきます。

.bash_profile

.bash_profile はログイン時にのみ実行されます。具体的な用途は:

  • 環境変数を設定する (export する変数)

環境変数はプロセス間で勝手に受け継がれるのでログイン時のみ設定すれば十分です。

.bashrc

.bashrc は対話モードの bash を起動する時に毎回実行されます。具体的な用途は:

  • 環境変数でない変数を設定する (export しない変数)
  • エイリアスを定義する
  • シェル関数を定義する
  • コマンドライン補完の設定をする

これらは bash を起動する度に毎回設定する必要があるものです。

その他

.bash_profile ? .bashrc ? いろいろあるけどこいつらなにもの? を参照。もっと突き詰めたい人は Linux: .bashrcと.bash_profileの違いを今度こそ理解する

Bash 以外のシェルを使用しない人は .bash_profile と .bashrc だけ知っておけば十分です。

.bashrc に書いた設定が反映されないけど .bash_profile に書くといける場合は、 .bash_profile から .bashrc を読み込む処理が抜けてます。


  • ps -aux : 현재 열려있는 작업과 PID를 볼 수 있다.
  • ps -ef | grep [app_name] : 실행되고 있는 앱의 상태를 볼 수 있다.
  • p kill -f node : 모든 노드를 죽인다.
  • kill -9 [pid] : pid값을 지닌 작업을 죽인다.
  • pkill [service_name ]: service명을 지닌 작업을 죽인다.
  • netstat -tnlp : 열려있는 모든 포트를 본다
  • lsof -i TCP:[포트번호] : 특정 포트에서 사용하는 프로그램 확인
  • fuser -k -n tcp [포트번호] : 특정 포트를 사용하는 프로그램 죽이기
  • mkdir [폴더명] : 폴더만들기
  • rm [파일명] : 파일 삭제
    • rm -Rf : 디렉토리 하에 있는 파일 디렉토리도 모두 삭제
  • rmdir [디렉토리명] : 디렉토리삭제
  • fuser -n tcp -k [포트번호]: 특정 포트의 프로세스 킬
  • find / -name [찾는 키워드]: 키워드에 매치하는 파일 디렉토리를 찾아줌
  • histroy | grep [찾는 키워드]: 내가 입력한 cmd 중 매치하는 것을 찾아줌
  • yum list installed | grep [소프트명] : yum으로 인스톨한 소프트를 찾아준다
  • service --status-all | grep [키워드] : 실행중인 서비스를 보여준다
  • wget
  • ckconfig
  • which
  • top : 현재 컴퓨터의 메모리 cpu등의 상태를 보여준다.
  • ssh –i CRT11-KeyPair ec2-user@10.11.12.132 : 리눅스에서 리눅스로 ssh가능
  • nslookup crt11.chmjmoqphaii.ap-northeast-1.rds.amazonaws.com : 이후에 적힌 엔드포인트의 프라이뱃 아이피 주소를 반환한다.
  • fuser 8080/tcp:포트가 쓰이는지 확인
  • fuser -k 8080/tcp : 포트 사용하고 있는 태스크 중지
  • sudo lsof -i -P -n | grep LISTEN : listen 중인 모든 포트 나타냄
  • alternatives --set python /usr/bin/python3.5 : 환경변수로 등록된 기존의 python2버전을 python3으로 바꿔줌(https://stackoverflow.com/questions/45220230/make-python3-5-as-default-in-aws)
  • ls -a : 숨겨진 . 파일까지 모두 보기 가능
  • sudo netstat -ltnp : 사용되는 모든 포트 보기
  • cp [옵션] [원본] [사본](sudo cp pki/ca.crt /etc/openvpn/) : 원본의 위치를 사본으로 복사해준다.
    • a: 원본 파일의 속성, 링크 정보들을 그대로 유지하면서 복사한다.
      • b: 복사할 대상이 이미 있을 경우 기존 파일을 백업하고 복사한다.
      • d: 만약 복사할 원본이 심볼릭 링크일 때 심볼릭 자체를 복사한다.
      • f: 만약 복사할 대상이 이미 있으면 강제로 지우고 복사한다.
      • i: 만약 복사할 대상이 이미 있으면 사용자에게 물어본다.
      • l: 하드링크 형식으로 복사한다.
      • P: 원본 파일 지정을 경로와 같이했을 경우 그 경로 그대로 복사된다.
      • p: 파일의 소유자, 그룹, 권한, 시간 정보들이 그대로 보존되어 복사된다.
      • r: 원본이 파일이면 그냥 복사되고 디렉터리라면 디렉터리 전체가 복사된다.
      • s: 파일을 심볼릭 링크 형식으로 복사한다. 원본 파일이름을 절대 경로로 지정해야 한다.
      • u: 복사할 대상이 있을 때 이 파일의 변경 날짜가 같거나 더 최근의 것이면 복사하지 않는다.
      • v: 복사 상태를 보여준다.
      • x: 원본과 대상 파일의 파일시스템이 다를 경우에는 복사하지 않는다.
      • R: 디렉터리를 복사할 경우 그 안에 포함된 모든 하위경로와 파일들을 모두 복사한다.
  • vi

    • vi command

      • vi file : file을 연다
      • vi file1 file2 : file1 과 file2 를 차례로 연다
      • view file : file을 읽기 모드로 연다
      • vi -R file : file을 읽기 모드로 연다
      • vi + file : file을 열때 커서가 file 본문의 마지막 행에 위치한다.
      • vi +n file : file을 열어 n행에 위치한다.
      • vi -r file : 손상된파일 회복
    • 입력모드 전환 명령어

      • i : 커서 있는데서 입력모드 전환
      • l : 커서 왼쪽, 행의 처음에 몬자 삽입
      • a : 커서 있는 줄 끝에서 입력모드 전환
      • A : 커서 오른쪽, 행의 끝에 문자 삽입
      • o : 커서 있는 줄 아래에 빈 줄 삽입
      • O : 커서 있는 줄 위에 빈 줄을 삽입
      • R :덮어쓰기 모드로 전환
    • 커서이동

      • ^, 0 ​:줄의 처음으로 이동
        • $ : 줄의 끝으로 이동
        • H : 화면 맨 위로 이동
        • M : 화면의 중간으로 이동
        • L : 화면 맨 아래로 이동
        • w : 다음 단어 끝으로 커서 이동
        • e : 다음 단어 앞으로 커서 이동
        • b : 이전 단어로 이동
        • shift + ↑: 한 페이지 앞으로 이동
        • shift + ↓:한 페이지 뒤로 이동
        • 3l , 3G : 현재 커서 위치한 행에서 3번째 행으로 이동
        • Ctrl + i : 한 화면 위로 이동
        • Ctrl + b : 한 화면 아래로 이동
        • Ctrl + d : 반 화면 위로 이동
        • Ctrl + u : 반 화면 아래로 이동
        • Ctrl + e : 한 줄씩 위로 이동
        • Ctrl + y : 한 줄씩 아래로 이동
    • 삭제

      • x 한 문자 삭제
      • 5x 커서가 있는 위치부터 5개의 문자를 삭제
      • d + ↑ 커서있는 줄, 윗줄 2줄 삭제
      • d + ↓ 커서잇는 줄, 아래줄 2줄 삭제
      • dw 한 단어 삭제
      • dd 한 줄 삭제
      • 5dd 커서가 있는 라인부터 5개의 라인 삭제
      • db 커서의 위치에서 거꾸로 한 단어 삭제
      • D 한줄 내에서 커서있는 뒤 모두 삭제
      • u 바로 전에 수행한 명령을 취소
      • :5,10d 5~10번째 행 삭제
    • 복사와 붙여넣기

      • yy 현재 줄을 버퍼로 복사
      • p 버퍼에 있는 내용을 커서 뒤에 삽입
      • P 버퍼에 있는 내용을 커서 앞에 삽입
      • 3y 현재 줄에서부터 아래로 3줄 복사
      • :5, 10y 5~10줄을 버퍼로 복사
      • :30pu 30행에 버퍼 내용을 삽입
      • d 현재 커서가 위치해 있는 단어 복사
      • 3yy 현재 행을 기준으로 3번째 행까지 n행 복사
    • 문자열찾기

      • /name name 문자열 찾기
      • n 다음 name으로 이동
      • N n과 같으며 역방향으로 이동
    • 문자열대체

      • :s/str/rep 현재 행의 str을 rep로 대체
      • :l,.s/str/rep/ 1부터 현재 행의 str을 rep로 대체
      • :%s/str/rep/g 파일 전체 str을 rep로 전부 대체
      • :.$/aaa/bbb 커서의 위치로부터 파일의 끝까지 있는 모든 aaa를 bbb로 대체
    • 파일저장 및 불러오기

      • :w 지정된 파일에 저장
      • :wq, :x, ZZ 지정된 파일에 저장하고 vi를 종료
      • :w php.ini php.ini 파일에 저장
      • :q 저장하지 않고 종료
      • :q! 저장하지 않고 강제 종료
      • :wq php.ini php.ini에 저장하고 vi를 종료
      • :r php.ini php.ini의 내용을 현재 커서가 있는데로 불러온다.
      • :e php.ini 현재의 화면을 지우고 새로운 파일 php.ini를 불러온다.
      • :5,10 w php.ini 5~10 줄까지의 내용을 php.ini에 저장
  • 기타
    • :set nu 행 번호 보여주기
    • :set nonu 행 번호 보여주기 취소
    • :. 바로 전에 실행한 명령어 재 실행
    • Ctrl + l 불필요한 화면 정리후 다시 표시

・tail명령어
1.TAIL 기능
파일의 마지막 부분을 출력한다.

  1. 문법
    tail [option] ... [file] ...
    기본 출력은 파일의 마지막 10줄을 보여준다.

  2. 옵션
    옵션

동작

tail -f

파일의 마지막 10라인을 실시간으로 계속해서 출력

tail -F

파일 변동 시 실시간으로 보여주되 로그파일처럼 특정 시간이 지난 후 파일이 변하게 되면 새로운 파일을 오픈하여 보여줌
(다시 명령을 실행할 필요가 없음)
tail -n

n 만큼의 라인을 출력

tail -n+n

불필요한 화면 정리후 다시 표시

・df명령어

옵션

동작

df -h

h 옵션으로 1k 블록단위에서 우리가 쉽게 볼 수 있도록 K, M, G, T 단위값으로 출력된다.

총 용량과 사용량등 쉽게 파악이 가능해 진다.

df -Th

각 파일 시스템의 유형을 파악가능하다(Type 탭). 단돈으론 잘 사용하지 않으며 h옵션과의

콜라보가 매우 뛰어나, 가장 많이 사용되는 옵션이다.

사이즈 사용된 메모리 등이 출력된다.

・du명령어

옵션

동작

du

1k블록단위로 사용 용량.

그리고 하위 디렉토리를 볼 수 있다.

여담으로 디스크의 최소단위가 4k이기 때문에 디렉토리중 용량이 4k인것은 빈 디렉토리일 확율이 크다.

df -h

k단위로 보기좋게 보여준다

・tar명령어

  1. tar로 압축하기 : tar -cvf [파일명.tar] [폴더명]

ex) abc라는 폴더를 aaa.tar로 압축하고자 한다면

 > tar -cvf aaa.tar abc
  1. tar 압축 풀기: tar -xvf [파일명.tar]

ex) aaa.tar라는 tar파일 압축을 풀고자 한다면

 > tar -xvf aaa.tar
  1. tar.gz로 압축하기 : tar -zcvf [파일명.tar.gz] [폴더명]

ex) abc라는 폴더를 aaa.tar.gz로 압축하고자 한다면

 > tar -zcvf aaa.tar.gz abc
  1. tar.gz 압축 풀기 : tar -zxvf [파일명.tar.gz]

ex) aaa.tar.gz라는 tar.gz파일 압축을 풀고자 한다면

 > tar -zxvf aaa.tar.gz

・ln명령어
ln은 Link 의 약어로서 리눅스 파일시스템에서 링크파일을 만드는 명령어이다. 리눅스에서는 심볼릭링크와 하드링크의 두가지 링크 파일이 존재한다.

심볼릭링크 (Symbolic Link)
단순히 원본파일을 가리키도록 링크만 시켜둔 것으로 MS의 윈도우시스템에서 흔히 사용하는 '바로가기' 같은 것이며, 원본파일을 가리키고만 있으므로 원본파일의 크기와는 무관한다. 그리고 심볼릭링크에서는 원본파일이 삭제되어 존재하지 않을 경우에 링크파일은 깜박거리면서 링크파일의 원본파일이 없다는 것을 알려준다.

하드링크 (Hard Link)
원본파일과 다른 이름으로 존재하는 동일한 파일이며 원본파일과 동일한 내용의 다른 파일이라고 할 수 있다. 그리고 하드링크에서는 원본파일과 링크파일 두개가 서로 다른 파일이기 때문에 둘 중 하나를 삭제하더라도 나머지 하나는 그대로 남아 있다. 또한 하드링크에서는 원본파일의 내용이 변경될 경우에는 링크파일의 내용 또한 자동으로 변경된다.

사용법 : ln [옵션] 원본파일 대상파일(대상디렉토리)

하드링크 파일 생성

BASH
ln hard_source hard_link
심볼릭 링크 디렉토리 생성

BASH
ln -s /tmp /var/tmp
[옵션]

--backup[=CONTROL] : 대상파일이 이미 존재할 경우에 백업파일을 만든 후에 링크파일 생성
-b : 링크파일 생성시에 대상파일이 이미 존재하면 백업파일을 만든 후에 링크파일을 생성
-d : 디렉토리에 대한 하드링크파일생성을 가능하게 함. 단 root 권한으로 수행하더라도 시스템의 권한제한으로 인하여 실패할 가능성이 높음. (-F 와 --directory 는 -d 와 동일함)
-f : 대상파일이 존재할 경우에 대상파일을 지우고 링크파일을 생성
-i : 대상파일이 존재할 경우에 대상파일을 지울것인가를 확인요청 (--interactive 와 동일)
-s : 심볼릭 링크파일을 생성
-S : 백업파일 생성시에 원하는 접미사(suffix)를 지정할 수 있음
-t, --target-directory=DIRECTORY : 링크파일을 생성할 디렉토리를 지정

출처: http://webdir.tistory.com/148 [WEBDIR]

https://raspi.taneyats.com/entry/home-electronics-2


Raspberry Piで電子工作する (2 - DHT11で気温・湿度を取得する)


f:id:ibuquicallig:20190606141530p:plain

この記事では電子部品のDHT11を使用して、Raspberry Piでの気温と湿度の取得方法と例などについて解説しています。

この記事でできること

  • DHT11を使用して温度と湿度を数値型で取得できる
  • モジュールから値を取得することができる
  • ループ処理で複数回値処理を実行することができる

前の記事

前回はPythonでLEDをチカチカさせるスクリプトを作成しました。

必要なもの

基本セット

まだRaspberry Pi用の電子工作アイテムをそろえていない場合は、以下の記事を参考に買い揃える必要があります。

DHT11

今回使用する温度と湿度を計測するためのモジュールはDHT11というものを使用します。単品で購入するよりもいろんなものが入っているモジュールのセットをAmazonなどで購入するほうが格段に安くなります。

以下のリンク先のセットにDHT11が含まれています。

DHT11単品だと4つのピンが飛び出ていますが、リンク先のものだと3ピンしか出ていません。データシートを見てみると3番目のピンは使われていない(null)ようなので特に問題ありません。

かつ、うれしいことにDHT11の乗っかっている基板で既にVCCピンとDATAピンを抵抗でつないでくれています。これで何も考えずにRaspberry Piとつないでも大丈夫となっています!

手順

それではさっそく作っていきましょう!今回も既に作成されているライブラリを使用してサクッと作っていきます。

ライブラリを取得

まずはライブラリを取得します。以下のGithubのページから取得します。PCでダウンロードしてRaspberry Piに転送というのは二度手間なので、URLだけ取得します。

取得するURLはリンク先の緑のClone or downloadをクリックして、Download ZIPで取得できるURLです(以下)。

https://github.com/szazo/DHT11_Python/archive/master.zip

このアドレスをwgetでRaspberry Pi上で取得します。

$ wget https://github.com/szazo/DHT11_Python/archive/master.zip
$ unzip master.zip
$ ls 
DHT11_Python-master ...

取得できたmaster.zipというアーカイブをunzipコマンドで解凍するとDHT11_Python-masterというディレクトリとして解凍されます。今回作成するスクリプトはこのディレクトリの中に置きます。

ここまで進めたら一旦回路作成に移りましょう。

回路を作成

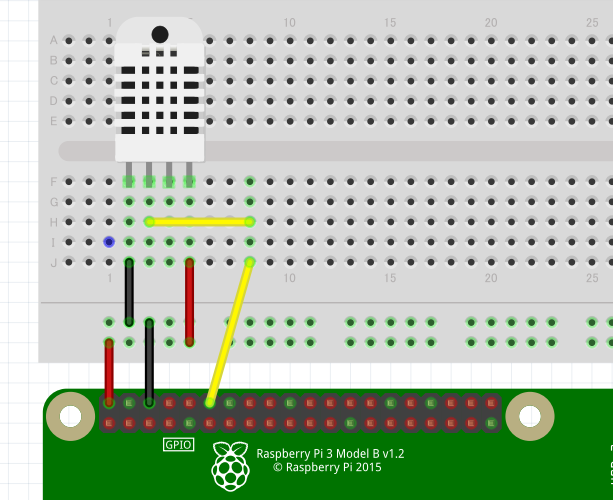
ブレッドボードで回路を作成していきます。前回作成したLEDの回路のようにRaspberry Piのピン > モジュール > Raspberry PiのGNDと電気が回るようにとりあえず作ります。

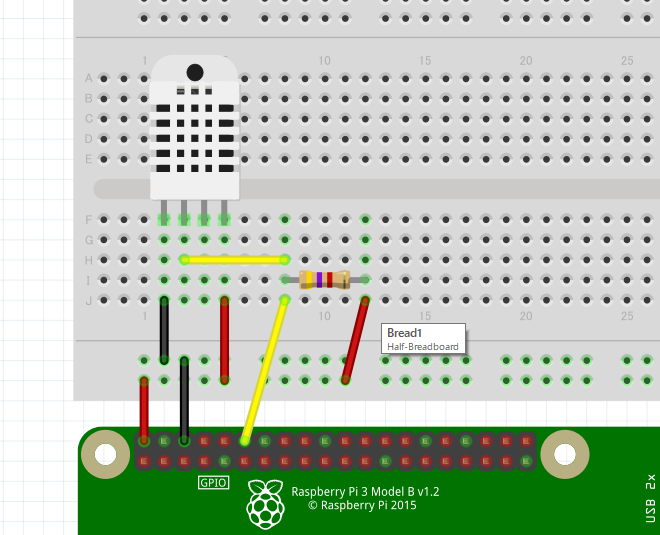
モジュールの基板にはGNDDATAVCCと書いてあると思います。Raspberry PiのGNDと基板のGND5VピンとVCCをつなぎます。そして、18番ピンをDATAとつないでデータを取得します。

f:id:ibuquicallig:20190606141600p:plain

作成しているソフトの関係上、基板に乗っていないDHT11しか描画できません。。左から3番目のピンは無視してください。

もし基板に乗っていないモジュールを使用する場合には、DATAピンとVCCピンを5.1kΩの抵抗でつなぎます。

f:id:ibuquicallig:20190606141607p:plain

電源と繋いでいるので、回路が作成された段階でモジュールのLEDが光ります。光っていれば成功です。

プログラムを作成

データを受け取ってコンソールに表示するプログラムを作成します。先ほどのライブラリがPythonなのでPythonで作成していきます。

$ cd DHT11_Python-master
vim get_temp_and_humid.py

ファイル名はget_temp_and_humid.pyとしておきます。内容は以下のような感じです。とりあえず体裁は気にせずに表示だけしてみます。

#!/usr/bin/env python
#coding:utf-8

import RPi.GPIO as GPIO
import dht11
import time
from datetime import datetime

# initialize GPIO
GPIO.setwarnings(False)
GPIO.setmode(GPIO.BCM)
GPIO.cleanup()

module = dht11.DHT11(pin=18)

while True:
    result = module.read()
    if result.is_valid():
        print(datetime.now().strftime("%Y/%m/%d %H:%M:%S"))
        print("気温: " + str(result.temperature) + "℃")
        print("湿度: " + str(result.humidity) + "%")
        break
    time.sleep(1)

実行結果は以下のような感じになります。もしコードが間違っていたり、ピンが間違っていてループから抜けられなくなった場合にはCtrl + Cで処理を強制終了してください。

python get_temp_and_humid.pyを実行して表示される内容はこんな感じです。

$ python get_temp_and_humid.py
2019/06/06 21:34:19
気温: 25℃
湿度: 61%


少しコードを見ていきましょう。

#!/usr/bin/env python
#coding:utf-8

シバンと呼ばれるものとエンコードの指定です。エンコードを指定していないと日本語などの全角文字を表示できません。

import RPi.GPIO as GPIO
import dht11
import time
from datetime import datetime

必要なモジュールをインポート(読み込み)しています。import dht11で先ほどダウンロードしたライブラリを使えるようになります。

# initialize GPIO
GPIO.setwarnings(False)
GPIO.setmode(GPIO.BCM)
GPIO.cleanup()

GPIOの初期化を行います。この部分は前回のLチカでも同じようなことをしました!

module = dht11.DHT11(pin=18)

moduleという変数にインスタンスを代入します。引数で指定している値(pin=18)のピンでインスタンス化します。18ピンを指定します。

while True:
    result = module.read()
    if result.is_valid():
        print(datetime.now().strftime("%Y/%m/%d %H:%M:%S"))
        print("気温: " + str(result.temperature) + "℃")
        print("湿度: " + str(result.humidity) + "%")
        break
    time.sleep(1)

肝心の値を取得して表示する部分です。まずはwhile True:で無限ループします。一番最後にtime.sleep(1)を入れることによって1秒ごとにループを実行するようになります。

データの読み取りは、先ほどインスタンス化した変数のread()という関数を実行することで取得できます。 取得できた値にはtemperaturehumidityといった形で温度などの値が格納されています。

取得した値が正常なものかどうかをis_valid()という関数で判定できるので、それをIF文の条件に突っ込みます。正常な時(True)だけコンソールに表示して、そうでない場合は次のループへ進みます。

以上で値を取得して表示することができます!

試しにDHT11を指で温めたり、息を吹きかけてみて温度と湿度が変わることが確認出来たらOKです!

最終的なコード

#!/usr/bin/env python
#coding:utf-8

import RPi.GPIO as GPIO
import dht11
import time
from datetime import datetime

# initialize GPIO
GPIO.setwarnings(False)
GPIO.setmode(GPIO.BCM)
GPIO.cleanup()

module = dht11.DHT11(pin=18)

while True:
    result = module.read()
    if result.is_valid():
        print(datetime.now().strftime("%Y/%m/%d %H:%M:%S"))
        print("気温: " + str(result.temperature) + "℃")
        print("湿度: " + str(result.humidity) + "%")
        break
    time.sleep(1)

最後に

前回はLEDをチカチカさせるだけでしたが、今回はライブラリを使用しながらモジュールからデータを取得することができました。

アナログをデジタルの値に変えるモジュールのライブラリなどは、製品名で探せばいくらでも転がっているので同じように使い方を調べながら進めることができるでしょう。あとはそのライブラリの言語をどれぐらい知っているかと、面白いアイデアを思いつくかどうかです(笑)

今回はPythonを使用しましたが、個人的にはNode.js(JavaScript)で動かすほうが好きだったりします。

次の記事

Node.js(JavaScript)でLチカしてみる

[:embed]

参考

以下のサイトの情報を引用・参考にしました。

DHT11のデータシート


https://bacchi.me/linux/systemd-tips/


systemdでユーザーの環境変数を読み込むようにする

更新日:

systemdでユーザーの環境変数が読み込まれず
うまくサービスが立ち上がらないという問題がありました。

調べてみると、systemdは.barshrcや.bash_profileに
定義した環境変数を読んでくれないということがわかりました。

環境変数を読み込ませたい場合は一手間かけてあげれば大丈夫なので、その方法をまとめてみました。

/etc/sysconfig/USER_NAME に読み込ませたい環境変数を書く

以下の要領でserviceを動かすユーザーが読み込む環境変数を定義するファイルを設定します。

systemd設定ファイルの[service]ディレクティブにEnvironmentFileを定義する

上記で作成した環境変数を定義したファイルを読み込ませるために、
systemd設定ファイルの[service]ディレクティブにEnvironmentFileの行を追加してやります。

  • 変更前

  • 変更後

サービスの再起動

ここまでの設定が終わればサービスの再起動を行います。

場合によっては設定ファイルのリロードを求められる場合があるのでケースバイケースで。


https://stackoverflow.com/questions/18135451/what-is-the-difference-between-var-var-and-var-in-the-bash-shell


Braces ($var vs. ${var})

In most cases, $var and ${var} are the same:

var=foo
echo $var
# foo
echo ${var}
# foo

The braces are only needed to resolve ambiguity in expressions:

var=foo
echo $varbar
# Prints nothing because there is no variable 'varbar'
echo ${var}bar
# foobar

Quotes ($var vs. "$var" vs. "${var}")

When you add double quotes around a variable, you tell the shell to treat it as a single word, even if it contains whitespaces:

var="foo bar"
for i in "$var"; do # Expands to 'for i in "foo bar"; do...'
    echo $i         #   so only runs the loop once
done
# foo bar

Contrast that behavior with the following:

var="foo bar"
for i in $var; do # Expands to 'for i in foo bar; do...'
    echo $i       #   so runs the loop twice, once for each argument
done
# foo
# bar

As with $var vs. ${var}, the braces are only needed for disambiguation, for example:

var="foo bar"
for i in "$varbar"; do # Expands to 'for i in ""; do...' since there is no
    echo $i            #   variable named 'varbar', so loop runs once and
done                   #   prints nothing (actually "")

var="foo bar"
for i in "${var}bar"; do # Expands to 'for i in "foo barbar"; do...'
    echo $i              #   so runs the loop once
done
# foo barbar

Note that "${var}bar" in the second example above could also be written "${var}"bar, in which case you don't need the braces anymore, i.e. "$var"bar. However, if you have a lot of quotes in your string these alternative forms can get hard to read (and therefore hard to maintain). This pageprovides a good introduction to quoting in Bash.

Arrays ($var vs. $var[@] vs. ${var[@]})

Now for your array. According to the bash manual:

Referencing an array variable without a subscript is equivalent to referencing the array with a subscript of 0.

In other words, if you don't supply an index with [], you get the first element of the array:

foo=(a b c)
echo $foo
# a

Which is exactly the same as

foo=(a b c)
echo ${foo}
# a

To get all the elements of an array, you need to use @ as the index, e.g. ${foo[@]}. The braces are required with arrays because without them, the shell would expand the $foo part first, giving the first element of the array followed by a literal [@]:

foo=(a b c)
echo ${foo[@]}
# a b c
echo $foo[@]
# a[@]

This page is a good introduction to arrays in Bash.

Quotes revisited (${foo[@]} vs. "${foo[@]}")

You didn't ask about this but it's a subtle difference that's good to know about. If the elements in your array could contain whitespace, you need to use double quotes so that each element is treated as a separate "word:"

foo=("the first" "the second")
for i in "${foo[@]}"; do # Expands to 'for i in "the first" "the second"; do...'
    echo $i              #   so the loop runs twice
done
# the first
# the second

Contrast this with the behavior without double quotes:

foo=("the first" "the second")
for i in ${foo[@]}; do # Expands to 'for i in the first the second; do...'
    echo $i            #   so the loop runs four times!
done
# the
# first
# the
# second


http://mwultong.blogspot.com/2006/10/linux-bashrc-bashprofile.html

bashrc / bash_profile 설정 파일들의 위치는?


파일명 앞에 점(.)이 붙어서 히든 파일이 된 설정파일들은 자신의 홈 디렉토리에 있습니다.

ls -a


이런 명령으로 보아야 히든 파일이 보입니다. 숨겨진 파일이기에 그냥 ls 로는 보이지 않습니다.


만약 하드 전체에서 .bash... 로 시작하는 모든 파일을 찾으려면, root로 로그인한 후

find / -name '.bash*'


이렇게 하면 찾아집니다. (▶▶ 리눅스 파일 찾기 명령: find 사용법 예제, Linux File Find Command 참고)


root 로 로그인 했을 때, root의 홈 디렉토리에 있는 파일들은 우분투 리눅스의 경우

.bashrc
.profile
.bash_history
.viminfo
.lesshst

이렇습니다.

다만, .bash_profile 은 root 계정에는 없고, 다른 사용자 계정에만 있습니다.


설정 파일은 /etc 디렉토리나 홈, 둘 중의 하나에 있거나 둘 다 있습니다. 다만 /etc 의 파일은 히든 파일이 아니기에 점이 없습니다.

/etc 디렉토리의 설정 파일들은 컴퓨터 전체에 일괄적으로 적용되는 설정 파일이고, 자신의 홈 디렉토리의 설정 파일들은 자신에게만 적용되는 것입니다.


Q: 홈에 리눅스 설정 파일들이 하나도 없어요/보이지 않아요


ls -a
이렇게 ls 에 -a 옵션을 붙여야, 히든 파일이 보입니다. 홈의 설정 파일들은 모두 히든 파일 즉 숨겨진 파일입니다.

+ Recent posts