id: flexbox
title: Layout with Flexbox


A component can specify the layout of its children using the Flexbox algorithm. Flexbox is designed to provide a consistent layout on different screen sizes.

You will normally use a combination of flexDirection, alignItems, and justifyContent to achieve the right layout.

Flexbox works the same way in React Native as it does in CSS on the web, with a few exceptions. The defaults are different, with flexDirection defaulting to column instead of row, and the flex parameter only supporting a single number.

Flex

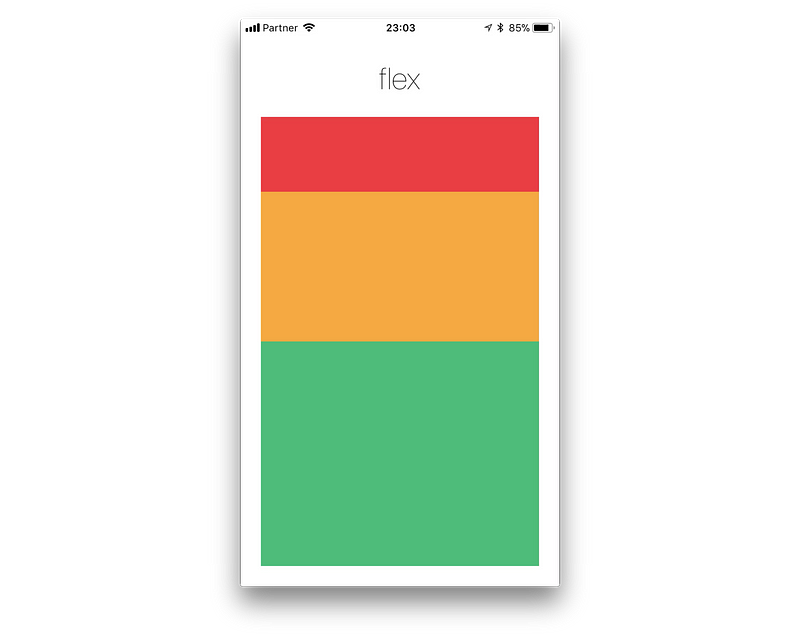
flex will define how your items are going to “fill” over the available space along your main axis. Space will be divided according to each element's flex property.

In the following example, the red, yellow, and green views are all children in the container view that has flex: 1 set. The red view uses flex: 1 , the yellow view uses flex: 2, and the green view uses flex: 3 . 1+2+3 = 6, which means that the red view will get 1/6 of the space, the yellow 2/6 of the space, and the green 3/6 of the space.

Flex

Flex Direction

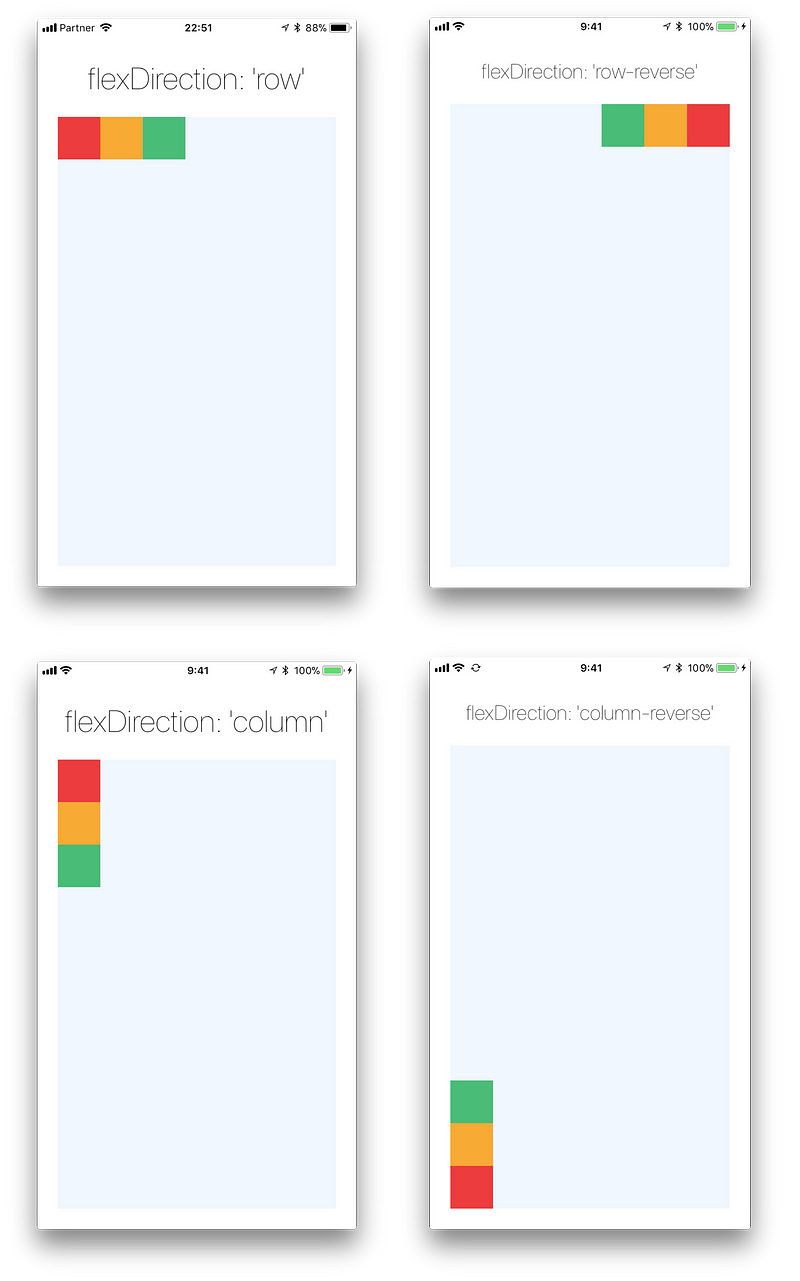
flexDirection controls the direction in which the children of a node are laid out. This is also referred to as the main axis. The cross axis is the axis perpendicular to the main axis, or the axis which the wrapping lines are laid out in.

  • row Align children from left to right. If wrapping is enabled, then the next line will start under the first item on the left of the container.

  • column (default value) Align children from top to bottom. If wrapping is enabled, then the next line will start to the right of the first item on the top of the container.

  • row-reverse Align children from right to left. If wrapping is enabled, then the next line will start under the first item on the right of the container.

  • column-reverse Align children from bottom to top. If wrapping is enabled, then the next line will start to the right of the first item on the bottom of the container.

You can learn more here.

import React, { Component } from 'react';
import { View } from 'react-native';

export default class FlexDirectionBasics extends Component {
  render() {
    return (
      // Try setting `flexDirection` to `column`.
      <View style={{flex: 1, flexDirection: 'row'}}>
        <View style={{width: 50, height: 50, backgroundColor: 'powderblue'}} />
        <View style={{width: 50, height: 50, backgroundColor: 'skyblue'}} />
        <View style={{width: 50, height: 50, backgroundColor: 'steelblue'}} />
      </View>
    );
  }
};

Flex Direction

Layout Direction

Layout direction specifies the direction in which children and text in a hierarchy should be laid out. Layout direction also affects what edge start and end refer to. By default, React Native lays out with LTR layout direction. In this mode start refers to left and end refers to right.

  • LTR (default value) Text and children are laid out from left to right. Margin and padding applied to the start of an element are applied on the left side.

  • RTL Text and children are laid out from right to left. Margin and padding applied to the start of an element are applied on the right side.

Justify Content

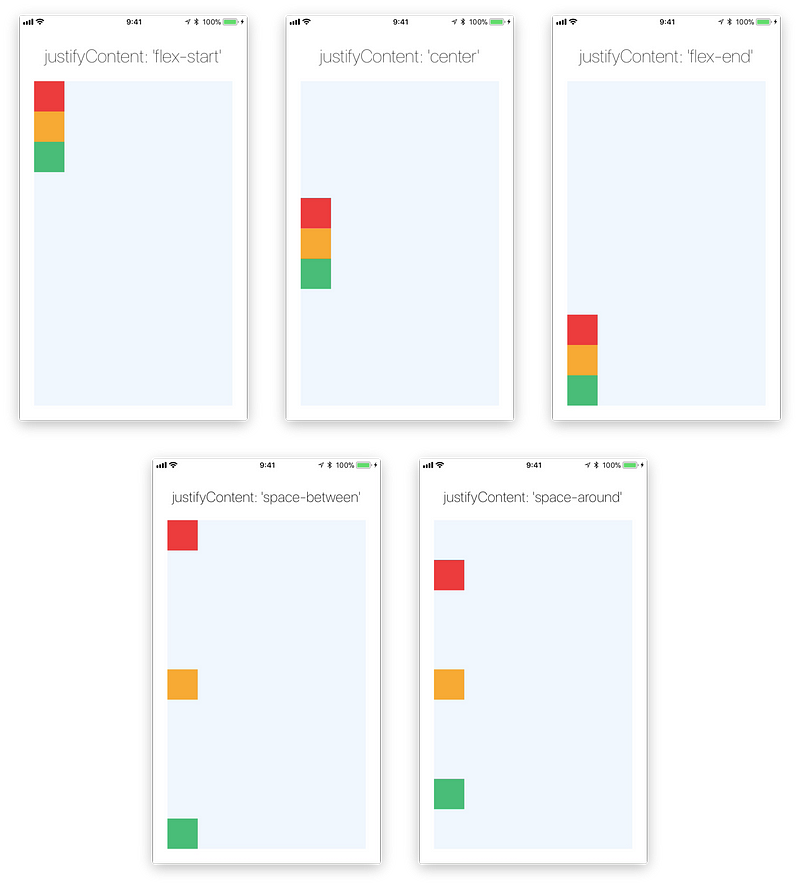
justifyContent describes how to align children within the main axis of their container. For example, you can use this property to center a child horizontally within a container with flexDirection set to row or vertically within a container with flexDirection set to column.

  • flex-start(default value) Align children of a container to the start of the container's main axis.

  • flex-end Align children of a container to the end of the container's main axis.

  • center Align children of a container in the center of the container's main axis.

  • space-between Evenly space off children across the container's main axis, distributing the remaining space between the children.

  • space-around Evenly space off children across the container's main axis, distributing the remaining space around the children. Compared to space-between, using space-around will result in space being distributed to the beginning of the first child and end of the last child.

  • space-evenly Evenly distribute children within the alignment container along the main axis. The spacing between each pair of adjacent items, the main-start edge and the first item, and the main-end edge and the last item, are all exactly the same.

You can learn more here.

import React, { Component } from 'react';
import { View } from 'react-native';

export default class JustifyContentBasics extends Component {
  render() {
    return (
      // Try setting `justifyContent` to `center`.
      // Try setting `flexDirection` to `row`.
      <View style={{
        flex: 1,
        flexDirection: 'column',
        justifyContent: 'space-between',
      }}>
        <View style={{width: 50, height: 50, backgroundColor: 'powderblue'}} />
        <View style={{width: 50, height: 50, backgroundColor: 'skyblue'}} />
        <View style={{width: 50, height: 50, backgroundColor: 'steelblue'}} />
      </View>
    );
  }
};

Justify Content

Align Items

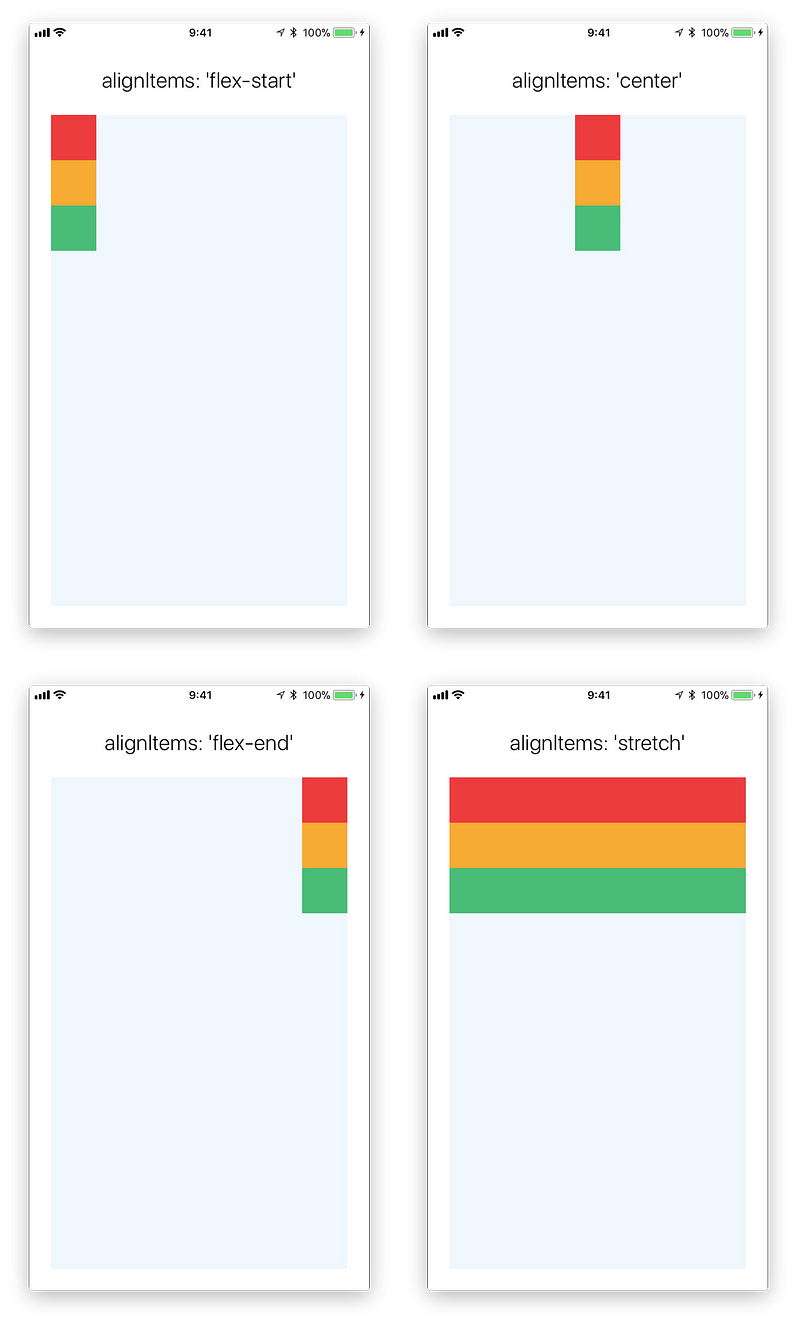
alignItems describes how to align children along the cross axis of their container. Align items is very similar to justifyContent but instead of applying to the main axis, alignItems applies to the cross axis.

  • stretch (default value) Stretch children of a container to match the height of the container's cross axis.

  • flex-start Align children of a container to the start of the container's cross axis.

  • flex-end Align children of a container to the end of the container's cross axis.

  • center Align children of a container in the center of the container's cross axis.

  • baseline Align children of a container along a common baseline. Individual children can be set to be the reference baseline for their parents.

For stretch to have an effect, children must not have a fixed dimension along the secondary axis. In the following example, setting alignItems: stretch does nothing until the width: 50 is removed from the children.

You can learn more here.

import React, { Component } from 'react';
import { View } from 'react-native';

export default class AlignItemsBasics extends Component {
  render() {
    return (
      // Try setting `alignItems` to 'flex-start'
      // Try setting `justifyContent` to `flex-end`.
      // Try setting `flexDirection` to `row`.
      <View style={{
        flex: 1,
        flexDirection: 'column',
        justifyContent: 'center',
        alignItems: 'stretch',
      }}>
        <View style={{width: 50, height: 50, backgroundColor: 'powderblue'}} />
        <View style={{height: 50, backgroundColor: 'skyblue'}} />
        <View style={{height: 100, backgroundColor: 'steelblue'}} />
      </View>
    );
  }
};

Align Items

Align Self

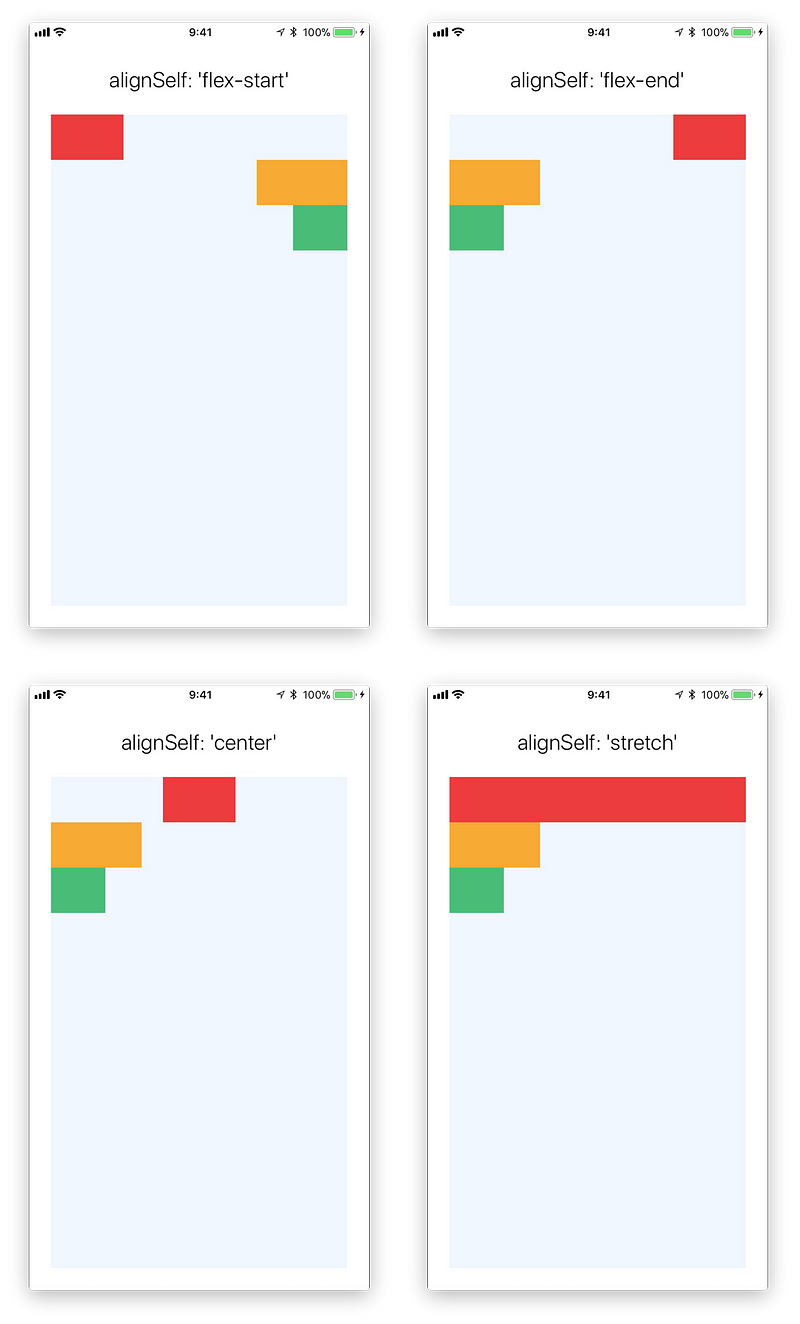
alignSelf has the same options and effect as alignItems but instead of affecting the children within a container, you can apply this property to a single child to change its alignment within its parent. alignSelf overrides any option set by the parent with alignItems.

Align Self

Align Content

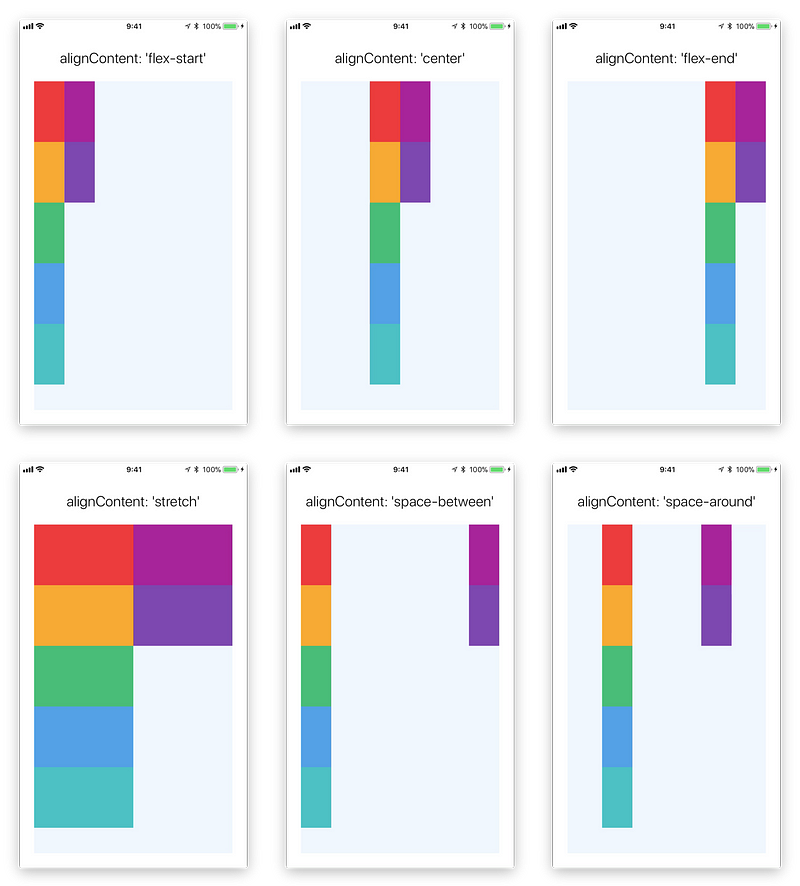
alignContent defines the distribution of lines along the cross-axis. This only has effect when items are wrapped to multiple lines using flexWrap.

  • flex-start (default value) Align wrapped lines to the start of the container's cross axis.

  • flex-end Align wrapped lines to the end of the container's cross axis.

  • stretch Stretch wrapped lines to match the height of the container's cross axis.

  • center Align wrapped lines in the center of the container's cross axis.

  • space-between Evenly space wrapped lines across the container's main axis, distributing the remaining space between the lines.

  • space-around Evenly space wrapped lines across the container's main axis, distributing the remaining space around the lines. Compared to space-between, using space-around will result in space being distributed to the begining of the first line and the end of the last line.

You can learn more here.

Align Content

Flex Wrap

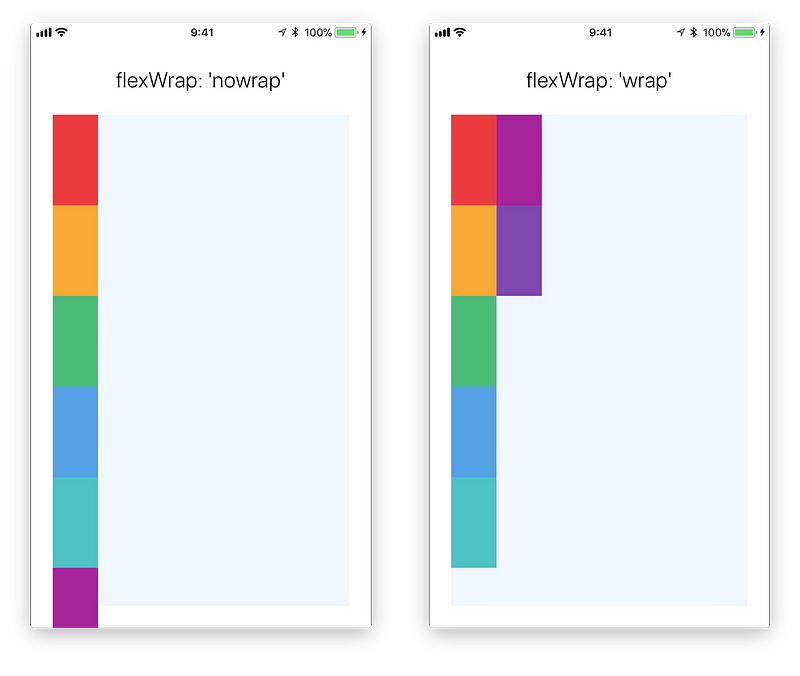
The flexWrap property is set on containers and it controls what happens when children overflow the size of the container along the main axis. By default, children are forced into a single line (which can shrink elements). If wrapping is allowed, items are wrapped into multiple lines along the main axis if needed.

When wrapping lines, alignContent can be used to specify how the lines are placed in the container. Learn more here.

Flex Wrap

Flex Basis, Grow, and Shrink

  • flexGrow describes how any space within a container should be distributed among its children along the main axis. After laying out its children, a container will distribute any remaining space according to the flex grow values specified by its children.

    flexGrow accepts any floating point value >= 0, with 0 being the default value. A container will distribute any remaining space among its children weighted by the children’s flexGrow values.

  • flexShrink describes how to shrink children along the main axis in the case in which the total size of the children overflows the size of the container on the main axis. flexShrink is very similar to flexGrow and can be thought of in the same way if any overflowing size is considered to be negative remaining space. These two properties also work well together by allowing children to grow and shrink as needed.

    flexShrink accepts any floating point value >= 0, with 1 being the default value. A container will shrink its children weighted by the children’s flexShrink values.

  • flexBasis is an axis-independent way of providing the default size of an item along the main axis. Setting the flexBasis of a child is similar to setting the width of that child if its parent is a container with flexDirection: row or setting the height of a child if its parent is a container with flexDirection: column. The flexBasis of an item is the default size of that item, the size of the item before any flexGrow and flexShrink calculations are performed.

You can learn more here.

Width and Height

The width property specifies the width of an element's content area. Similarly, the height property specifies the height of an element's content area.

Both width and height can take the following values:

  • auto (default value) React Native calculates the width/height for the element based on its content, whether that is other children, text, or an image.

  • pixels Defines the width/height in absolute pixels. Depending on other styles set on the component, this may or may not be the final dimension of the node.

  • percentage Defines the width or height in percentage of its parent's width or height, respectively.

Absolute & Relative Layout

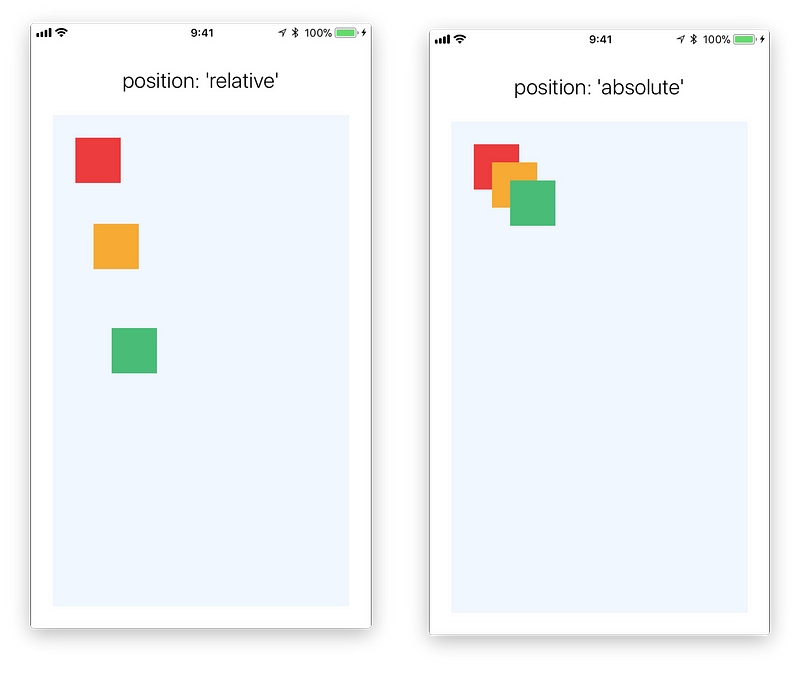
The position type of an element defines how it is positioned within its parent.

relative (default value) By default, an element is positioned relatively. This means an element is positioned according to the normal flow of the layout, and then offset relative to that position based on the values of top, right, bottom, and left. The offset does not affect the position of any sibling or parent elements.

absolute When positioned absolutely, an element doesn't take part in the normal layout flow. It is instead laid out independent of its siblings. The position is determined based on the top, right, bottom, and left values.

Absolute & Relative Layoutp

Going Deeper

Check out the interactive yoga playground that you can use to get a better understanding of flexbox.

We've covered the basics, but there are many other styles you may need for layouts. The full list of props that control layout is documented here.

Additionally, you can see some examples from Wix Engineers.


https://qiita.com/rico/items/0f645e84028d4fe00be6


display:none と visibility:hidden の違い

この記事は最終更新日から3年以上が経過しています。

visibility:hiddenは名前の通り、要素はあるけど見えない状態。
display:noneは、要素も取得されず、完全にその場にない扱い。

検証準備

html

<!doctype html>
<html lang="ja">
<head>
    <meta charset="UTF-8">
    <title>difference between visibility hidden and display none</title>
    <link rel="stylesheet" href="css/style.css">
</head>
<body>
    <div id="one" class="box"></div>
    <div id="two" class="box">
        <h3>Visibility:hidden</h3>
        エレメント描画されず。けど、表示エリアは「残る」。背景色で塗りつぶした感じ。
    </div>
    <div id="three" class="box">
        <h3>display:none</h3>
        エレメントが表示エリアから消える。DOMとして存在はするけど描画されない。
    </div>
        <div id="four" class="box"></div>
</body>
</html>

css

float:leftかけておく。

2番目のボックスにvisibility:hiddenをかけて、
3番目のボックスにdisplay:noneをかけようと思います。

@charset "UTF-8";

.box{
  width:150px;
  height:150px;
  margin:10px;
  border-radius: 10px;        /* CSS3草案 */
  -webkit-border-radius: 10px;    /* Safari,Google Chrome用 */
  -moz-border-radius: 10px;   /* Firefox用 */
  float:left;
  padding:20px;
}

#one{

  background:#000;
}

#two{
  /*visibility:hidden;*/
  background:#9eccb3;
}

#three{
  background:#f47d44;
  /*display:none;*/
}

#four{
  background:#000;
  clear:right;
}


ブラウザ

2.png

検証結果

visibility:hidden

<二番目の緑のボックス>
二番目のボックスがあった場所だけぽっかりそのまま空白に。

3.png

display:none

<三番目のオレンジのボックス>
要素自体がなくなったので、次の4番目のボックスがつまる。

5.png

visibility:hiddenは名前の通り、要素はあるけど見えない状態。
display:noneは、要素も取得されず、完全にその場にない扱い。

もしdisplay:noneで要素の横幅等を測りたかったら、
absoluteにっして-9999pxしてとばして測る。


https://heropy.blog/2018/01/31/sass/


Sass(SCSS) 완전 정복!

css sass scss

CSS는 상대적으로 배우기 쉽고 재미있습니다.
웹 개발 초심자에게는 이만큼 접근하기 좋은 게 없죠.

CSS는 분명 쉽고 재밌지만, 작업이 고도화될수록 불편함도 같이 커집니다.
불필요한 선택자(Selector)의 과용과 연산 기능의 한계, 구문(Statement)의 부재 등 프로젝트의 규모가 커질수록 아쉬움도 같이 커지죠.
하지만 웹에서는 표준 CSS만 동작할 수 있기 때문에 다른 선택권이 없습니다.

그렇다면 우리는 앞으로 계속 CSS만 사용해야 할까요?

CSS Preprocessor 란?

HTML, CSS를 다루는 분이라면 한 번은 들어봤을 Sass, Less 등이 있습니다.
이 친구들은 CSS 전(예비)처리기 입니다.
보통 CSS Preprocessor 라고 부릅니다.

CSS가 동작하기 전에 사용하는 기능으로,
웹에서는 분명 CSS가 동작하지만 우리는 CSS의 불편함을 이런 확장 기능으로 상쇄할 수 있습니다.

사스는 기초 언어에 힘과 우아함을 더해주는 CSS의 확장이다.

어떻게 사용하나요?

위에서 언급한 것처럼 웹에서는 CSS만 동작합니다.
SassLessStylus 같은 전처리기(이하 ‘전처리기’로 표기)는 직접 동작시킬 수 없습니다.
그렇다면 어떻게 사용할 수 있을까요?

CSS는 불편하니 일단 배제하고 우선 전처리기로 작성(코딩)합니다.
전처리기는 CSS 문법과 굉장히 유사하지만 선택자의 중첩(Nesting)이나 조건문, 반복문, 다양한 단위(Unit)의 연산 등… 표준 CSS 보다 훨씬 많은 기능을 사용해서 편리하게 작성할 수 있습니다.
단, 웹에서는 직접 동작하지 않으니 이렇게 작성한 전처리기를 웹에서 동작 가능한 표준의 CSS로 컴파일(Compile)합니다.
전처리기로 작성하고 CSS로 컴파일해서 동작시키는 거죠.

컴파일은 어떻게 하나요?

전처리기 종류마다 방법이 조금씩 다르고 여러 방식을 제공합니다.
보통의 경우 컴파일러(Compiler)가 필요합니다.
우리는 이제 Sass(SCSS)를 알아볼 것이고 컴파일 방법에 대해서도 같이 살펴보겠습니다.

왜 Sass(SCSS)죠?

보통 언급되는 전처리기 3대장으로 Less, Sass(SCSS), Stylus가 있습니다.

저는 가장 많이 사용하고 진입장벽이 비교적 낮았던 Less를 처음 사용했습니다.
기본적인 기능은 전처리기들이 다 비슷합니다만 개인적으로 Less는 몇몇 기능에 큰 아쉬움이 있었습니다.
정확하게 언급하진 않겠지만 프로젝트 진행 중 Less에서 제공하는 기능의 한계로 막히는 경우가 몇 번 있었는데 그 기능이 Sass나 Stylus에는 있었습니다.
하지만 진입장벽이 낮기 때문에 접하기 쉽고 그만큼 많이 사용되는 듯합니다.

Stylus 같은 경우는 현재 이 블로그(HEROPY)를 만들면서 사용하고 있습니다.
깔끔하고 좀 더 세련됐으며 기능도 훌륭합니다.
하지만 덜 사용되며(덜 유명하며) 비교적 늦게 나왔기 때문에 성숙도는 떨어집니다.
그 때문인지 컴파일 후 사소한 버그가 몇몇 보입니다.

Sass(SCSS)는 언급한 두 가지 전처리기의 장점을 모두 가집니다.
문법은 Sass가 Stylus와 비슷하고, SCSS는 Less와 비슷하며, Sass와 SCSS는 하나의 컴파일러로 모두 컴파일 가능합니다.
또한, 2006년부터 시작하여 가장 오래된 CSS 확장 언어이며 그만큼 높은 성숙도와 많은 커뮤니티를 가지고 있고 기능도 훌륭합니다.
그래서 저는 Sass(SCSS)를 선택했습니다.

Sass와 SCSS는 차이점은 뭔가요?

Sass(Syntactically Awesome Style Sheets)의 3버전에서 새롭게 등장한 SCSS는 CSS 구문과 완전히 호환되도록 새로운 구문을 도입해 만든 Sass의 모든 기능을 지원하는 CSS의 상위집합(Superset) 입니다.
즉, SCSS는 CSS와 거의 같은 문법으로 Sass 기능을 지원한다는 말입니다.

더 쉽고 간단한 차이는 {}(중괄호)와 ;(세미콜론)의 유무입니다.
아래의 예제를 비교해 보세요.

Sass:

.list
  width: 100px
  float: left
  li
    color: red
    background: url("./image.jpg")
    &:last-child
      margin-right: -10px

SCSS:

.list {
  width: 100px;
  float: left;
  li {
    color: red;
    background: url("./image.jpg");
    &:last-child {
      margin-right: -10px
    }
  }
}

Sass는 선택자의 유효범위를 ‘들여쓰기’로 구분하고, SCSS는 {}로 범위를 구분합니다.
Sass 방식과 SCSS 방식 중 어떤 방식이 마음에 드세요?

거의 유일합니다만, 다른 차이도 있습니다.
아래는 Mixins(‘믹스인’은 재사용 가능한 기능을 만드는 방식의 의미합니다) 예제입니다.
Sass는 단축 구문으로 사용합니다.

:Sass

=border-radius($radius)
  -webkit-border-radius: $radius
  -moz-border-radius:    $radius
  -ms-border-radius:     $radius
  border-radius:         $radius

.box
  +border-radius(10px)

:SCSS

@mixin border-radius($radius) {
  -webkit-border-radius: $radius;
     -moz-border-radius: $radius;
      -ms-border-radius: $radius;
          border-radius: $radius;
}

.box { @include border-radius(10px); }

Sass는 =와 + 기호로 Mixins 기능을 사용했고,
SCSS는 @mixin과 @include로 기능을 사용했습니다.

단순한 몇 가지를 제외하면 거의 차이가 없지만 복잡한 문장이 될 경우 여러 환경에 따른 장단점이 있을 수 있습니다.
Sass는 좀 더 간결하고 작성하기 편리하며, {}나 ;를 사용하지 않아도 되니 코드가 훨씬 깔끔해집니다.
SCSS는 인라인 코드(한 줄 작성)를 작성할 수 있고, CSS와 유사한 문법을 가지기 때문에 코드 통합이 훨씬 쉽습니다.

이렇게 몇몇 장단점이 있기 때문에 회사나 팀에서 원하는 방식을 사용해야 하거나, 개인 취향에 따라서 선택할 수 있습니다.
단지 상황에 맞는, 원하는 방식으로 골라서 사용하면 됩니다.

보통의 경우 SCSS를 추천합니다.

컴파일 방법

Sass(SCSS)는 웹에서 직접 동작할 수 없습니다.
어디까지나 최종에는 표준 CSS로 동작해야 하며, 우리는 전처리기로 작성 후 CSS로 컴파일해야 합니다.
다양한 방법으로 컴파일이 가능하지만 자바스크립트 개발 환경(Node.js)에서 추천하는 몇가지 방법을 소개합니다.

SassMeister

간단한 Sass 코드는 컴파일러를 설치하는게 부담될 수 있습니다.
그럴 경우 SassMeister를 사용할 수 있습니다.

페이지 접속 후 바로 Sass나 SCSS 문법으로 코딩하면 CSS로 실시간 변환됩니다.
HTML를 작성하여 적용된 결과를 보거나 Sass 버전 설정 등 여러 환경 설정들을 지원하니 학습에 도움이 될 것입니다.

node-sass

node-sass는 Node.js를 컴파일러인 LibSass에 바인딩한 라이브러리 입니다.
NPM으로 전역 설치하여 사용합니다.

$ npm install -g node-sass

컴파일하려는 파일의 경로와 컴파일된 파일이 저장될 경로를 설정합니다.
[]는 선택사항입니다.

$ node-sass [옵션] <입력파일경로> [출력파일경로]
$ node-sass scss/main.scss public/main.css

여러 출력 경로를 설정할 수 있습니다.

$ node-sass scss/main.scss public/main.css dist/style.css

옵션을 적용할 수도 있습니다.
옵션으로 --watch 혹은 -w를 입력하면, 런타임 중 파일을 감시하여 저장 시 자동으로 변경 사항을 컴파일합니다.

$ node-sass --watch scss/main.scss public/main.css

기타 옵션은 node-sass CLI에서 확인할 수 있습니다.

Gulp

빌드 자동화 도구(JavaScript Task Runner)인 Gulp에서는 gulpfile.js을 만들어 아래와 같이 설정할 수 있습니다.
먼저 gulp 명령을 사용하기 위해서는 전역 설치가 필요합니다.

$ npm install -g gulp

Gulp와 함께 Sass 컴파일러인 gulp-sass를 개발 의존성(devDependency) 모드로 설치합니다.
gulp-sass는 위에서 살펴본 node-sass를 Gulp에서 사용할 수 있도록 만들어진 플러그인입니다.

$ npm install --save-dev gulp gulp-sass
// gulpfile.js
var gulp = require('gulp')
var sass = require('gulp-sass')

// 일반 컴파일
gulp.task('sass', function () {
  return gulp.src('./src/scss/*.scss')  // 입력 경로
    .pipe(sass().on('error', sass.logError))
    .pipe(gulp.dest('./dist/css'));  // 출력 경로
});

// 런타임 중 파일 감시
gulp.task('sass:watch', function () {
  gulp.watch('./src/scss/*.scss', ['sass']);  // 입력 경로와 파일 변경 감지 시 실행할 Actions(Task Name)
});

환경을 설정했으니 컴파일합니다.

$ gulp sass

런타임 중 파일 감시 모드로 실행할 수도 있습니다.

$ gulp sass:watch

Webpack

JavaScript 모듈화 도구인 Webpack의 설정은 좀 더 복잡합니다.
Webpack - 1 - 시작하기 / EJS / SASS(SCSS) 포스트를 참고하세요.

Parcel

웹 애플리케이션 번들러 Parcel은 굉장히 단순하게 컴파일할 수 있습니다.
좀 더 자세한 내용은 Parcel - 시작하기 / SASS / PostCSS / Babel / Production을 참고하세요.

우선 Parcel를 전역으로 설치합니다.

$ npm install -g parcel-bundler

프로젝트에 Sass 컴파일러(node-sass)를 설치합니다.

$ npm install --save-dev node-sass

이제 HTML에 <link>로 Sass 파일만 연결하면 됩니다.
다른 설정은 필요하지 않습니다.

<link rel="stylesheet" href="scss/main.scss">
$ parcel index.html
# 혹은
$ parcel build index.html

dist/에서 컴파일된 Sass 파일을 볼 수 있고,
별도의 포트 번호를 설정하지 않았다면 http://localhost:1234에 접속하여 적용 상태를 확인할 수 있습니다.

문법(Syntax)

위의 ‘Sass와 SCSS의 차이점’에서 설명한대로 Sass와 SCSS의 기능은 동일하니, 편의를 위해 SCSS 문법으로 설명을 진행합니다.
단, Sass와 SCSS의 차이점이 있다면 나눠 설명합니다.

주석(Comment)

CSS 주석은 /* ... */ 입니다.
Sass(SCSS)는 JavaScript처럼 두 가지 스타일의 주석을 사용합니다.

// 컴파일되지 않는 주석
/* 컴파일되는 주석 */

Sass의 경우 컴파일되는 여러 줄 주석을 사용할 때 각 줄 앞에 *을 붙여야 하고, 중요한 것은 *의 라인을 맞춰줘야 합니다.

Sass:

/* 컴파일되는
 * 여러 줄
 * 주석 */

// Error
/* 컴파일되는
* 여러 줄
    * 주석 */

SCSS는 각 줄에 *이 없어도 문제되지 않습니다. 따라서 기존 CSS와 호환이 쉽습니다.

SCSS:

/*
컴파일되는
여러 줄
주석
*/

데이터 종류(Data Types)

데이터설명예시
Numbers숫자1.8220px2em
Strings문자boldrelative"/images/a.png""dotum"
Colors색상 표현redblue#FFFF00rgba(255,0,0,.5)
Booleans논리truefalse
Nulls아무것도 없음null
Lists공백이나 ,로 구분된 값의 목록(apple, orange, banana)apple orange
MapsLists와 유사하나 값이 Key: Value 형태(apple: a, orange: o, banana: b)

특이사항

Sass에서 사용하는 데이터 종류들의 몇 가지 특이사항을 소개합니다.

  • Numbers: 숫자에 단위가 있거나 없습니다.
  • Strings: 문자에 따옴표가 있거나 없습니다.
  • Nulls: 속성값으로 null이 사용되면 컴파일하지 않습니다.
  • Lists: ()를 붙이거나 붙이지 않습니다.
  • Maps: ()를 꼭 붙여야 합니다.

중첩(Nesting)

Sass는 중첩 기능을 사용할 수 있습니다.
상위 선택자의 반복을 피하고 좀 더 편리하게 복잡한 구조를 작성할 수 있습니다.

SCSS:

.section {
  width: 100%;
  .list {
    padding: 20px;
    li {
      float: left;
    }
  }
}

Compiled to:

.section {
  width: 100%;
}
.section .list {
  padding: 20px;
}
.section .list li {
  float: left;
}

Ampersand (상위 선택자 참조)

중첩 안에서 & 키워드는 상위(부모) 선택자를 참조하여 치환합니다.

SCSS:

.btn {
  position: absolute;
  &.active {
    color: red;
  }
}

.list {
  li {
    &:last-child {
      margin-right: 0;
    }
  }
}

Compiled to:

.btn {
  position: absolute;
}
.btn.active {
  color: red;
}
.list li:last-child {
  margin-right: 0;
}

& 키워드가 참조한 상위 선택자로 치환되는 것이기 때문에 다음과 같이 응용할 수도 있습니다.

SCSS:

.fs {
  &-small { font-size: 12px; }
  &-medium { font-size: 14px; }
  &-large { font-size: 16px; }
}

Compiled to:

.fs-small {
  font-size: 12px;
}
.fs-medium {
  font-size: 14px;
}
.fs-large {
  font-size: 16px;
}

@at-root (중첩 벗어나기)

중첩에서 벗어나고 싶을 때 @at-root 키워드를 사용합니다.
중첩 안에서 생성하되 중첩 밖에서 사용해야 경우에 유용합니다.

SCSS:

.list {
  $w: 100px;
  $h: 50px;
  li {
    width: $w;
    height: $h;
  }
  @at-root .box {
    width: $w;
    height: $h;
  }
}

Compiled to:

.list li {
  width: 100px;
  height: 50px;
}
.box {
  width: 100px;
  height: 50px;
}

아래 예제 처럼 .list 안에 있는 특정 변수를 범위 밖에서 사용할 수 없기 때문에, 위 예제 처럼 @at-root 키워드를 사용해야 합니다.(변수는 아래에서 설명합니다)

.list {
  $w: 100px;
  $h: 50px;
  li {
    width: $w;
    height: $h;
  }
}

// Error
.box {
  width: $w;
  height: $h;
}

중첩된 속성

font-margin- 등과 같이 동일한 네임 스페이스를 가지는 속성들을 다음과 같이 사용할 수 있습니다.

SCSS:

.box {
  font: {
    weight: bold;
    size: 10px;
    family: sans-serif;
  };
  margin: {
    top: 10px;
    left: 20px;
  };
  padding: {
    bottom: 40px;
    right: 30px;
  };
}

Compiled to:

.box {
  font-weight: bold;
  font-size: 10px;
  font-family: sans-serif;
  margin-top: 10px;
  margin-left: 20px;
  padding-bottom: 40px;
  padding-right: 30px;
}

변수(Variables)

반복적으로 사용되는 값을 변수로 지정할 수 있습니다.
변수 이름 앞에는 항상 $를 붙입니다.

$변수이름: 속성값;

SCSS:

$color-primary: #e96900;
$url-images: "/assets/images/";
$w: 200px;

.box {
  width: $w;
  margin-left: $w;
  background: $color-primary url($url-images + "bg.jpg");
}

Compiled to:

.box {
  width: 200px;
  margin-left: 200px;
  background: #e96900 url("/assets/images/bg.jpg");
}

변수 유효범위(Variable Scope)

변수는 사용 가능한 유효범위가 있습니다.
선언된 블록({}) 내에서만 유효범위를 가집니다.

변수 $color는 .box1의 블록 안에서 설정되었기 때문에, 블록 밖의 .box2에서는 사용할 수 없습니다.

.box1 {
  $color: #111;
  background: $color;
}
// Error
.box2 {
  background: $color;
}

변수 재 할당(Variable Reassignment)

다음과 같이 변수에 변수를 할당할 수 있습니다.

SCSS:

$red: #FF0000;
$blue: #0000FF;

$color-primary: $blue;
$color-danger: $red;

.box {
  color: $color-primary;
  background: $color-danger;
}

Compiled to:

.box {
  color: #0000FF;
  background: #FF0000;
}

!global (전역 설정)

!global 플래그를 사용하면 변수의 유효범위를 전역(Global)로 설정할 수 있습니다.

SCSS:

.box1 {
  $color: #111 !global;
  background: $color;
}
.box2 {
  background: $color;
}

Compiled to:

.box1 {
  background: #111;
}
.box2 {
  background: #111;
}

대신 기존에 사용하던 같은 이름의 변수가 있을 경우 값이 덮어져 사용될 수 있습니다.

SCSS:

$color: #000;
.box1 {
  $color: #111 !global;
  background: $color;
}
.box2 {
  background: $color;
}
.box3 {
  $color: #222;
  background: $color;
}

Compiled to:

.box1 {
  background: #111;
}
.box2 {
  background: #111;
}
.box3 {
  background: #222;
}

!default (초깃값 설정)

!default 플래그는 할당되지 않은 변수의 초깃값을 설정합니다.
즉, 할당되어있는 변수가 있다면 변수가 기존 할당 값을 사용합니다.

SCSS:

$color-primary: red;

.box {
  $color-primary: blue !default;
  background: $color-primary;
}

Compiled to:

.box {
  background: red;
}

좀 더 유용하게, ‘변수와 값을 설정하겠지만, 혹시 기존 변수가 있을 경우는 현재 설정하는 변수의 값은 사용하지 않겠다’는 의미로 쓸 수 있습니다.
예를 들어, Bootstrap 같은 외부 Sass(SCSS) 라이브러리를 연결했더니 변수 이름이 같아 내가 작성한 코드의 변수들이 Overwrite(덮어쓰기) 된다면 문제가 있겠죠.
반대로 내가 만든 Sass(SCSS) 라이브러리가 다른 사용자 코드의 변수들을 Overwrite 한다면, 사용자들은 그 라이브러리를 더 이상 사용하지 않을 것입니다.
이럴 때 Sass(SCSS) 라이브러리(혹은 새롭게 만든 모듈)에서 사용하는 변수에 !default 플래그가 있다면 기존 코드(원본)를 Overwrite 하지 않고도 사용할 수 있습니다.

// _config.scss
$color-active: red;
// main.scss
@import 'config';

$color-active: blue !default;

.box {
  background: $color-active;  // red
}

다음은 Bootstrap 코드(_variables.scss)의 일부입니다.

// stylelint-disable
$white: #fff !default;
$gray-100: #f8f9fa !default;
$gray-200: #e9ecef !default;
$gray-300: #dee2e6 !default;
$gray-400: #ced4da !default;
$gray-500: #adb5bd !default;
$gray-600: #6c757d !default;
$gray-700: #495057 !default;
$gray-800: #343a40 !default;
$gray-900: #212529 !default;
$black: #000 !default;
view raw_variables.scss hosted with ❤ by GitHub

#{} (문자 보간)

#{}를 이용해서 코드의 어디든지 변수 값을 넣을 수 있습니다.

$family: unquote("Droid+Sans");
@import url("http://fonts.googleapis.com/css?family=#{$family}");
@import url("http://fonts.googleapis.com/css?family=Droid+Sans");

Sass의 내장 함수 unquote()는 문자에서 따옴표를 제거합니다.

가져오기(Import)

@import로 외부에서 가져온 Sass 파일은 모두 단일 CSS 출력 파일로 병합됩니다.
또한, 가져온 파일에 정의된 모든 변수 또는 Mixins 등을 주 파일에서 사용할 수 있습니다.

Sass @import는 기본적으로 Sass 파일을 가져오는데, CSS @import 규칙으로 컴파일되는 몇 가지 상황이 있습니다.

  • 파일 확장자가 .css일 때
  • 파일 이름이 http://로 시작하는 경우
  • url()이 붙었을 경우
  • 미디어쿼리가 있는 경우

위의 경우 CSS @import 규칙대로 컴파일 됩니다.

@import "hello.css";
@import "http://hello.com/hello";
@import url(hello);
@import "hello" screen;

여러 파일 가져오기

하나의 @import로 여러 파일을 가져올 수도 있습니다.
파일 이름은 ,로 구분합니다.

@import "header", "footer";

파일 분할(Partials)

프로젝트 규모가 커지면 파일들을 header나 side-menu 같이 각 기능과 부분으로 나눠 유지보수가 쉽도록 관리하게 됩니다.
이 경우 파일이 점점 많아지는데, 모든 파일이 컴파일 시 각각의 ~.css 파일로 나눠서 저장된다면 관리나 성능 차원에서 문제가 될 수 있겠죠.
그래서 Sass는 Partials 기능을 지원합니다.
파일 이름 앞에 _를 붙여(_header.scss와 같이) @import로 가져오면 컴파일 시 ~.css 파일로 컴파일하지 않습니다.

예를 들어보겠습니다.
다음과 같이 scss/ 안에 3개의 Sass 파일이 있습니다.

Sass-App
  # ...
  ├─scss
  │  ├─header.scss
  │  ├─side-menu.scss
  │  └─main.scss
  # ...

main.scss로 나머지 ~.scss 파일을 가져옵니다.

// main.scss
@import "header", "side-menu";

그리고 이 파일들을 css/디렉토리로 컴파일합니다.
(컴파일은 위에서 설명한 node-sass로 진행합니다.)

# `scss`디렉토리에 있는 파일들을 `css`디렉토리로 컴파일
$ node-sass scss --output css

컴파일 후 확인하면 아래와 같이 scss/에 있던 파일들이 css/ 안에 각 하나씩의 파일로 컴파일됩니다.

Sass-App
  # ...
  ├─css
  │  ├─header.css
  │  ├─side-menu.css
  │  └─main.css
  ├─scss
  │  ├─header.scss
  │  ├─side-menu.scss
  │  └─main.scss
  # ...

자, 이번에는 가져올 파일 이름에 _를 붙이겠습니다.
메인 파일인 main.scss에서는 _를 사용하지 않습니다.

Sass-App
  # ...
  ├─scss
  │  ├─_header.scss
  │  ├─_side-menu.scss
  │  └─main.scss
  # ...
// main.scss
@import "header", "side-menu";

같은 방법으로 컴파일하면…

$ node-sass scss --output css

아래처럼 별도의 파일로 컴파일되지 않고 사용됩니다.

Sass-App
  # ...
  ├─css
  │  └─main.css  # main + header + side-menu
  ├─scss
  │  ├─header.scss
  │  ├─side-menu.scss
  │  └─main.scss
  # ...

Webpack이나 ParcelGulp 같은 일반적인 빌드툴에서는 Partials 기능을 사용할 필요 없이, 설정된 값에 따라 빌드됩니다. 하지만 되도록 _를 사용할 것을 권장합니다.

연산(Operations)

Sass는 기본적인 연산 기능을 지원합니다.
레이아웃 작업시 상황에 맞게 크기를 계산을 하거나 정해진 값을 나눠서 작성할 경우 유용합니다.
다음은 Sass에서 사용 가능한 연산자 종류 입니다.

산술 연산자:

종류설명주의사항
+더하기
-빼기
*곱하기하나 이상의 값이 반드시 숫자(Number)
/나누기오른쪽 값이 반드시 숫자(Number)
%나머지

비교 연산자:

종류설명
==동등
!=부등
<대소 / 보다 작은
>대소 / 보다 큰
<=대소 및 동등 / 보다 작거나 같은
>=대소 및 동등 / 보다 크거나 같은

논리(불린, Boolean) 연산자:

종류설명
and그리고
or또는
not부정

숫자(Numbers)

상대적 단위 연산

일반적으론 절댓값을 나타내는 px 단위로 연산을 합니다만, 상대적 단위(%emvw 등)의 연산의 경우 CSS calc()로 연산해야 합니다.

width: 50% - 20px;  // 단위 모순 에러(Incompatible units error)
width: calc(50% - 20px);  // 연산 가능

나누기 연산의 주의사항

CSS는 속성 값의 숫자를 분리하는 방법으로 /를 허용하기 때문에 /가 나누기 연산으로 사용되지 않을 수 있습니다.
예를 들어, font: 16px / 22px serif; 같은 경우 font-size: 16px와 line-height: 22px의 속성값 분리를 위해서 /를 사용합니다.
아래 예제를 보면 나누기 연산자만 연산 되지 않고 그대로 컴파일됩니다.

SCSS:

div {
  width: 20px + 20px;  // 더하기
  height: 40px - 10px;  // 빼기
  font-size: 10px * 2;  // 곱하기
  margin: 30px / 2;  // 나누기
}

Compiled to:

div {
  width: 40px;  /* OK */
  height: 30px;  /* OK */
  font-size: 20px;  /* OK */
  margin: 30px / 2;  /* ?? */
}

따라서 /를 나누기 연산 기능으로 사용하려면 다음과 같은 조건을 충족해야 합니다.

  • 값 또는 그 일부가 변수에 저장되거나 함수에 의해 반환되는 경우
  • 값이 ()로 묶여있는 경우
  • 값이 다른 산술 표현식의 일부로 사용되는 경우

SCSS:

div {
  $x: 100px;
  width: $x / 2;  // 변수에 저장된 값을 나누기
  height: (100px / 2);  // 괄호로 묶어서 나누기
  font-size: 10px + 12px / 3;  // 더하기 연산과 같이 사용
}

Compiled to:

div {
  width: 50px;
  height: 50px;
  font-size: 14px;
}

문자(Strings)

문자 연산에는 +가 사용됩니다.
문자 연산의 결과는 첫 번째 피연산자를 기준으로 합니다.
첫 번째 피연산자에 따옴표가 붙어있다면 연산 결과를 따옴표로 묶습니다.
반대로 첫 번째 피연산자에 따옴표가 붙어있지 않다면 연산 결과도 따옴표를 처리하지 않습니다.

SCSS:

div::after {
  content: "Hello " + World;
  flex-flow: row + "-reverse" + " " + wrap
}

Compiled to:

div::after {
  content: "Hello World";
  flex-flow: row-reverse wrap;
}

색상(Colors)

색상도 연산할 수 있습니다.

SCSS:

div {
  color: #123456 + #345678;
  // R: 12 + 34 = 46
  // G: 34 + 56 = 8a
  // B: 56 + 78 = ce
  background: rgba(50, 100, 150, .5) + rgba(10, 20, 30, .5);
  // R: 50 + 10 = 60
  // G: 100 + 20 = 120
  // B: 150 + 30 = 180
  // A: Alpha channels must be equal
}

Compiled to:

div {
  color: #468ace;
  background: rgba(60, 120, 180, 0.5);
}

RGBA에서 Alpha 값은 연산되지 않으며 서로 동일해야 다른 값의 연산이 가능합니다.
Alpha 값을 연산하기 위한 다음과 같은 색상 함수(Color Functions)를 사용할 수 있습니다.

opacify()transparentize()

SCSS:

$color: rgba(10, 20, 30, .5);
div {
  color: opacify($color, .3);  // 30% 더 불투명하게 / 0.5 + 0.3
  background-color: transparentize($color, .2);  // 20% 더 투명하게 / 0.5 - 0.2
}

Compiled to:

div {
  color: rgba(10, 20, 30, 0.8);
  background-color: rgba(10, 20, 30, 0.3);
}

논리(Boolean)

Sass의 @if 조건문에서 사용되는 논리(Boolean) 연산에는 ‘그리고’,’ 또는’, ‘부정’이 있습니다.
자바스크립트 문법에 익숙하다면 &&||!와 같은 기능으로 생각하면 됩니다.

종류설명
and그리고
or또는
not부정(반대)

간단한 예제를 확인하고, 더 자세한 내용은 조건문에서 살펴보겠습니다.

SCSS:

$width: 90px;
div {
  @if not ($width > 100px) {
    height: 300px;
  }
}

Compiled to:

div {
  height: 300px;
}

재활용(Mixins)

Sass Mixins는 스타일 시트 전체에서 재사용 할 CSS 선언 그룹 을 정의하는 아주 훌륭한 기능입니다.
약간의 Mixin(믹스인)으로 다양한 스타일을 만들어낼 수 있습니다.

우선, Mixin은 두 가지만 기억하면 됩니다.
선언하기(@mixin)와 포함하기(@include) 입니다.
만들어서(선언), 사용(포함)하는 거죠!

@mixin

기본적인 Mixin 선언은 아주 간단합니다.
@mixin 지시어를 이용하여 스타일을 정의합니다.

// SCSS
@mixin 믹스인이름 {
  스타일;
}

// Sass
=믹스인이름
  스타일
// SCSS
@mixin large-text {
  font-size: 22px;
  font-weight: bold;
  font-family: sans-serif;
  color: orange;
}

// Sass
=large-text
  font-size: 22px
  font-weight: bold
  font-family: sans-serif
  color: orange

Mixin은 선택자를 포함 가능하고 상위(부모) 요소 참조(& 같은)도 할 수 있습니다.

@mixin large-text {
  font: {
    size: 22px;
    weight: bold;
    family: sans-serif;
  }
  color: orange;

  &::after {
    content: "!!";
  }

  span.icon {
    background: url("/images/icon.png");
  }
}

@include

선언된 Mixin을 사용(포함)하기 위해서는 @include가 필요합니다.
위에서 선언한 Mixin을 사용해 보겠습니다.

// SCSS
@include 믹스인이름;

// Sass
+믹스인이름

SCSS:

// SCSS
h1 {
  @include large-text;
}
div {
  @include large-text;
}

// Sass
h1
  +large-text
div
  +large-text

Compiled to:

h1 {
  font-size: 22px;
  font-weight: bold;
  font-family: sans-serif;
  color: orange;
}
h1::after {
  content: "!!";
}
h1 span.icon {
  background: url("/images/icon.png");
}

div {
  font-size: 22px;
  font-weight: bold;
  font-family: sans-serif;
  color: orange;
}
div::after {
  content: "!!";
}
div span.icon {
  background: url("/images/icon.png");
}

인수(Arguments)

Mixin은 함수(Functions)처럼 인수(Arguments)를 가질 수 있습니다.
하나의 Mixin으로 다양한 결과를 만들 수 있습니다.

// SCSS
@mixin 믹스인이름($매개변수) {
  스타일;
}
@include 믹스인이름(인수);

// Sass
=믹스인이름($매개변수)
  스타일

+믹스인이름(인수)

매개변수(Parameters)란 변수의 한 종류로, 제공되는 여러 데이터 중 하나를 가리키기 위해 사용된다.
제공되는 여러 데이터들을 전달인수(Arguments) 라고 부른다.

SCSS:

@mixin dash-line($width, $color) {
  border: $width dashed $color;
}

.box1 { @include dash-line(1px, red); }
.box2 { @include dash-line(4px, blue); }

Compiled to:

.box1 {
  border: 1px dashed red;
}
.box2 {
  border: 4px dashed blue;
}

인수의 기본값 설정

인수(argument)는 기본값(default value)을 가질 수 있습니다.
@include 포함 단계에서 별도의 인수가 전달되지 않으면 기본값이 사용됩니다.

@mixin 믹스인이름($매개변수: 기본값) {
  스타일;
}

SCSS:

@mixin dash-line($width: 1px, $color: black) {
  border: $width dashed $color;
}

.box1 { @include dash-line; }
.box2 { @include dash-line(4px); }

Compiled to:

.box1 {
  border: 1px dashed black;
}
.box2 {
  border: 4px dashed black;
}

키워드 인수(Keyword Arguments)

@mixin 믹스인이름($매개변수A: 기본값, $매개변수B: 기본값) {
  스타일;
}

@include 믹스인이름($매개변수B: 인수);

Mixin에 전달할 인수를 입력할 때 명시적으로 키워드(변수)를 입력하여 작성할 수 있습니다.
별도의 인수 입력 순서를 필요로 하지 않아 편리하게 작성할 수 있습니다.
단, 작성하지 않은 인수가 적용될 수 있도록 기본값을 설정해 주는 것이 좋습니다.

@mixin position(
  $p: absolute,
  $t: null,
  $b: null,
  $l: null,
  $r: null
) {
  position: $p;
  top: $t;
  bottom: $b;
  left: $l;
  right: $r;
}

.absolute {
  // 키워드 인수로 설정할 값만 전달
  @include position($b: 10px, $r: 20px);
}
.fixed {
  // 인수가 많아짐에 따라 가독성을 확보하기 위해 줄바꿈
  @include position(
    fixed,
    $t: 30px,
    $r: 40px
  );
}
.absolute {
  position: absolute;
  bottom: 10px;
  right: 20px;
}
.fixed {
  position: fixed;
  top: 30px;
  right: 40px;
}

가변 인수(Variable Arguments)

때때로 입력할 인수의 개수가 불확실한 경우가 있습니다.
그럴 경우 가변 인수를 사용할 수 있습니다.
가변 인수는 매개변수 뒤에 ...을 붙여줍니다.

@mixin 믹스인이름($매개변수...) {
  스타일;
}

@include 믹스인이름(인수A, 인수B, 인수C);
// 인수를 순서대로 하나씩 전달 받다가, 3번째 매개변수($bg-values)는 인수의 개수에 상관없이 받음
@mixin bg($width, $height, $bg-values...) {
  width: $width;
  height: $height;
  background: $bg-values;
}

div {
  // 위의 Mixin(bg) 설정에 맞게 인수를 순서대로 전달하다가 3번째 이후부터는 개수에 상관없이 전달
  @include bg(
    100px,
    200px,
    url("/images/a.png") no-repeat 10px 20px,
    url("/images/b.png") no-repeat,
    url("/images/c.png")
  );
}
div {
  width: 100px;
  height: 200px;
  background: url("/images/a.png") no-repeat 10px 20px,
              url("/images/b.png") no-repeat,
              url("/images/c.png");
}

위에선 인수를 받는 매개변수에 ...을 사용하여 가변 인수를 활용했습니다.
이번엔 반대로 가변 인수를 전달할 값으로 사용해 보겠습니다.

@mixin font(
  $style: normal,
  $weight: normal,
  $size: 16px,
  $family: sans-serif
) {
  font: {
    style: $style;
    weight: $weight;
    size: $size;
    family: $family;
  }
}
div {
  // 매개변수 순서와 개수에 맞게 전달
  $font-values: italic, bold, 16px, sans-serif;
  @include font($font-values...);
}
span {
  // 필요한 값만 키워드 인수로 변수에 담아 전달
  $font-values: (style: italic, size: 22px);
  @include font($font-values...);
}
a {
  // 필요한 값만 키워드 인수로 전달
  @include font((weight: 900, family: monospace)...);
}
div {
  font-style: italic;
  font-weight: bold;
  font-size: 16px;
  font-family: sans-serif;
}
span {
  font-style: italic;
  font-weight: normal;
  font-size: 22px;
  font-family: sans-serif;
}
a {
  font-style: normal;
  font-weight: 900;
  font-size: 16px;
  font-family: monospace;
}

@content

선언된 Mixin에 @content이 포함되어 있다면 해당 부분에 원하는 스타일 블록 을 전달할 수 있습니다.
이 방식을 사용하여 기존 Mixin이 가지고 있는 기능에 선택자나 속성 등을 추가할 수 있습니다.

@mixin 믹스인이름() {
  스타일;
  @content;
}

@include 믹스인이름() {
  // 스타일 블록
  스타일;
}

SCSS:

@mixin icon($url) {
  &::after {
    content: $url;
    @content;
  }
}
.icon1 {
  // icon Mixin의 기존 기능만 사용
  @include icon("/images/icon.png");
}
.icon2 {
  // icon Mixin에 스타일 블록을 추가하여 사용
  @include icon("/images/icon.png") {
    position: absolute;
  };
}

Compiled to:

.icon1::after {
  content: "/images/icon.png";
}
.icon2::after {
  content: "/images/icon.png";
  position: absolute;
}

Mixin에게 전달된 스타일 블록은 Mixin의 범위가 아니라 스타일 블록이 정의된 범위에서 평가됩니다.
즉, Mixin의 매개변수는 전달된 스타일 블록 안에서 사용되지 않고 전역 값으로 해석됩니다.
전역 변수(Global variables)와 지역 변수(Local variables)를 생각하면 좀 더 쉽습니다.

SCSS:

$color: red;

@mixin colors($color: blue) {
  // Mixin의 범위
  @content;
  background-color: $color;
  border-color: $color;
}

div {
  @include colors() {
    // 스타일 블록이 정의된 범위
    color: $color;
  }
}

Compiled to:

div {
  color: red;
  background-color: blue;
  border-color: blue;
}

확장(Extend)

특정 선택자가 다른 선택자의 모든 스타일을 가져야하는 경우가 종종 있습니다.
이럴 경우 선택자의 확장 기능을 사용할 수 있습니다.
다음 예제를 봅시다.

@extend 선택자;

SCSS:

.btn {
  padding: 10px;
  margin: 10px;
  background: blue;
}
.btn-danger {
  @extend .btn;
  background: red;
}

Compiled to:

.btn, .btn-danger {
  padding: 10px;
  margin: 10px;
  background: blue;
}
.btn-danger {
  background: red;
}

컴파일된 결과가 마음에 드시나요?
결과를 보면 ,로 구분하는 다중 선택자(Multiple Selector)가 만들어졌습니다.

사실 @extend는 다음과 같은 문제를 고려해야 합니다.

  • 내 현재 선택자(위 예제의 .btn-danger)가 어디에 첨부될 것인가?
  • 원치 않는 부작용이 초래될 수도 있는가?
  • 이 한 번의 확장으로 얼마나 큰 CSS가 생성되는가?

결과적으로 확장(Extend) 기능은 무해하거나 혹은 유익할 수도 있지만 그만큼 부작용을 가지고 있을 수 있습니다.
따라서 확장은 사용을 권장하지 않으며, 위에서 살펴본 Mixin을 대체 기능으로 사용하세요.

사용을 권장하지 않는 이유에 대해서 좀 더 자세한 정보를 원하면 Sass Guidelines Extend를 참고하세요.

함수(Functions)

자신의 함수를 정의하여 사용할 수 있습니다.
함수와 Mixins은 거의 유사하지만 반환되는 내용이 다릅니다.

Mixin은 위에서 살펴본 대로 지정한 스타일(Style)을 반환하는 반면,
함수는 보통 연산된(Computed) 특정 을 @return 지시어를 통해 반환합니다.

// Mixins
@mixin 믹스인이름($매개변수) {
  스타일;
}

// Functions
@function 함수이름($매개변수) {
  @return 값
}

사용하는 방법에도 차이가 있습니다.
Mixin은 @include 지시어를 사용하는 반면,
함수는 함수이름으로 바로 사용합니다.

// Mixin
@include 믹스인이름(인수);

// Functions
함수이름(인수)

SCSS:

$max-width: 980px;

@function columns($number: 1, $columns: 12) {
  @return $max-width * ($number / $columns)
}

.box_group {
  width: $max-width;

  .box1 {
    width: columns();  // 1
  }
  .box2 {
    width: columns(8);
  }
  .box3 {
    width: columns(3);
  }
}

Compiled to:

.box_group {
  /* 총 너비 */
  width: 980px;
}
.box_group .box1 {
  /* 총 너비의 약 8.3% */
  width: 81.66667px;
}
.box_group .box2 {
  /* 총 너비의 약 66.7% */
  width: 653.33333px;
}
.box_group .box3 {
  /* 총 너비의 25% */
  width: 245px;
}

위와 같이 함수는 @include 같은 별도의 지시어 없이 사용하기 때문에 내가 지정한 함수와 내장 함수(Built-in Functions)의 이름이 충돌할 수 있습니다.
따라서 내가 지정한 함수에는 별도의 접두어를 붙여주는 것이 좋습니다.

내장 함수란, 응용 프로그램에 내장되어 있으며 최종 사용자가 액세스 할 수 있는 기능입니다.
예를 들어, 대부분의 스프레드 시트 응용 프로그램은 행이나 열의 모든 셀을 추가하는 내장 SUM 함수를 지원합니다.

예를 들어, 색의 빨강 성분을 가져오는 내장 함수로 이미 red()가 있습니다.
같은 이름을 사용하여 함수를 정의하면 이름이 충돌하기 때문에 별도의 접두어를 붙여 extract-red() 같은 이름을 만들 수 있습니다.

// 내가 정의한 함수
@function extract-red($color) {
  // 내장 함수
  @return rgb(red($color), 0, 0);
}

div {
  color: extract-red(#D55A93);
}

혹은 모든 내장 함수의 이름을 다 알고 있을 수 없기 때문에 특별한 이름을 접두어로 사용할 수도 있습니다.
my-custom-func-red()

조건과 반복(Control Directives / Expressions)

if (함수)

조건의 값(truefalse)에 따라 두 개의 표현식 중 하나만 반환합니다.
조건부 삼항 연산자(conditional ternary operator)와 비슷합니다.

조건의 값이 true이면 표현식1을,
조건의 값이 false이면 표현식2를 실행합니다.

if(조건, 표현식1, 표현식2)

SCSS:

$width: 555px;
div {
  width: if($width > 300px, $width, null);
}

Compiled to:

div {
  width: 555px;
}

@if (지시어)

@if 지시어는 조건에 따른 분기 처리가 가능하며, if 문(if statements)과 유사합니다.
같이 사용할 수 있는 지시어는 @elseif가 있습니다.
추가 지시어를 사용하면 좀 더 복잡한 조건문을 작성할 수 있습니다.

// @if
@if (조건) {
  /* 조건이 참일 때 구문 */
}

// @if @else
@if (조건) {
  /* 조건이 참일 때 구문 */
} @else {
  /* 조건이 거짓일 때 구문 */
}

// @if @else if
@if (조건1) {
  /* 조건1이 참일 때 구문 */
} @else if (조건2) {
  /* 조건2가 참일 때 구문 */
} @else {
  /* 모두 거짓일 때 구문 */
}

조건에 ()는 생략이 가능하기 때문에, () 없이 작성하는 방법이 좀 더 편리할 수 있습니다.

$bg: true;
div {
  @if $bg {
    background: url("/images/a.jpg");
  }
}

SCSS:

$color: orange;
div {
  @if $color == strawberry {
    color: #FE2E2E;
  } @else if $color == orange {
    color: #FE9A2E;
  } @else if $color == banana {
    color: #FFFF00;
  } @else {
    color: #2A1B0A;
  }
}

Compiled to:

div {
  color: #FE9A2E;
}

조건에는 논리 연산자 andornot을 사용할 수 있습니다.

SCSS:

@function limitSize($size) {
  @if $size >= 0 and $size <= 200px {
    @return 200px;
  } @else {
    @return 800px;
  }
}

div {
  width: limitSize(180px);
  height: limitSize(340px);
}

Compiled to:

div {
  width: 200px;
  height: 800px;
}

좀 더 복잡하지만 실용적인 예제를 봅시다.
Sass의 내장 함수 unitless()는 숫자에 단위가 있는지 여부를 반환합니다.

SCSS:

@mixin pCenter($w, $h, $p: absolute) {
  @if
    $p == absolute
    or $p == fixed
    or not $p == relative
    or not $p == static
  {
    width: if(unitless($w), #{$w}px, $w);
    height: if(unitless($h), #{$h}px, $h);
    position: $p;
    top: 0;
    bottom: 0;
    left: 0;
    right: 0;
    margin: auto;
  }
}

.box1 {
  @include pCenter(10px, 20px);
}
.box2 {
  @include pCenter(50, 50, fixed);
}
.box3 {
  @include pCenter(100, 200, relative);
}

Compiled to:

.box1 {
  width: 10px;
  height: 20px;
  position: absolute;
  top: 0;
  bottom: 0;
  left: 0;
  right: 0;
  margin: auto;
}

.box2 {
  width: 50px;
  height: 50px;
  position: fixed;
  top: 0;
  bottom: 0;
  left: 0;
  right: 0;
  margin: auto;
}

@for

@for는 스타일을 반복적으로 출력합니다.
for 문과 유사합니다.

@for는 through를 사용하는 형식과 to를 사용하는 형식으로 나뉩니다.
두 형식은 종료 조건이 해석되는 방식이 다릅니다.

// through
// 종료 만큼 반복
@for $변수 from 시작 through 종료 {
  // 반복 내용
}

// to
// 종료 직전까지 반복
@for $변수 from 시작 to 종료 {
  // 반복 내용
}

차이점을 이해하기 위해 다음 예제를 살펴봅시다.
변수는 관례상 $i를 사용합니다.

SCSS:

// 1부터 3번 반복
@for $i from 1 through 3 {
  .through:nth-child(#{$i}) {
    width : 20px * $i
  }
}

// 1부터 3 직전까지만 반복(2번 반복)
@for $i from 1 to 3 {
  .to:nth-child(#{$i}) {
    width : 20px * $i
  }
}

Compiled to:

.through:nth-child(1) { width: 20px; }
.through:nth-child(2) { width: 40px; }
.through:nth-child(3) { width: 60px; }

.to:nth-child(1) { width: 20px; }
.to:nth-child(2) { width: 40px; }

to는 주어진 값 직전까지만 반복해야할 경우 유용할 수 있습니다.
그러나 :nth-child()에서 특히 유용하게 사용되는 @for는 일반적으로 through를 사용하길 권장합니다.

@each

@each는 List와 Map 데이터를 반복할 때 사용합니다.
for in 문과 유사합니다.

@each $변수 in 데이터 {
  // 반복 내용
}

List 데이터를 반복해 보겠습니다.

SCSS:

// List Data
$fruits: (apple, orange, banana, mango);

.fruits {
  @each $fruit in $fruits {
    li.#{$fruit} {
      background: url("/images/#{$fruit}.png");
    }
  }
}

Compiled to:

.fruits li.apple {
  background: url("/images/apple.png");
}
.fruits li.orange {
  background: url("/images/orange.png");
}
.fruits li.banana {
  background: url("/images/banana.png");
}
.fruits li.mango {
  background: url("/images/mango.png");
}

혹시 매번 반복마다 Index 값이 필요하다면 다음과 같이 index() 내장 함수를 사용할 수 있습니다.

SCSS:

$fruits: (apple, orange, banana, mango);

.fruits {
  @each $fruit in $fruits {
    $i: index($fruits, $fruit);
    li:nth-child(#{$i}) {
      left: 50px * $i;
    }
  }
}

Compiled to:

.fruits li:nth-child(1) {
  left: 50px;
}
.fruits li:nth-child(2) {
  left: 100px;
}
.fruits li:nth-child(3) {
  left: 150px;
}
.fruits li:nth-child(4) {
  left: 200px;
}

동시에 여러 개의 List 데이터를 반복 처리할 수도 있습니다.
단, 각 데이터의 Length가 같아야 합니다.

SCSS:

$apple: (apple, korea);
$orange: (orange, china);
$banana: (banana, japan);

@each $fruit, $country in $apple, $orange, $banana {
  .box-#{$fruit} {
    background: url("/images/#{$country}.png");
  }
}

Compiled to:

.box-apple {
  background: url("/images/korea.png");
}
.box-orange {
  background: url("/images/china.png");
}
.box-banana {
  background: url("/images/japan.png");
}

Map 데이터를 반복할 경우 하나의 데이터에 두 개의 변수가 필요합니다.

@each $key변수, $value변수 in 데이터 {
  // 반복 내용
}
$fruits-data: (
  apple: korea,
  orange: china,
  banana: japan
);

@each $fruit, $country in $fruits-data {
  .box-#{$fruit} {
    background: url("/images/#{$country}.png");
  }
}
.box-apple {
  background: url("/images/korea.png");
}
.box-orange {
  background: url("/images/china.png");
}
.box-banana {
  background: url("/images/japan.png");
}

@while

@while은 조건이 false로 평가될 때까지 내용을 반복합니다.
while 문과 유사하게 잘못된 조건으로 인해 컴파일 중 무한 루프에 빠질 수 있습니다.
사용을 권장하지 않습니다.

@while 조건 {
  // 반복 내용
}
$i: 6;

@while $i > 0 {
  .item-#{$i} {
    width: 2px * $i;
  }
  $i: $i - 2;
}
.item-6 { width: 12px; }
.item-4 { width: 8px; }
.item-2 { width: 4px; }

내장 함수(Built-in Functions)

Sass에서 기본적으로 제공하는 내장 함수에는 많은 종류가 있습니다.
모두 소개하지 않고, 주관적 경험에 의거해 필요하거나 필요할 수 있는 함수만 정리했습니다.

Sass Built-in Functions에서 모든 내장 함수를 확인할 수 있습니다.

색상(RGB / HSL / Opacity) 함수

mix($color1, $color2) : 두 개의 색을 섞습니다.

lighten($color, $amount) : 더 밝은색을 만듭니다.

darken($color, $amount) : 더 어두운색을 만듭니다.

saturate($color, $amount) : 색상의 채도를 올립니다.

desaturate($color, $amount) : 색상의 채도를 낮춥니다.

grayscale($color) : 색상을 회색으로 변환합니다.

invert($color) : 색상을 반전시킵니다.

rgba($color, $alpha) : 색상의 투명도를 변경합니다.

opacify($color, $amount) / fade-in($color, $amount) : 색상을 더 불투명하게 만듭니다.

transparentize($color, $amount) / fade-out($color, $amount) : 색상을 더 투명하게 만듭니다.

문자(String) 함수

unquote($string) : 문자에서 따옴표를 제거합니다.

quote($string) : 문자에 따옴표를 추가합니다.

str-insert($string, $insert, $index) : 문자의 index번째에 특정 문자를 삽입합니다.

str-index($string, $substring) : 문자에서 특정 문자의 첫 index를 반환합니다.

str-slice($string, $start-at, [$end-at]) : 문자에서 특정 문자(몇 번째 글자부터 몇 번째 글자까지)를 추출합니다.

to-upper-case($string) : 문자를 대문자를 변환합니다.

to-lower-case($string) : 문자를 소문자로 변환합니다.

숫자(Number) 함수

percentage($number) : 숫자(단위 무시)를 백분율로 변환합니다.

round($number) : 정수로 반올림합니다.

ceil($number) : 정수로 올림합니다.

floor($number) : 정수로 내림(버림)합니다.

abs($number) : 숫자의 절대 값을 반환합니다.

min($numbers…) : 숫자 중 최소 값을 찾습니다.

max($numbers…) : 숫자 중 최대 값을 찾습니다.

random() : 0 부터 1 사이의 난수를 반환합니다.

List 함수

모든 List 내장 함수는 기존 List 데이터를 갱신하지 않고 새 List 데이터를 반환합니다.
모든 List 내장 함수는 Map 데이터에서도 사용할 수 있습니다.

length($list) : List의 개수를 반환합니다.

nth($list, $n) : List에서 n번째 값을 반환합니다.

set-nth($list, $n, $value) : List에서 n번째 값을 다른 값으로 변경합니다.

join($list1, $list2, [$separator]) : 두 개의 List를 하나로 결합합니다.

zip($lists…) : 여러 List들을 하나의 다차원 List로 결합합니다.

index($list, $value) : List에서 특정 값의 index를 반환합니다.

Map 함수

모든 Map 내장 함수는 기존 Map 데이터를 갱신하지 않고 새 Map 데이터를 반환합니다.

map-get($map, $key) : Map에서 특정 key의 value를 반환합니다.

map-merge($map1, $map2) : 두 개의 Map을 병합하여 새로운 Map를 만듭니다.

map-keys($map) : Map에서 모든 key를 List로 반환합니다.

map-values($map) : Map에서 모든 value를 List로 반환합니다.

관리(Introspection) 함수

variable-exists(name) : 변수가 현재 범위에 존재하는지 여부를 반환합니다.(인수는 $없이 변수의 이름만 사용합니다.)

unit($number) : 숫자의 단위를 반환합니다.

unitless($number) : 숫자에 단위가 있는지 여부를 반환합니다.

comparable($number1, $number2) : 두 개의 숫자가 연산 가능한지 여부를 반환합니다.

참고 자료(References)

http://sass-lang.com/documentation
https://www.sitepoint.com/sass-basics-operators/
https://sass-guidelin.es/ko/
http://www.thesassway.com/
Selector Example Example description
.class .intro Selects all elements with class="intro"
#id #firstname Selects the element with id="firstname"
* * Selects all elements
element p Selects all <p> elements
element.class div.main Selects all elements with class="main" which in div tag
element.#id div#id Selects all elements with id="id" which in div tag
element,element div, p Selects all <div> elements and all <p> elements
element element div p Selects all <p> elements inside <div> elements
element>element div > p Selects all <p> elements where the parent is a <div> element
element+element div + p Selects all <p> elements that are placed immediately after <div> elements
element1~element2 p ~ ul Selects every <ul> element that are preceded by a <p> element
[attribute] [target] Selects all elements with a target attribute
[attribute=value] [target=_blank] Selects all elements with target="_blank"
[attribute~=value] [title~=flower] Selects all elements with a title attribute containing the word "flower"
[attribute|=value] [lang|=en] Selects all elements with a lang attribute value starting with "en"
[attribute^=value] a[href^="https"] Selects every <a> element whose href attribute value begins with "https"
[attribute$=value] a[href$=".pdf"] Selects every <a> element whose href attribute value ends with ".pdf"
[attribute*=value] a[href*="w3schools"] Selects every <a> element whose href attribute value contains the substring "w3schools"
:active a:active Selects the active link
::after p::after Insert something after the content of each <p> element
::before p::before Insert something before the content of each <p> element
:checked input:checked Selects every checked <input> element
:disabled input:disabled Selects every disabled <input> element
:empty p:empty Selects every <p> element that has no children (including text nodes)
:enabled input:enabled Selects every enabled <input> element
:first-child p:first-child Selects every <p> element that is the first child of its parent
::first-letter p::first-letter Selects the first letter of every <p> element
::first-line p::first-line Selects the first line of every <p> element
:first-of-type p:first-of-type Selects every <p> element that is the first <p> element of its parent
:focus input:focus Selects the input element which has focus
:hover a:hover Selects links on mouse over
:in-range input:in-range Selects input elements with a value within a specified range
:invalid input:invalid Selects all input elements with an invalid value
:lang(language) p:lang(it) Selects every <p> element with a lang attribute equal to "it" (Italian)
:last-child p:last-child Selects every <p> element that is the last child of its parent
:last-of-type p:last-of-type Selects every <p> element that is the last <p> element of its parent
:link a:link Selects all unvisited links
:not(selector) :not(p) Selects every element that is not a <p> element
:nth-child(n) p:nth-child(2) Selects every <p> element that is the second child of its parent
:nth-last-child(n) p:nth-last-child(2) Selects every <p> element that is the second child of its parent, counting from the last child
:nth-last-of-type(n) p:nth-last-of-type(2) Selects every <p> element that is the second <p> element of its parent, counting from the last child
:nth-of-type(n) p:nth-of-type(2) Selects every <p> element that is the second <p> element of its parent
:only-of-type p:only-of-type Selects every <p> element that is the only <p> element of its parent
:only-child p:only-child Selects every <p> element that is the only child of its parent
:optional input:optional Selects input elements with no "required" attribute
:out-of-range input:out-of-range Selects input elements with a value outside a specified range
:read-only input:read-only Selects input elements with the "readonly" attribute specified
:read-write input:read-write Selects input elements with the "readonly" attribute NOT specified
:required input:required Selects input elements with the "required" attribute specified
:root :root Selects the document's root element
::selection ::selection Selects the portion of an element that is selected by a user
:target #news:target Selects the current active #news element (clicked on a URL containing that anchor name)
:valid input:valid Selects all input elements with a valid value
:visited a:visited Selects all visited links


인라인 엘리먼트의 세로정렬

1.vertical-align

CSS에서는 가로정렬 보다 세로정렬이 훨씬 어려운데, 세로정렬을 정확히 이해하기 위해서는 세로정렬에서 가장 빈번히 사용되는 vertical-align을 정확히 이해하는 것이 필요합니다. vertical-align은 본래 인라인 엘리먼트에만 적용이 가능하며, vertical-align이 적용된 해당 인라인 엘리먼트의 한 라인 안에서의 상대적인 위치(top,middle,bottom)을 표현하는 속성입니다. 


위의 비교 그림에서 보면 알 수 있듯, vertical-align은 인라인 엘리먼트의 한 라인을 기준으로 상대적인 위치를 표현합니다. 

 이와 같은 성질을 이용하여 블록 엘리먼트도 세로 정렬을 조정하는데, 여기서 한가지 의문이 생깁니다. vertical-align는 인라인 엘리먼트에만 적용이 가능하다고 했는데 블록 엘리먼트에 어떻게 적용하지? 하는 궁금증 입니다. 이를 위해 display:inline-block 이라는 속성이 등장하게 됩니다. 즉, 블록 엘리먼트를 강제로 인라인 엘리먼트화 하여 vertical-align을 적용시켜 버리는 것이죠.


 이때 한가지 더 복잡한 문제는, 가운데 정렬 시키고 싶은 블록 엘리먼트에 vertical-align을 적용하는 것이 아니고, 그 한단계 위에 있는 부모 블록 엘리먼트에 vertical-align을 적용해야, 내가 타겟으로 삼은 블록 엘리먼트의 세로 정렬이 이루어 진다는 점입니다. 예를 통해 설명하겠습니다.


<!DOCTYPE html>
<html lang="en">
<head>
    <style>
        .container{
            background-color:rgb(125, 163, 3);
            width:600px;
            heghtㅑ:600px;
        }
        .outer{
            background-color:rgb(156, 198, 21);
            width:500px;
            height:500px;
        }
        .inner{
            background-color:rgb(202, 244, 66);
            width:400px;
            height:400px;
            margin:auto;
            display: table-cell;
            vertical-align: middle;
            text-align: center;
        }
        .centered{
            background-color:rgb(226, 255, 132);
            width:300px;
            height:300px;
            display: inline-block;
            width: 60%;
        }
        .target_p{
            background-color:white;
            width:200px;
            height:200px;
        }
        .target_span{
            background-color:white;
        }
    </style>
 
</head>
<body>
    <div class="container">
        <div class="outer">
            <div class="inner">
                <div class="centered">
 
                    <p class="target_p">
                        target_p center text?
                    </p>
                    <span class="target_span">
                        target_span center text?
                    </span>
 
                </div>
            </div>
        </div>
    </div>
 
</body>
</html>


위의 예를 보면 .centered이 .inner의 정 중앙에 위치 한 것을 알 수 있습니다. 


        .inner{
            background-color:rgb(202, 244, 66);
            width:400px;
            height:400px;
            margin:auto;
            display: table-cell;
            vertical-align: middle;
            text-align: center;
        }


        .centered{
            background-color:rgb(226, 255, 132);
            width:300px;
            height:300px;
            display: inline-block;
            width: 60%;
        }


여기서 핵심은 .inner의 display: table-cell;와 vertical-align: middle; 그리고

.centered의 display: inline-block;입니다.


먼저 .centered을 display: inline-block;으로 선언하여 인라인 엘리먼트화 시킵니다. 그리고 그 부모 블록 엘리먼트 인 .inner에서 vertical-align: middle; 을 선언하므로 그 아래의 인라인 엘리먼트 들은 세로 정렬이 되는 것이죠. 또한, text-align: center;이 선언되었으므로 상속으로 인해 자식요소들의 가로 정렬도 이루어 지게 됩니다.


블록 엘리먼트 내의 텍스트 세로정렬

위와 같은 vertical-align: middle; 의 성질을 이용하면 됩니다.


블록 엘리먼트 자체의 세로정렬

1.vertical-align의 이용


2.position:absolute;margin-left:auto; margin-right:auto; margin-top:X%;


3.position:absolute; transform:translate(X%, X%);

http://dongpal.tistory.com/2참고


4.bootstrap의 class="vertical-center", margin="auto"

한 단계 위의 블록 엘리먼트에 class="vertical-center"을 설정하면 그 바로 아래 레벨의 블록과 인라인 엘리먼트들의 세로정렬이 수행된다.


CSS를 중앙 정렬은 생각보다 복잡합니다. 구글링 해봐도, 상황에 따라 중앙정렬의 방법이 매우 상이해 도대체 같은 주제에 대해 답안이 이렇게나 다른것에 놀라울 따름이네요. 하지만, 중앙정렬의 상황을 정리해보면 위와같은 가짓수로 패턴화가 되는 것을 알 수 있다. 각 상활별 CSS 중앙정렬 방법을 알아볼 것입니다.


①인라인 엘리먼트의 가로정렬

먼저 인라인 엘리먼트를 "인라인 엘리먼트 내의 텍스트 정렬"과 "인라인 엘리먼트 자체의 정렬"로 구분하지 않은 이유는, 인라인 엘리먼트의 경우 블록이 형성되지 않아 텍스트가 쓰여지는 만큼의 영역이 되기 때문에 인라인 엘리먼트 = 텍스트 로 간주했기 때문입니다.


1. 상위 블록 엘리먼트의 text-align:center(left,right)를 상속받기


text-align은 가로정렬을 담당하는 속성인데, 이는 다음과 같은 특성을 가집니다.


text-align

CSS
.align-left { text-align: left; }
.align-center { text-align: center; }
.align-right { text-align: right; }
.align-justify { text-align: justify; }


・내용이 든  <p> 같은 종결 블록 요소에만 적용된다.

・인라인 요소에 적용되지 않으며, 구조 블록 요소에는 제대로 적용되지 않는다.

・구조 블록 요소에 text-align 속성을 지정하면 그 속성값은 자식 요소로 상속된다.

・자식 요소에 상속된 text-align속성은 자식이 인라인 요소라 하더라도 적용된다.

이때 주목해야 할 것은, text-align은 인라인 엘리먼트에는 직접 적용할 수 없는 속성이지만, 블록에 text-align을 선언하면 자식요소에 상속이 되게 되고, 상속은 인라인・블록 할 것없이 모두 적용된다는 점입니다. 이러한 상속의 특성을 이용하여 인라인 엘리먼트의 가로정렬이 가능하게 됩니다.


1
2
3
4
5
6
7
8
9
10
11
12
13
14
15
16
17
18
19
20
21
22
23
24
25
26
27
28
29
30
31
32
33
34
35
36
37
38
39
40
41
42
43
44
45
46
47
48
49
50
51
52
53
54
55
56
57
58
59
60
61
62
63
64
65
66
<!DOCTYPE html>
<html lang="en">
<head>
    <style>
        .container{
            background-color:rgb(125, 163, 3);
            width:600px;
            heghtㅑ:600px;
        }
        .outer{
            background-color:rgb(156, 198, 21);
            width:500px;
            height:500px;
        }
        .inner{
            background-color:rgb(202, 244, 66);
            width:400px;
            height:400px;
            margin:auto;
            display: table-cell;
            vertical-align: middle;
            text-align: center;
        }
        .centered{
            background-color:rgb(226, 255, 132);
            width:300px;
            height:300px;
            display: inline-block;
            width: 60%;
        }
        .target_p{
            background-color:white;
            width:200px;
            height:200px;
        }
        .target_span{
            background-color:white;
        }
    </style>
 
</head>
<body>
    <div class="container">
        <div class="outer">
            <div class="inner">
                <div class="centered">
 
                    <p class="target_p">
                        target_p center text?
                    </p>
                    <span class="target_span">
                        target_span center text?
                    </span>
 
                </div>
            </div>
        </div>
    </div>
 
</body>
</html>
cs


inner의 text-align: center;을 상속받아 .target_span의 텍스트(target_span center text?)가 중앙 정렬 된 것을 볼 수 있습니다.


②블록 엘리먼트 내의 텍스트 가로정렬

1.text-align

위에서 언급한 text-align를 사용하면 됩니다. inner의 text-align: center;을 상속받아 .target_p의 텍스트(target_p center text?)가 중앙 정렬 된 것을 볼 수 있습니다.(위의 예)


2.부트스트랩을 이용한 text-center

블록엘리먼트인 div의 클래스를 text-center로 설정하면, 그 하위레벨의 인라인엘리먼트들이 모두 중앙정렬 된다.

1
2
3
4
<div class="text-center">
    <button type="button" class="btn btn-primary" id="upload-image-button" disabled><i class="glyphicon glyphicon-film">Image analyze</i></button>
    <button type="button" class="btn btn-primary" id="upload-text-button" disabled><i class="glyphicon glyphicon-file">Text analyze</i></button>
</div>
cs


③블록 엘리먼트 자체의 가로정렬

1.float 속성

 float 속성은 블록 엘리먼트를 가로로 움직이게 할 수 있습니다. right none left 를 가지며, 가로 중앙 정렬은 가지고 있지 않습니다. 블록 엘리먼트의 가로 중앙 정렬에 사용되는 것이 margin 입니다.


<!DOCTYPE html>
<html lang="en">
<head>
    <style>
        .container{
            background-color:rgb(125, 163, 3);
            width:600px;
            heghtㅑ:600px;
        }
        .outer{
            background-color:rgb(156, 198, 21);
            width:500px;
            height:500px;
        }
        .inner{
            background-color:rgb(202, 244, 66);
            width:400px;
            height:400px;
            margin:auto;
            display: table-cell;
            vertical-align: middle;
            text-align: center;
            float:right;
        }
        .centered{
            background-color:rgb(226, 255, 132);
            width:300px;
            height:300px;
            display: inline-block;
            width: 60%;
        }
        .target_p{
            background-color:white;
            width:200px;
            height:200px;
        }
        .target_span{
            background-color:white;
        }
    </style>
 
</head>
<body>
    <div class="container">
        <div class="outer">
            <div class="inner">
                <div class="centered">
 
                    <p class="target_p">
                        target_p center text?
                    </p>
                    <span class="target_span">
                        target_span center text?
                    </span>
 
                </div>
            </div>
        </div>
    </div>
 
</body>
</html>
cs


.inner 이 오른쪽으로 이동한 것을 관찰할 수 있습니다.


2.margin 속성

margin속성은 border을 기준으로 외부의 영역에 해당 됩니다. .inner의 외부에 .outer가 있으므로 .inner의 margin을 설정하면 .outer와의 위치를 조정할 수 있습니다.


<!DOCTYPE html>
<html lang="en">
<head>
    <style>
        .container{
            background-color:rgb(125, 163, 3);
            width:600px;
            heghtㅑ:600px;
        }
        .outer{
            background-color:rgb(156, 198, 21);
            width:500px;
            height:500px;
        }
        .inner{
            background-color:rgb(202, 244, 66);
            width:400px;
            height:400px;
            margin:auto;
        }
        .centered{
            background-color:rgb(226, 255, 132);
            width:300px;
            height:300px;
            display: inline-block;
            width: 60%;
        }
        .target_p{
            background-color:white;
            width:200px;
            height:200px;
        }
        .target_span{
            background-color:white;
        }
    </style>
 
</head>
<body>
    <div class="container">
        <div class="outer">
            <div class="inner">
                <div class="centered">
 
                    <p class="target_p">
                        target_p center text?
                    </p>
                    <span class="target_span">
                        target_span center text?
                    </span>
 
                </div>
            </div>
        </div>
    </div>
 
</body>
</html>
cs


.inner가 .outer의 중앙에 위치하게 된 것을 볼 수 있습니다.


인라인 엘리먼트의 세로정렬


블록 엘리먼트 내의 텍스트 세로정렬


블록 엘리먼트 자체의 세로정렬


지난 시간엔 float 속성을 배웠는데요, float는 객체를 오른쪽 또는 왼쪽으로 정렬해서


레이아웃을 배치할 때 유용하다고 했습니다.


 [css 기초] float 속성에 대하여


오늘 배울 position 역시 레이아웃을 배치하거나, 객체를 위치시킬 때 사용할 수 있는 속성 입니다 


*position 속성은 상속되지 않음*


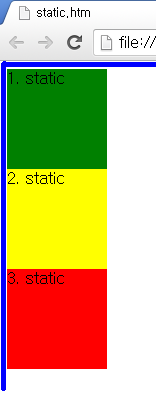
 position: static 


position: static은  초기값으로 위치를 지정하지 않을 때와 같습니다


보통 static은 사용할 일이 없지만, 앞에 설정된 position을 무시할 때 사용되기도 합니다.

top, bottom, left, right 속성값이 적용되지 않습니다.


우선 position: static 설정 할 때 html과 실행화면을 보겠습니다.


 static.htm


 <html>
<head>
<style type="text/css">
#static1
{
width:100px;
height:100px;
background-color:green;
position: static;
}

#static2
{
width:100px;
height:100px;
background-color:yellow;
position: static;
}
#static3
{
width:100px;
height:100px;
background-color:red;
position: static;
}
</style>
</head>

<body>
<div id="static1">
1. static
</div>
<div id="static2">
2. static
</div>
<div id="static3">
3. static
</div>
</body>
</html>


[position: static 실행화면입니다]

float 설정하지 않은 div는 아래처럼 정렬됩니다

position: static 설정 전과 후는 따라서 같습니다...


주의: html문서 body에 margin:0, padding:0을 따로 지정하지 않으면 아래 화면처럼

공간(파란색 부분)이 있습니다. 뒤에서 다룰 relative도 마찬가지임...


 position: relative


position: relative은  위치 계산을 할 때 자신의 static의 원래 위치를 기준으로 계산합니다.


위(top), 아래(bottom), 좌(left), 우(right)의 위치를 같이 설정할 수도 있습니다.


사용 예:


#relative

{

position: relative;

}


#relative2

{

position: relative;

top: 0px'

left: 100px;

}


html 작성을 해 보겠습니다...


 relative.htm


<!DOCTYPE html>
<html>
<head>
<style type="text/css">
#static
{
width:100px;
height:100px;
background-color:green;

position: static;
}

#relative2
{
width:100px;
height:100px;
background-color:yellow;
position:relative;
top:0px;
left:100px;
}
#relative3
{
width:100px;
height:100px;
background-color:red;
position:relative;
top:0px;
left:200px;
}
</style>
</head>

<body>
<div id="static">
1. static
</div>
<div id="relative2">
2. relative
</div>
<div id="relative3">
3. relative
</div>
</body>
</html>


[position: relative 실행 화면입니다]

 position: static 실행 화면을 같이 참조해주세요.

2번 노란 사각형은 원래의 위치에서 위 0px, 왼쪽 100px

3번 빨간 사각형은 원래의 위치에서 위 0px, 왼쪽 200px으로 지정한 것입니다.


 position: absolute


position: absolute은 relative와 달리 문서의 원래 위치와 상관없이 위치를 지정할 수 있습니다.

하지만  가장 가까운 상위 요소를 기준으로(단, static은 제외) 위치가 결정됩니다.

상위 요소가 없으면 위치는 html를 기준으로 설정됩니다.


relative와 마찬가지로 위(top), 아래(bottom), 좌(left), 우(right)의 위치를 같이 설정할 수 있습니다


사용 예:

#absolute

{

position: absolute;

top: 0px'

left: 100px;

}


 absolute.htm


<ins id="aswift_2_expand" style="margin: 0px; padding: 0px; border: currentcolor; width: 700px; height: 0px; display: inline-table; visibility: visible; position: relative;"><ins id="aswift_2_anchor" style="margin: 0px; padding: 0px; border: currentcolor; width: 700px; height: 0px; overflow: hidden; display: block; visibility: visible; opacity: 0;"><iframe name="aswift_2" width="700" height="60" id="aswift_2" frameborder="0" marginwidth="0" marginheight="0" scrolling="no" vspace="0" hspace="0" allowfullscreen="true" style="left: 0px; top: 0px; width: 700px; height: 60px; " allowtransparency="true"></iframe></ins></ins>


 <!DOCTYPE html>
<html>
<head>
<style type="text/css">
#static
{
width:100px;
height:100px;
background-color:green;

position: static;
}

#absolute2
{
width:100px;
height:100px;
background-color:yellow;
position:absolute;
top: 0px;
left:100px;
}
#absolute3
{
width:100px;
height:100px;
background-color:red;
position:absolute;
top: 0px;
left: 200px;
}
</style>
</head>

<body>
<div id="static">
1. static
</div>
<div id="absolute2">
2. absolute
</div>
<div id="absolute3">
3. absolute
</div>
</body>
</html>


 [position:absolute 실행화면입니다]


1. static, 2. absolute(top 0px left 100px) 3 absolute(top 0px left: 200px)로 설정함

absolute는 static이나 relative와 다르게 바깥 쪽에 공간이 생기지 않습니다


위에서 absolute는 상위 요소를 기준으로 위치가 결정된다고 했습니다.

이번엔 상위에 div를 만들고 그 안에 absolute 2개를 넣어 보겠습니다.


1. relative(top 100px left 100px) 2. absolute(top 0px left 100px) 3. absolute(top 0px left 200px)로 설정함


 reab.htm


<!DOCTYPE html>
<html>
<head>
<style type="text/css">
#relative
{
width:300px;
height:300px;
background-color:green;
position: relative;
top: 100px;
left: 100px;
}

#absolute2
{
width:100px;
height:100px;
background-color:yellow;
position:absolute;
top:0px;
left:100px;
}
#absolute3
{
width:100px;
height:100px;
background-color:red;
position:absolute;
top: 0px;
left: 200px;
}
</style>
</head>

<body>
<div id="relative">
<div id="absolute2">
2. absolute
</div>
<div id="absolute3">
3. absolute
</div>
</div>
</body>
</html>


실행하면, relative(녹색) 안에 설정된 absolute는 녹색 부분으로부터 시작해서 위치가 결정됨을 알 수 있습니다.


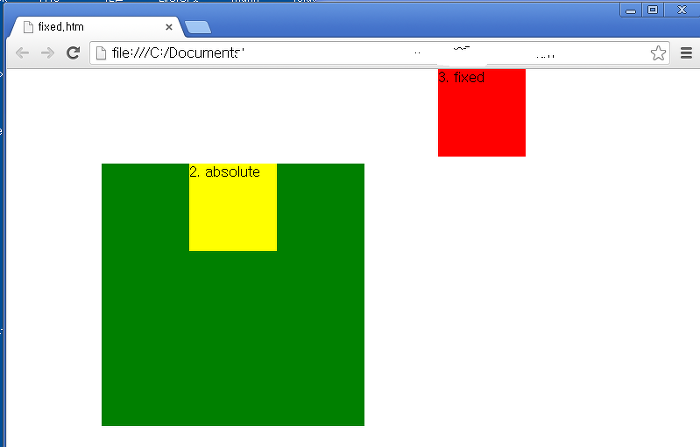
 position: fixed


position: fixed 브라우저 화면의 상대 위치입니다.


따라서 화면이 바뀌더라도 고정된 위치를 설정할 수 있습니다.(상위 요소에 영향을 받지 않음)


마찬가지로 위(top), 아래(bottom), 좌(left), 우(right)의 위치도 같이 설정할 수 있습니다.


IE7, IE8은 position: fixed 값이 적용되지 않으므로  문서 타입을 규정해주어야 합니다.


DOCTYPE 선언하는 이유와 버전별 선언 정리 (HTML5, HTML 4, XHTML)


사용 예:

#fixed

{

position: fixed;

right: 100px'

bottom: 100px;

}


 fixed.htm


 <!DOCTYPE html>
<html>
<head>
<style type="text/css">
#relative
{
width:300px;
height:300px;
background-color:green;
position: relative;
top: 100px;
left: 100px;
}

#absolute2
{
width:100px;
height:100px;
background-color:yellow;
position:absolute;
top:0px;
left:100px;
}
#fixed3
{
width:100px;
height:100px;
background-color:red;
position:fixed;
top: 0px;
right: 200px;
}
</style>
</head>

<body>
<div id="relative">
<div id="absolute2">
2. absolute
</div>
<div id="fixed3">
3. fixed
</div>
</div>
</body>
</html>


[position: fixed 실행화면입니다]


상위 요소를 설정했는데도 fixed는 그에 영향 받지 않고 위치를 결정할 수 있습니다.


웹페이지에서 항상 따라다니는 광고나 공지가 바로 이 fixed를 설정한 객체입니다.


1. relative(top 100px left 100px) 2. absolute(top 0px left 100px) 3. fixed(top 0px right 200px)로 설정함


오늘은 position으로 레이아웃을 배치하는 법을 배워보았는데요,


다음 시간에는 여러 객체가 겹칠 때 어느 객체가 앞으로 나올지 결정하는 속성 z-index를 배워 볼게요


출처: http://aboooks.tistory.com/82 [지구별 안내서]


자식, 자손요소들은 부모의 속성값을 그대로 상속받습니다.


먼저 부모, 자식, 자손 요소에 대해 알아볼까요? 우리가 생각하는 가계도와 똑같습니다.
일단 제일 위에 값을 부모라고 합니다. 그 바로 밑에 위치하는 애들이 자식요소입니다.
이 자식 요소안에 위치하는 애들은 자손입니다.
모든 부모에게 부모가 있는 것처럼 부모요소 또한 상위개념 요소에게는 자식요소가 됩니다.


상속

자식, 자손요소는 부모요소의 속성값을 상속받습니다.


하지만 상속은 절대적인 것은 아닙니다.
상속이 안되는 속성값도 있고, 특정속성을 상속받지 않는 태그도 있습니다.


예를 들어, color 속성은 상속되게 되는데, 부모요소인 #parent에 color값을 주면 자식, 자손들이 상속받습니다.


<div id="parent">
   <h1>나는 자식입니다.</h1>
   <p>나도 자식입니다.</p>
   <div>
   <span>나는 자손이에요</span>
   </div>
</div>


css 적용 우선순위


CSS의 특성상 중복되는 속성이 등장 할 수 있는데 이때는 아래와 같은 특정 원칙에 따라 CSS를 처리합니다.

1. 속성값 뒤에 !important 를 붙인 속성 
2. HTML에서 style을 직접 지정한 속성 
3. #id 로 지정한 속성 
4. .클래스:추상클래스 로 지정한 속성 
5. 태그이름 으로 지정한 속성 
6. 상위 객체에 의해 상속된 속성

같은 우선 순위에 있는 경우, 쪽수가 많은 경우가 우선되며, 이마저 같은 경우 CSS에서 나중에 선언한 것이 우선되어 적용된다.

CSS에는 중복되는 속성 사용시 특정 순위에 따라 적용하는데, 이를 무시하고 절대적으로 우위에 가게 하고 싶다면 속성 값 뒤에!important 를 사용하면 된다.

!important 는 우선순위 뿐만 아니라 디자이너-개발자간 교류에서 중요한 속성이라는 표현을 할 때 쓰이기도 한다.


+ Recent posts