https://dev.to/spukas/3-reasons-to-usereducer-over-usestate-43ad


3 Reasons to useReducer() over useState()

github logo  ・2 min read  

What It Is

useReducer() is a method from the React Hooks API, similar to useState but gives you more control to manage the state. It takes a reducer function and initial state as arguments and returns the state and dispatch method:

const [state, dispatch] = React.useReducer(reducerFn, initialState, initFn);

A reducer (being called that because of the function type you would pass to an array methodArray.prototype.reduce(reducer, initialValue)) is a pattern taken from the Redux. If you are not familiar with Redux, in short, a reducer is a pure function that takes previous state and action as an argument, and returns the next state.

(prevState, action) => newState

Actions are a piece of information that describes what happened, and based on that information, the reducer specifies how the state should change. Actions are passed through the dispatch(action) method.

3 Reasons to Use It

Most of the time, you are well covered with just useState() method, which is built on top of useReducer(). But there cases when useReducer() is preferable.

Next state depends on the previous

It is always better to use this method when the state depends on the previous one. It will give you a more predictable state transition. The simple example would be:

function reducer(state, action) {
  switch (action.type) {
    case 'ADD': return { count: state.count + 1 };
    case 'SUB': return { count: state.count - 1 };
    default: return state;
  }
}

function Counter() {
  const [state, dispatch] = React.useReducer(reducer, { count: 0 });
  return (
    <>
      Count: {state.count}
      <button onClick={() => dispatch({type: 'ADD'})}>Add</button>
      <button onClick={() => dispatch({type: 'SUB'})}>Substract</button>
    </>
  );
}

Complex state shape

When the state consists of more than primitive values, like nested object or arrays. For example:

const [state, dispatch] = React.useReducer(
  fetchUsersReducer,
  {
    users: [
      { name: 'John', subscribred: false },
      { name: 'Jane', subscribred: true },
    ],
    loading: false,
    error: false,
  },
);

It is easier to manage this local state, because the parameters depends from each other and the all the logic could be encapsulated into one reducer.

Easy to test

Reducers are pure functions, and this means they have no side effects and must return the same outcome given the same arguments. It is easier to test them because they do not depend on React. Let's take a reducer from the counter example and test it with a mock state:

test("increments the count by one", () => {
  const newState = reducer({ count: 0 }, { type: "ADD" });
  expect(newState.count).toBe(1)
})

Conclusion

useReducer() is an alternative to useState() which gives you more control over the state management and can make testing easier. All the cases can be done with useState() method, so in conclusion, use the method that you are comfortable with, and it is easier to understand for you and colleagues.


'frameworks > react' 카테고리의 다른 글

React + ESLint + airbnb + vscode 세팅  (1) 2020.09.13
Exporting Data to Excel with React  (0) 2020.04.08
How to Use the useReducer Hook  (0) 2020.03.29
How the useContext Hook Works  (0) 2020.03.28
How the useEffect Hook Works  (0) 2020.03.28


https://daveceddia.com/usereducer-hook-examples/


How to Use the useReducer Hook

Out of all the new React Hooks, and maybe just based on the name alone, this one seems poised to make the most 🔥 🔥 🔥

The word “reducer” evokes images of Redux for many – but you don’t have to understand Redux to read this post, or to use the new useReducer hook that comes with the React 16.8.

We’ll talk about what a “reducer” actually is, how you can take advantage of useReducer to manage complex state in your components, and what this new hook might mean for Redux. Will Redux get the hook? (I’m sorry, these puns just write themselves I can’t stop it)

In this post we’re looking at the useReducer hook. It’s great for managing more complicated state than you would want to manage with useState on its own.

Watch this video explaining what you can do with the useReducer hook (or just keep reading).

What’s a Reducer?

If you’re familiar with Redux or the reduce method on arrays, you know what a “reducer” is. If you aren’t familiar, a “reducer” is a fancy word for a function that takes 2 values and returns 1 value.

If you have an array of things, and you want to combine those things into a single value, the “functional programming” way to do that is to use Array’s reduce function. For instance, if you have an array of numbers and you want to get the sum, you can write a reducer function and pass it to reduce, like this:

let numbers = [1, 2, 3];
let sum = numbers.reduce((total, number) => {
  return total + number;
}, 0);

If you haven’t seen this before it might look a bit cryptic. What this does is call the function for each element of the array, passing in the previous total and the current element number. Whatever you return becomes the new total. The second argument to reduce (0 in this case) is the initial value for total. In this example, the function provided to reduce (a.k.a. the “reducer” function) will be called 3 times:

  • Called with (0, 1), returns 1.
  • Called with (1, 2), returns 3.
  • Called with (3, 3), returns 6.
  • reduce returns 6, which gets stored in sum.

Ok, but, what about useReducer?

I spent half a page explaining Array’s reduce function because, well, useReducer takes the same arguments, and basically works the same way. You pass a reducer function and an initial value (initial state). Your reducer receives the current state and an action, and returns the new state. We could write one that works just like the summation reducer:

useReducer((state, action) => {
  return state + action;
}, 0);

So… what triggers this? How does the action get in there? Good question.

useReducer returns an array of 2 elements, similar to the useState hook. The first is the current state, and the second is a dispatch function. Here’s how it looks in practice:

const [sum, dispatch] = useReducer((state, action) => {
  return state + action;
}, 0);

Notice how the “state” can be any value. It doesn’t have to be an object. It could be a number, or an array, or anything else.

Let’s look at a complete example of a component using this reducer to increment a number:

import React, { useReducer } from 'react';

function Counter() {
  // First render will create the state, and it will
  // persist through future renders
  const [sum, dispatch] = useReducer((state, action) => {
    return state + action;
  }, 0);

  return (
    <>
      {sum}

      <button onClick={() => dispatch(1)}>
        Add 1
      </button>
    </>
  );
}

Give it a try in this CodeSandbox.

You can see how clicking the button dispatches an action with a value of 1, which gets added to the current state, and then the component re-renders with the new (larger!) state.

I’m intentionally showing an example where the “action” doesn’t have the form { type: "INCREMENT_BY", value: 1 } or some other such thing, because the reducers you create don’t have to follow the typical patterns from Redux. The world of Hooks is a new world: it’s worth considering whether you find old patterns valuable and want to keep them, or whether you’d rather change things up.

A More Complex Example

Let’s look at an example that does more closely resemble a typical Redux reducer. We’ll create a component to manage a shopping list. We’ll see another hook here, too: useRef.

First we need to import the two hooks:

import React, { useReducer, useRef } from 'react';

Then create a component that sets up a ref and a reducer. The ref will hold a reference to a form input, so that we can extract its value. (We could also manage the input with state, passing the value and onChange props as usual, but this is a good chance to show off the useRef hook!)

function ShoppingList() {
  const inputRef = useRef();
  const [items, dispatch] = useReducer((state, action) => {
    switch (action.type) {
      // do something with the action
    }
  }, []);

  return (
    <>
      <form onSubmit={handleSubmit}>
        <input ref={inputRef} />
      </form>
      <ul>
        {items.map((item, index) => (
          <li key={item.id}>
            {item.name}
          </li>
        ))}
      </ul>
    </>
  );
}

Notice that our “state” in this case is an array. We’re initializing it to an empty array (the second argument to useReducer) and will be returning an array from the reducer function soon.

The useRef Hook

A quick aside, and then we’ll get back to the reducer, but I wanted to explain what useRef does.

The useRef hook allows you to create a persistent ref to a DOM node. Calling useRef creates an empty one (or you can initialize it to a value by passing an argument). The object it returns has a property current, so in the example above we can access the input’s DOM node with inputRef.current. If you’re familiar with React.createRef(), this works very much the same.

The object returned by useRef is more than just a way to hold a DOM reference, though. It can hold any value specific to this component instance, and it persists between renders. Sound familiar? It should!

useRef can be used to create generic instance variables, just like you can do with a React class component with this.whatever = value. The only thing is, writing to it counts as a “side effect” so you can’t change it during a render – only inside the body of a useEffect hook. The official Hooks FAQ has an example of using a ref as an instance variable.

Back to the useReducer example…

We’ve wrapped the input with a form so that pressing Enter will trigger the submit function. Now need to write the handleSubmit function that will add an item to the list, as well as handle the action in the reducer.

function ShoppingList() {
  const inputRef = useRef();
  const [items, dispatch] = useReducer((state, action) => {
    switch (action.type) {
      case 'add':
        return [
          ...state,
          {
            id: state.length,
            name: action.name
          }
        ];
      default:
        return state;
    }
  }, []);

  function handleSubmit(e) {
    e.preventDefault();
    dispatch({
      type: 'add',
      name: inputRef.current.value
    });
    inputRef.current.value = '';
  }

  return (
    // ... same ...
  );
}

We’ve filled out the reducer function with two cases: one for when the action has type === 'add', and the default case for everything else.

When the reducer gets the “add” action, it returns a new array that includes all the old elements, plus the new one at the end.

We’re using the length of the array as a sort of auto-incrementing (ish) ID. This works for our purposes here, but it’s not a great idea for a real app because it could lead to duplicate IDs, and bugs. (better to use a library like uuid or let the server generate a unique ID!)

The handleSubmit function is called when the user presses Enter in the input box, and so we need to call preventDefault to avoid a full page reload when that happens. Then it calls dispatch with an action. In this app, we’re deciding to give our actions a more Redux-y shape – an object with a type property and some associated data. We’re also clearing out the input.

Try the project at this stage in this CodeSandbox.


Another example

import React, { useReducer } from 'react';

function Count() {
const initialState = {count: 0};

function reducer(state, action) {
switch (action.type) {
case 'increment':
return {count: state.count + 1};
case 'decrement':
return {count: state.count - 1};
default:
throw new Error();
}
}

const [state, dispatch] = useReducer(reducer, initialState);
return (
<>
Count: {state.count}
<button onClick={() => dispatch({type: 'decrement'})}>-</button>
<button onClick={() => dispatch({type: 'increment'})}>+</button>
</>
);
}

export default Count;
so dispatch function's parameter({type: 'decrement'}) is getting into the reducer function's second parameter(action).(reducer function is first parameter is useReducer). With this structure, dispatch could change the state with logic inside. This is the main different setState.


Remove an Item

Now let’s add the ability to remove an item from the list.

We’ll add a “delete” <button> next to the item, which will dispatch an action with type === "remove" and the index of the item to remove.

Then we just need to handle that action in the reducer, which we’ll do by filtering the array to remove the doomed item.

function ShoppingList() {
  const inputRef = useRef();
  const [items, dispatch] = useReducer((state, action) => {
    switch (action.type) {
      case 'add':
        // ... same as before ...
      case 'remove':
        // keep every item except the one we want to remove
        return state.filter((_, index) => index != action.index);
      default:
        return state;
    }
  }, []);

  function handleSubmit(e) { /*...*/ }

  return (
    <>
      <form onSubmit={handleSubmit}>
        <input ref={inputRef} />
      </form>
      <ul>
        {items.map((item, index) => (
          <li key={item.id}>
            {item.name}
            <button
              onClick={() => dispatch({ type: 'remove', index })}
            >
              X
            </button>
          </li>
        ))}
      </ul>
    </>
  );
}

Try it in CodeSandbox.

Exercise: Clear the List

We’ll add one more feature: a button that clears the list. This one is an exercise!

Insert a button above the <ul> and give it an onClick prop that dispatches an action with type “clear”. Then, add a case to the reducer that handles the “clear” action.

Open up the previous CodeSandbox checkpoint and make your changes (don’t worry, it won’t overwrite my sandbox).

Did you try it? Got it working? Nice job!

Did you scroll down hoping to just read the answer? I guarantee this Hooks stuff will seem a lot less magical once you try it out a bit on your own, so I urge you to give it a try!

So… is Redux Dead?

Many peoples’ first thought upon seeing the useReducer hook went something like… “well, React has reducers built in now, and it has Context to pass data around, so Redux is dead!” I wanted to give some thoughts on that here, because I bet you might be wondering.

I don’t think useReducer will kill Redux any more than Context killed Redux (it didn’t). I do think this further expands React’s capabilities in terms of state management, so the cases where you truly need Redux might be diminished.

Redux still does more than Context + useReducer combined – it has the Redux DevTools for great debugging, and middleware for customizability, and a whole ecosystem of helper libraries. You can pretty safely argue that Redux is used in plenty of places where it is overkill (including almost every example that teaches how to use it, mine included!), but I think it still has sticking power.

Redux provides a global store where you can keep app data centralized. useReducer is localized to a specific component. Nothing would stop you from building your own mini-Redux with useReducer and useContext, though! And if you want to do that, and it fits your needs, go for it! (plenty of people on Twitter already have, and posted screenshots) I’d still miss the DevTools personally, but I’m sure there’ll be 5 or 10 or 300 npm packages for that shortly, if there aren’t already.

tl;dr – Redux isn’t dead. Hooks don’t obsolete Redux. Hooks are pretty new though, and I’m excited to see what new stuff the community builds with them.

Try It Out Yourself!

Here are a few tiny apps you can build to try out the useReducer hook on your own:

  • Make a “room” with a light that has 4 levels – off, low, medium, high – and change the level each time you press a button.
  • Make a “keypad” with 6 buttons that must be pressed in the correct order to unlock it. Each correct button press advances the state. Incorrect button presses reset it.


'frameworks > react' 카테고리의 다른 글

Exporting Data to Excel with React  (0) 2020.04.08
3 Reasons to useReducer() over useState()  (0) 2020.03.30
How the useContext Hook Works  (0) 2020.03.28
How the useEffect Hook Works  (0) 2020.03.28
Using the Effect Hook  (0) 2020.03.28

https://daveceddia.com/usecontext-hook/


How the useContext Hook Works

The useContext Hook

There’s a running theme between all these new React Hooks: almost all of them exist to make function components as powerful as class Components.

The useContext hook is a little different though. It just makes things nicer.

In case you haven’t heard of React’s Context API, it’s a way to pass data deeply throughout your app without having to manually pass props down through multiple levels. It can be a good alternative to tools like Redux when all you need to do is pass data around, and you can learn more about Context and how it compares to Redux here.

In this post we’ll look at how useContext makes Context a little easier to consume.

The Standard Way

The typical way to use the Context API looks like this:

import React from "react";
import ReactDOM from "react-dom";

// Create a Context
const NumberContext = React.createContext();
// It returns an object with 2 values:
// { Provider, Consumer }

function App() {
  // Use the Provider to make a value available to all
  // children and grandchildren
  return (
    <NumberContext.Provider value={42}>
      <div>
        <Display />
      </div>
    </NumberContext.Provider>
  );
}

function Display() {
  // Use the Consumer to grab the value from context
  // Notice this component didn't get any props!
  return (
    <NumberContext.Consumer>
      {value => <div>The answer is {value}.</div>}
    </NumberContext.Consumer>
  );
}

ReactDOM.render(<App />, document.querySelector("#root"));

Here’s the example on CodeSandbox.

See how we get the value inside the Display component? We have to wrap our content in a NumberContext.Consumer and use the render props pattern – passing a function as a child – to retrieve the value and display it.

This works fine, and “render props” is a great pattern for passing dynamic data around, but it does introduce some unnecessary nesting and some cognitive overhead (especially if you’re not used to it).

I cover the Context API in more depth here.

The useContext Way

Let’s rewrite the Display using the new useContext hook and see what it looks like:

// import useContext (or we could write React.useContext)
import React, { useContext } from 'react';

// ...

function Display() {
  const value = useContext(NumberContext);
  return <div>The answer is {value}.</div>;
}

That’s all there is to it. Call useContext, pass in the context object you got from React.createContext, and out pops the value. Easier to read, right?

The only thing you want to watch out for is that you have to pass the whole context object to useContext – not just the consumer! React will warn you if you forget, but try to rememeber, eh?

Nested Consumers

You might have a case where your component needs to receive data from multiple parent contexts, leading to code like this:

function HeaderBar() {
  return (
    <CurrentUser.Consumer>
      {user =>
        <Notifications.Consumer>
          {notifications =>
            <header>
              Welcome back, {user.name}!
              You have {notifications.length} notifications.
            </header>
          }
      }
    </CurrentUser.Consumer>
  );
}

This is an awful lot of nesting just to receive 2 values. Here’s what it can look like with useContext:

function HeaderBar() {
  const user = useContext(CurrentUser);
  const notifications = useContext(Notifications);

  return (
    <header>
      Welcome back, {user.name}!
      You have {notifications.length} notifications.
    </header>
  );
}

Much easier to read.

If you want to connect provider and consumer in different file

How can I implement this if the provider and the consumer are in different files?

D
Dave Ceddia
0 points
12 months ago

Export the Context from where it's created, and import it wherever you need the Provider and Consumer. If you have an egghead membership I have a lesson describing how to do this here.


context.js

import { createContext } from 'react';

const Context = createContext();

export default Context


app.js

import React, { useState } from 'react';
import './App.css';
import Display from './components/Display';
import Context from './components/Context';

function App() {

return (
<div className="App">
<body>
<Context.Provider value={42}>
<div>
<Display />
</div>
</Context.Provider>
</body>
</div>
);
}

export default App;


Display.js

import React from "react";
import Context from "./Context";

// It returns an object with 2 values:
// { Provider, Consumer }

function Display() {
// Use the Consumer to grab the value from context
// Notice this component didn't get any props!
return (
<Context.Consumer>
{value => <div>The answer is {value}.</div>}
</Context.Consumer>
);
}

export default Display;


'frameworks > react' 카테고리의 다른 글

3 Reasons to useReducer() over useState()  (0) 2020.03.30
How to Use the useReducer Hook  (0) 2020.03.29
How the useEffect Hook Works  (0) 2020.03.28
Using the Effect Hook  (0) 2020.03.28
Using the State Hook  (0) 2020.03.28

https://daveceddia.com/useeffect-hook-examples/


The useEffect Hook


Picture this: you have a perfectly good function component, and then one day, you need to add a lifecycle method to it.

Ugh.

“Maybe I can work around it somehow?” eventually turns to “oooook FINE I’ll convert it to a class.”

Cue the class Thing extends React.Component, and copy-pasting the function body into render, and then fixing the indentation, and then finally adding the lifecycle method.

The useEffect hook gives you a better way.

With useEffect, you can handle lifecycle events directly inside function components. Namely, three of them: componentDidMountcomponentDidUpdate, and componentWillUnmount. All with one function! Crazy, I know. Let’s see an example.

import React, { useEffect, useState } from 'react';
import ReactDOM from 'react-dom';

function LifecycleDemo() {
  // It takes a function
  useEffect(() => {
    // This gets called after every render, by default
    // (the first one, and every one after that)
    console.log('render!');

    // If you want to implement componentWillUnmount,
    // return a function from here, and React will call
    // it prior to unmounting.
    return () => console.log('unmounting...');
  })

  return "I'm a lifecycle demo";
}

function App() {
  // Set up a piece of state, just so that we have
  // a way to trigger a re-render.
  const [random, setRandom] = useState(Math.random());

  // Set up another piece of state to keep track of
  // whether the LifecycleDemo is shown or hidden
  const [mounted, setMounted] = useState(true);

  // This function will change the random number,
  // and trigger a re-render (in the console,
  // you'll see a "render!" from LifecycleDemo)
  const reRender = () => setRandom(Math.random());

  // This function will unmount and re-mount the
  // LifecycleDemo, so you can see its cleanup function
  // being called.
  const toggle = () => setMounted(!mounted);

  return (
    <>
      <button onClick={reRender}>Re-render</button>
      <button onClick={toggle}>Show/Hide LifecycleDemo</button>
      {mounted && <LifecycleDemo/>}
    </>
  );
}

ReactDOM.render(<App/>, document.querySelector('#root'));

Try it out in CodeSandbox.

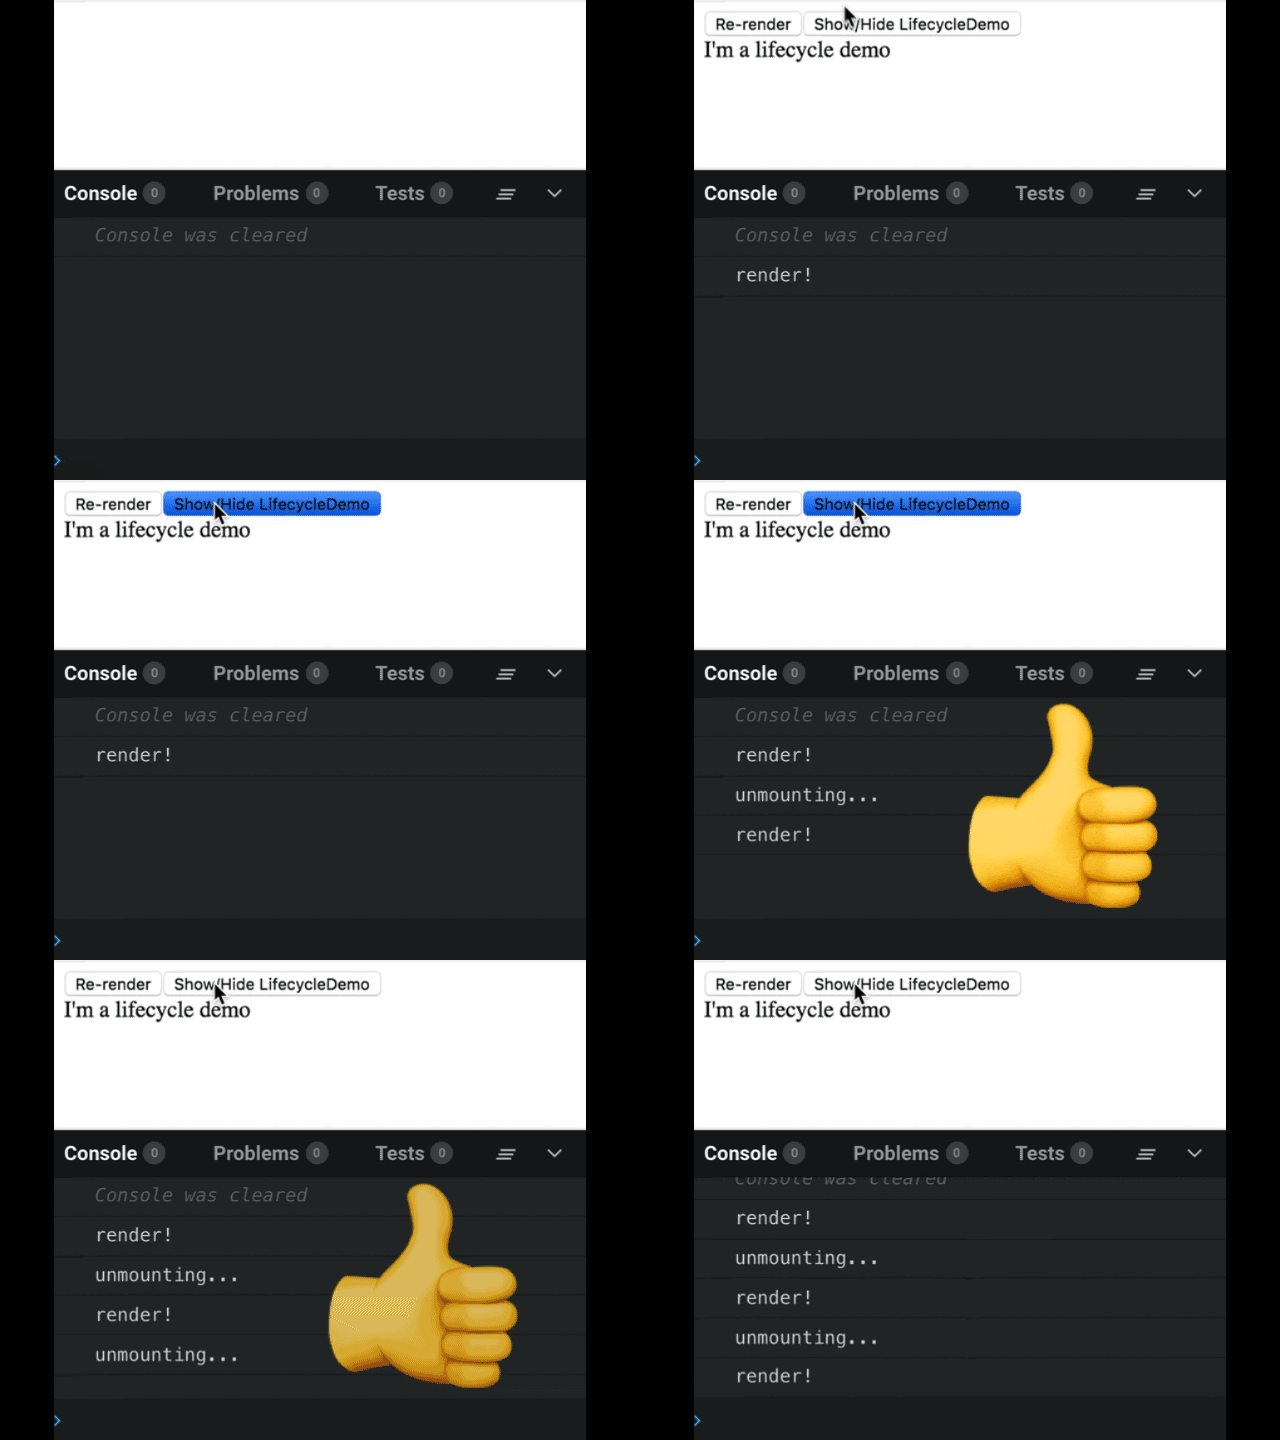
Click the Show/Hide button. Look at the console. It prints “unmounting” before it disappears, and “render!” when it reappears.
Console output of clicking show/hide

Now, try the Re-render button. With each click, it prints “render!” and it prints “umounting”. That seems weird…
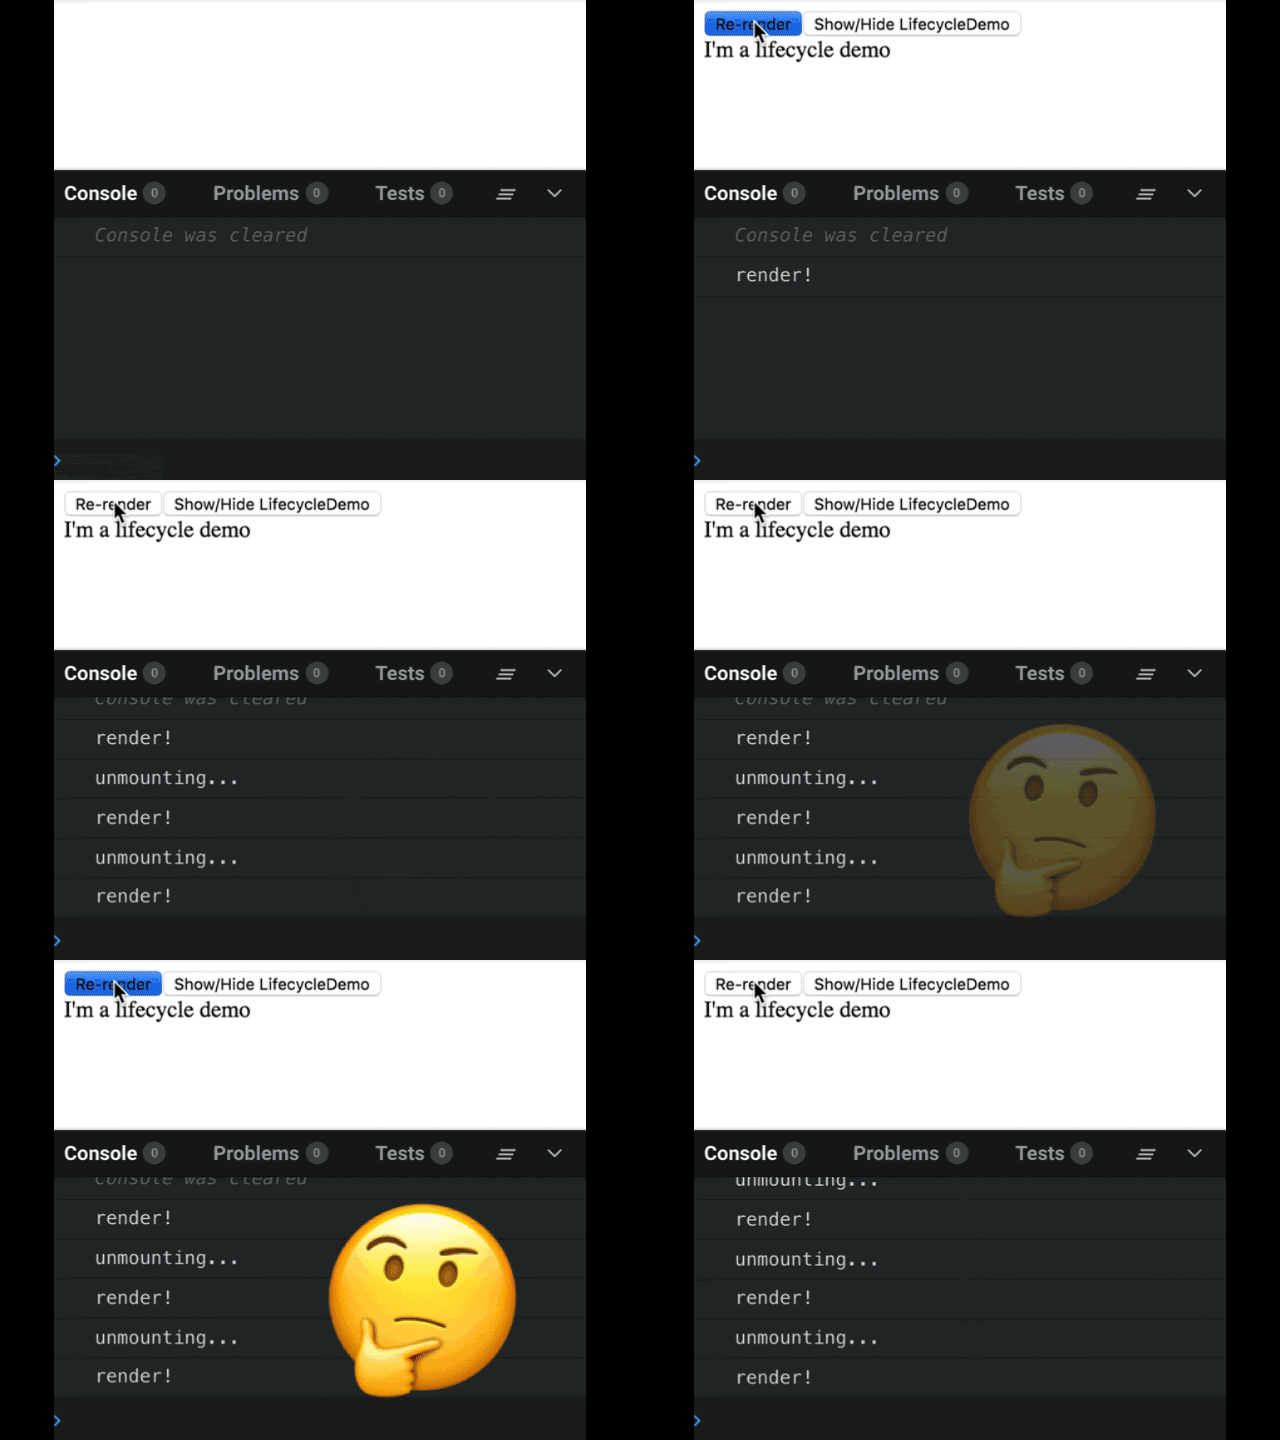
Console output of clicking Re-render

Why is it “unmounting” with every render?

Well, the cleanup function you can (optionally) return from useEffect isn’t only called when the component is unmounted. It’s called every time before that effect runs – to clean up from the last run. This is actually more powerful than the componentWillUnmount lifecycle because it lets you run a side effect before and after every render, if you need to.

Not Quite Lifecycles

useEffect runs after every render (by default), and can optionally clean up for itself before it runs again.

Rather than thinking of useEffect as one function doing the job of 3 separate lifecycles, it might be more helpful to think of it simply as a way to run side effects after render – including the potential cleanup you’d want to do before each one, and before unmounting.

Prevent useEffect From Running Every Render

If you want your effects to run less often, you can provide a second argument – an array of values. Think of them as the dependencies for that effect. If one of the dependencies has changed since the last time, the effect will run again. (It will also still run after the initial render)

const [value, setValue] = useState('initial');

useEffect(() => {
  // This effect uses the `value` variable,
  // so it "depends on" `value`.
  console.log(value);
}, [value])  // pass `value` as a dependency

Another way to think of this array: it should contain every variable that the effect function uses from the surrounding scope. So if it uses a prop? That goes in the array. If it uses a piece of state? That goes in the array.

Only Run on Mount and Unmount

You can pass the special value of empty array [] as a way of saying “only run on mount and unmount”. So if we changed our component above to call useEffect like this:

useEffect(() => {
  console.log('mounted');
  return () => console.log('unmounting...');
}, [])  // <-- add this empty array here

Then it will print “mounted” after the initial render, remain silent throughout its life, and print “unmounting…” on its way out.

This comes with a big warning, though: passing the empty array is prone to bugs. It’s easy to forget to add an item to it if you add a dependency, and if you miss a dependency, then that value will be stale the next time useEffect runs and it might cause some strange problems.

Focus On Mount

Sometimes you just want to do one tiny thing at mount time, and doing that one little thing requires rewriting a function as a class.

In this example, let’s look at how you can focus an input control upon first render, using useEffect combined with the useRef hook.

import React, { useEffect, useState, useRef } from "react";
import ReactDOM from "react-dom";

function App() {
  // Store a reference to the input's DOM node
  const inputRef = useRef();

	// Store the input's value in state
  const [value, setValue] = useState("");

  useEffect(
    () => {
      // This runs AFTER the first render,
      // so the ref is set by now.
      console.log("render");
      // inputRef.current.focus();
    },
		// The effect "depends on" inputRef
    [inputRef]
  );

  return (
    <input
      ref={inputRef}
      value={value}
      onChange={e => setValue(e.target.value)}
    />
  );
}

ReactDOM.render(<App />, document.querySelector("#root"));

At the top, we’re creating an empty ref with useRef. Passing it to the input’s ref prop takes care of setting it up once the DOM is rendered. And, importantly, the value returned by useRef will be stable between renders – it won’t change.

So, even though we’re passing [inputRef] as the 2nd argument of useEffect, it will effectively only run once, on initial mount. This is basically “componentDidMount” (except the timing of it, which we’ll talk about later).

To prove it, try out the example. Notice how it focuses (it’s a little buggy with the CodeSandbox editor, but try clicking the refresh button in the “browser” on the right). Then try typing in the box. Each character triggers a re-render, but if you look at the console, you’ll see that “render” is only printed once.

Fetch Data With useEffect

Let’s look at another common use case: fetching data and displaying it. In a class component, you’d put this code in the componentDidMount method. To do it with hooks, we’ll pull in useEffect. We’ll also need useState to store the data.

It’s worth mentioning that when the data-fetching portion of React’s new Suspense feature is ready, that’ll be the preferred way to fetch data. Fetching from useEffect has one big gotcha (which we’ll go over) and the Suspense API is going to be much easier to use.

Here’s a component that fetches posts from Reddit and displays them:

import React, { useEffect, useState } from "react";
import ReactDOM from "react-dom";

function Reddit() {
  // Initialize state to hold the posts
  const [posts, setPosts] = useState([]);

  // effect functions can't be async, so declare the
  // async function inside the effect, then call it
  useEffect(() => {
    async function fetchData() {
      // Call fetch as usual
      const res = await fetch(
        "https://www.reddit.com/r/reactjs.json"
      );

      // Pull out the data as usual
      const json = await res.json();

      // Save the posts into state
      // (look at the Network tab to see why the path is like this)
      setPosts(json.data.children.map(c => c.data));
    }

    fetchData();
  }); // <-- we didn't pass a value. what do you think will happen?

  // Render as usual
  return (
    <ul>
      {posts.map(post => (
        <li key={post.id}>{post.title}</li>
      ))}
    </ul>
  );
}

ReactDOM.render(
  <Reddit />,
  document.querySelector("#root")
);

You’ll notice that we aren’t passing the second argument to useEffect here. This is bad. Don’t do this.

Passing no 2nd argument causes the useEffect to run every render. Then, when it runs, it fetches the data and updates the state. Then, once the state is updated, the component re-renders, which triggers the useEffect again. You can see the problem.

To fix this, we need to pass an array as the 2nd argument. What should be in the array?

Go ahead, think about it for a second.

The only variable that useEffect depends on is setPosts. Therefore we should pass the array [setPosts] here. Because setPosts is a setter returned by useState, it won’t be recreated every render, and so the effect will only run once.

Fun fact: When you call useState, the setter function it returns is only created once! It’ll be the exact same function instance every time the component renders, which is why it’s safe for an effect to depend on one. This fun fact is also true for the dispatch function returned by useReducer.

Re-fetch When Data Changes

Let’s expand on the example to cover another common problem: how to re-fetch data when something changes, like a user ID, or in this case, the name of the subreddit.

First we’ll change the Reddit component to accept the subreddit as a prop, fetch the data based on that subreddit, and only re-run the effect when the prop changes:

// 1. Destructure the `subreddit` from props:
function Reddit({ subreddit }) {
  const [posts, setPosts] = useState([]);

  useEffect(() => {
    async function fetchData() {
      // 2. Use a template string to set the URL:
      const res = await fetch(
        `https://www.reddit.com/r/${subreddit}.json`
      );

      const json = await res.json();
      setPosts(json.data.children.map(c => c.data));
    }

    fetchData();

    // 3. Re-run this effect when `subreddit` changes:
  }, [subreddit, setPosts]);

  return (
    <ul>
      {posts.map(post => (
        <li key={post.id}>{post.title}</li>
      ))}
    </ul>
  );
}

// 4. Pass "reactjs" as a prop:
ReactDOM.render(
  <Reddit subreddit='reactjs' />,
  document.querySelector("#root")
);

This is still hard-coded, but now we can customize it by wrapping the Reddit component with one that lets us change the subreddit. Add this new App component, and render it at the bottom:

function App() {
  // 2 pieces of state: one to hold the input value,
  // another to hold the current subreddit.
  const [inputValue, setValue] = useState("reactjs");
  const [subreddit, setSubreddit] = useState(inputValue);

  // Update the subreddit when the user presses enter
  const handleSubmit = e => {
    e.preventDefault();
    setSubreddit(inputValue);
  };

  return (
    <>
      <form onSubmit={handleSubmit}>
        <input
          value={inputValue}
          onChange={e => setValue(e.target.value)}
        />
      </form>
      <Reddit subreddit={subreddit} />
    </>
  );
}

ReactDOM.render(<App />, document.querySelector("#root"));

Try the working example on CodeSandbox.

The app is keeping 2 pieces of state here – the current input value, and the current subreddit. Submitting the input “commits” the subreddit, which will cause Reddit to re-fetch the data from the new selection. Wrapping the input in a form allows the user to press Enter to submit.

btw: Type carefully. There’s no error handling. If you type a subreddit that doesn’t exist, the app will blow up. Implementing error handling would be a great exercise though! ;)

We could’ve used just 1 piece of state here – to store the input, and send the same value down to Reddit – but then the Reddit component would be fetching data with every keypress.

The useState at the top might look a little odd, especially the second line:

const [inputValue, setValue] = useState("reactjs");
const [subreddit, setSubreddit] = useState(inputValue);

We’re passing an initial value of “reactjs” to the first piece of state, and that makes sense. That value will never change.

But what about that second line? What if the initial state changes? (and it will, when you type in the box)

Remember that useState is stateful (read more about useState). It only uses the initial state once, the first time it renders. After that it’s ignored. So it’s safe to pass a transient value, like a prop that might change or some other variable.

A Hundred And One Uses

The useEffect function is like the swiss army knife of hooks. It can be used for a ton of things, from setting up subscriptions to creating and cleaning up timers to changing the value of a ref.

One thing it’s not good for is making DOM changes that are visible to the user. The way the timing works, an effect function will only fire after the browser is done with layout and paint – too late, if you wanted to make a visual change.

For those cases, React provides the useMutationEffect and useLayoutEffect hooks, which work the same as useEffect aside from when they are fired. Have a look at the docs for useEffect and particularly the section on the timing of effects if you have a need to make visible DOM changes.

This might seem like an extra complication. Another thing to worry about. It kinda is, unfortunately. The positive side effect of this (heh) is that since useEffect runs after layout and paint, a slow effect won’t make the UI janky. The down side is that if you’re moving old code from lifecycles to hooks, you have to be a bit careful, since it means useEffect is almost-but-not-quite equivalent to componentDidUpdate in regards to timing.

Try Out useEffect

You can try useEffect on your own in this hooks-enabled CodeSandbox. A few ideas…

  • Render an input box and store its value with useState. Then set the document.title in an effect. (like Dan’s demo from React Conf)
  • Make a custom hook that fetches data from a URL
  • Add a click handler to the document, and print a message every time the user clicks. (don’t forget to clean up the handler!)

If you’re in need of inspiration, here is Nik Graf’s Collection of React Hooks – currently at 88 and counting! Most of them are simple to implement on your own. (like useOnMount, which I bet you could implement based on what you learned in this post!)

'frameworks > react' 카테고리의 다른 글

How to Use the useReducer Hook  (0) 2020.03.29
How the useContext Hook Works  (0) 2020.03.28
Using the Effect Hook  (0) 2020.03.28
Using the State Hook  (0) 2020.03.28
Redux도입시 디렉토리 구조의 3가지 베스트 프렉티스 패턴  (0) 2020.03.16

https://ko.reactjs.org/docs/hooks-effect.html


Using the Effect Hook

Hooks는 React 16.8버전에 새로 추가되었습니다. Hook은 클래스 컴포넌트를 작성하지 않아도 state와 같은 특징들을 사용할 수 있습니다.

Effect Hook을 사용하면 함수 컴포넌트에서 side effect를 수행할 수 있습니다.

import React, { useState, useEffect } from 'react';
function Example() {
  const [count, setCount] = useState(0);

  // componentDidMount, componentDidUpdate와 같은 방식으로  useEffect(() => {    // 브라우저 API를 이용하여 문서 타이틀을 업데이트합니다.    document.title = `You clicked ${count} times`;  });
  return (
    <div>
      <p>You clicked {count} times</p>
      <button onClick={() => setCount(count + 1)}>
        Click me
      </button>
    </div>
  );
}

위의 코드는 이전 페이지의 카운터 예시를 바탕으로 하지만, 문서의 타이틀을 클릭 횟수가 포함된 문장으로 표현할 수 있도록 새로운 기능을 더했습니다.

데이터 가져오기, 구독(subscription) 설정하기, 수동으로 리액트 컴포넌트의 DOM을 수정하는 것까지 이 모든 것이 side effects입니다. 이런 기능들(operations)을 side effect(혹은 effect)라 부르는 것이 익숙하지 않을 수도 있지만, 아마도 이전에 만들었던 컴포넌트에서 위의 기능들을 구현해보았을 것입니다.

리액트의 class 생명주기 메서드에 친숙하다면, useEffect Hook을 componentDidMount와 componentDidUpdatecomponentWillUnmount가 합쳐진 것으로 생각해도 좋습니다.

리액트 컴포넌트에는 일반적으로 두 종류의 side effects가 있습니다. 정리(clean-up)가 필요한 것과 그렇지 않은 것. 이 둘을 어떻게 구분해야 할지 자세하게 알아봅시다.

정리(Clean-up)를 이용하지 않는 Effects

리액트가 DOM을 업데이트한 뒤 추가로 코드를 실행해야 하는 경우가 있습니다. 네트워크 리퀘스트, DOM 수동 조작, 로깅 등은 정리(clean-up)가 필요 없는 경우들입니다. 이러한 예들은 실행 이후 신경 쓸 것이 없기 때문입니다. class와 hook이 이러한 side effects를 어떻게 다르게 구현하는지 비교해봅시다.

Class를 사용하는 예시

리액트의 class 컴포넌트에서 render 메서드 그 자체는 side effect를 발생시키지 않습니다. 이때는 아직 이른 시기로서 이러한 effect를 수행하는 것은 리액트가 DOM을 업데이트하고 난 이후입니다.

리액트 class에서 side effect를 componentDidMount와 componentDidUpdate에 두는 것이 바로 이 때문입니다. 예시로 돌아와서 리액트가 DOM을 바꾸고 난 뒤 문서 타이틀을 업데이트하는 리액트 counter 클래스 컴포넌트를 봅시다.

class Example extends React.Component {
  constructor(props) {
    super(props);
    this.state = {
      count: 0
    };
  }

  componentDidMount() {    document.title = `You clicked ${this.state.count} times`;  }  componentDidUpdate() {    document.title = `You clicked ${this.state.count} times`;  }
  render() {
    return (
      <div>
        <p>You clicked {this.state.count} times</p>
        <button onClick={() => this.setState({ count: this.state.count + 1 })}>
          Click me
        </button>
      </div>
    );
  }
}

위 코드에서 class 안의 두 개의 생명주기 메서드에 같은 코드가 중복되는 것에 주의합시다

이는 컴포넌트가 이제 막 마운트된 단계인지 아니면 업데이트되는 것인지에 상관없이 같은 side effect를 수행해야 하기 때문입니다. 개념적으로 렌더링 이후에는 항상 같은 코드가 수행되기를 바라는 것이죠. 하지만 리액트 클래스 컴포넌트는 그러한 메서드를 가지고 있지 않습니다. 함수를 별개의 메서드로 뽑아낸다고 해도 여전히 두 장소에서 함수를 불러내야 합니다.

이제 useEffect Hook에서 같은 기능을 어떻게 구현하는지 보겠습니다.

Hook을 이용하는 예시

아래의 코드는 위에서 이미 보았던 것이지만 이번에는 좀 더 자세히 살펴보겠습니다.

import React, { useState, useEffect } from 'react';
function Example() {
  const [count, setCount] = useState(0);

  useEffect(() => {    document.title = `You clicked ${count} times`;  });
  return (
    <div>
      <p>You clicked {count} times</p>
      <button onClick={() => setCount(count + 1)}>
        Click me
      </button>
    </div>
  );
}

useEffect가 하는 일은 무엇일까요? useEffect Hook을 이용하여 우리는 리액트에게 컴포넌트가 렌더링 이후에 어떤 일을 수행해야하는 지를 말합니다. 리액트는 우리가 넘긴 함수를 기억했다가(이 함수를 ‘effect’라고 부릅니다) DOM 업데이트를 수행한 이후에 불러낼 것입니다. 위의 경우에는 effect를 통해 문서 타이틀을 지정하지만, 이 외에도 데이터를 가져오거나 다른 명령형(imperative) API를 불러내는 일도 할 수 있습니다.

useEffect를 컴포넌트 안에서 불러내는 이유는 무엇일까요? useEffect를 컴포넌트 내부에 둠으로써 effect를 통해 count state 변수(또는 그 어떤 prop에도)에 접근할 수 있게 됩니다. 함수 범위 안에 존재하기 때문에 특별한 API 없이도 값을 얻을 수 있는 것입니다. Hook은 자바스크립트의 클로저를 이용하여 리액트에 한정된 API를 고안하는 것보다 자바스크립트가 이미 가지고 있는 방법을 이용하여 문제를 해결합니다.

useEffect는 렌더링 이후에 매번 수행되는 걸까요? 네, 기본적으로 첫번째 렌더링 이후의 모든 업데이트에서 수행됩니다.(나중에 effect를 필요에 맞게 수정하는 방법에 대해 다룰 것입니다.) 마운팅과 업데이트라는 방식으로 생각하는 대신 effect를 렌더링 이후에 발생하는 것으로 생각하는 것이 더 쉬울 것입니다. 리액트는 effect가 수행되는 시점에 이미 DOM이 업데이트되었음을 보장합니다.

상세한 설명

effect에 대해 좀 더 알아보았으니 아래의 코드들을 더 쉽게 이해할 수 있을 것입니다.

function Example() {
  const [count, setCount] = useState(0);

  useEffect(() => {
    document.title = `You clicked ${count} times`;
  });
}

count state 변수를 선언한 뒤 리액트에게 effect를 사용함을 말하고 있습니다. useEffect Hook에 함수를 전달하고 있는데 이 함수가 바로 effect입니다. 이 effect 내부에서 document.title이라는 브라우저 API를 이용하여 문서 타이틀을 지정합니다. 같은 함수 내부에 있기 때문에 최신의 count를 바로 얻을 수 있습니다. 컴포넌트를 렌더링할 때 리액트는 우리가 이용한 effect를 기억하였다가 DOM을 업데이트한 이후에 실행합니다. 이는 맨 첫 번째 렌더링은 물론 그 이후의 모든 렌더링에 똑같이 적용됩니다.

숙련된 자바스크립트 개발자라면 useEffect에 전달된 함수가 모든 렌더링에서 다르다는 것을 알아챘을지도 모릅니다. 이는 의도된 것으로서, count 값이 제대로 업데이트 되는지에 대한 걱정 없이 effect 내부에서 그 값을 읽을 수 있게 하는 부분이기도 합니다. 리렌더링하는 때마다 모두 이전과 다른 effect로 교체하여 전달합니다. 이 점이 렌더링의 결과의 한 부분이 되게 만드는 점인데, 각각의 effect는 특정한 렌더링에 속합니다. 이 페이지의 뒷부분에서 이것이 왜 유용한지에 대해서 더 자세히 다룰 것입니다.

componentDidMount 혹은 componentDidUpdate와는 달리 useEffect에서 사용되는 effect는 브라우저가 화면을 업데이트하는 것을 차단하지 않습니다. 이를 통해 애플리케이션의 반응성을 향상해줍니다. 대부분의 effect는 동기적으로 실행될 필요가 없습니다. 흔하지는 않지만 (레이아웃의 측정과 같은) 동기적 실행이 필요한 경우에는 useEffect와 동일한 API를 사용하는 useLayoutEffect라는 별도의 Hook이 존재합니다.

정리(clean-up)를 이용하는 Effects

위에서 정리(clean-up)가 필요하지 않은 side effect를 보았지만, 정리(clean-up)가 필요한 effect도 있습니다. 외부 데이터에 구독(subscription)을 설정해야 하는 경우를 생각해보겠습니다. 이런 경우에 메모리 누수가 발생하지 않도록 정리(clean-up)하는 것은 매우 중요합니다. class와 Hook을 사용하는 두 경우를 비교해보겠습니다.

Class를 사용하는 예시

리액트 class에서는 흔히 componentDidMount에 구독(subscription)을 설정한 뒤 componentWillUnmount에서 이를 정리(clean-up)합니다. 친구의 온라인 상태를 구독할 수 있는 ChatAPI 모듈의 예를 들어보겠습니다. 다음은 class를 이용하여 상태를 구독(subscribe)하고 보여주는 코드입니다.

class FriendStatus extends React.Component {
  constructor(props) {
    super(props);
    this.state = { isOnline: null };
    this.handleStatusChange = this.handleStatusChange.bind(this);
  }

  componentDidMount() {    ChatAPI.subscribeToFriendStatus(      this.props.friend.id,      this.handleStatusChange    );  }  componentWillUnmount() {    ChatAPI.unsubscribeFromFriendStatus(      this.props.friend.id,      this.handleStatusChange    );  }  handleStatusChange(status) {    this.setState({      isOnline: status.isOnline    });  }
  render() {
    if (this.state.isOnline === null) {
      return 'Loading...';
    }
    return this.state.isOnline ? 'Online' : 'Offline';
  }
}

componentDidMount와 componentWillUnmount가 어떻게 대칭을 이루고 있는지를 봅시다. 두 개의 메서드 내에 개념상 똑같은 effect에 대한 코드가 있음에도 불구하고 생명주기 메서드는 이를 분리하게 만듭니다.

주의

눈썰미가 좋은 독자들은 이 예시가 완전하기 위해서는 componentDidUpdate가 필요하다는 것을 눈치챘을 것입니다. 이에 대해서는 다음 섹션에서 다룰 것입니다.

Hook을 이용하는 예시

이제 이 컴포넌트를 Hook을 이용하여 구현해봅시다.

정리(clean-up)의 실행을 위해 별개의 effect가 필요하다고 생각할 수도 있습니다. 하지만 구독(subscription)의 추가와 제거를 위한 코드는 결합도가 높기 때문에 useEffect는 이를 함께 다루도록 고안되었습니다. effect가 함수를 반환하면 리액트는 그 함수를 정리가 필요한 때에 실행시킬 것입니다.

import React, { useState, useEffect } from 'react';

function FriendStatus(props) {
  const [isOnline, setIsOnline] = useState(null);

  useEffect(() => {    function handleStatusChange(status) {      setIsOnline(status.isOnline);    }    ChatAPI.subscribeToFriendStatus(props.friend.id, handleStatusChange);    // effect 이후에 어떻게 정리(clean-up)할 것인지 표시합니다.    return function cleanup() {      ChatAPI.unsubscribeFromFriendStatus(props.friend.id, handleStatusChange);    };  });
  if (isOnline === null) {
    return 'Loading...';
  }
  return isOnline ? 'Online' : 'Offline';
}

effect에서 함수를 반환하는 이유는 무엇일까요? 이는 effect를 위한 추가적인 정리(clean-up) 메커니즘입니다. 모든 effect는 정리를 위한 함수를 반환할 수 있습니다. 이 점이 구독(subscription)의 추가와 제거를 위한 로직을 가까이 묶어둘 수 있게 합니다. 구독(subscription)의 추가와 제거가 모두 하나의 effect를 구성하는 것입니다.

리액트가 effect를 정리(clean-up)하는 시점은 정확히 언제일까요? 리액트는 컴포넌트가 마운트 해제되는 때에 정리(clean-up)를 실행합니다. 하지만 위의 예시에서 보았듯이 effect는 한번이 아니라 렌더링이 실행되는 때마다 실행됩니다. 리액트가 다음 차례의 effect를 실행하기 전에 이전의 렌더링에서 파생된 effect 또한 정리하는 이유가 바로 이 때문입니다. 이것이 버그를 방지하는 데에 어떻게 도움이 되는지 그리고 성능 저하 문제가 발생할 경우 effect를 건너뛰는 방법에 대해서 이다음으로 논의해봅시다.

주의

effect에서 반드시 유명함수(named function)를 반환해야 하는 것은 아닙니다. 목적을 분명히 하기 위해 정리(clean-up)라고 부르고 있지만 화살표 함수를 반환하거나 다른 이름으로 불러도 무방합니다.

요약

useEffect가 컴포넌트의 렌더링 이후에 다양한 side effects를 표현할 수 있음을 위에서 배웠습니다. effect에 정리(clean-up)가 필요한 경우에는 함수를 반환합니다.

no clean up : useEffect함수에 return을 전달하지 하지 않는 형태. render되고 난 직후 시행
with clean up : useEffect함수에 return으로 function을 전달하는 형태. 페이지가 unmount되기 직전 시행

  useEffect(() => {
    function handleStatusChange(status) {
      setIsOnline(status.isOnline);
    }

    ChatAPI.subscribeToFriendStatus(props.friend.id, handleStatusChange);
    return () => {
      ChatAPI.unsubscribeFromFriendStatus(props.friend.id, handleStatusChange);
    };
  });

정리(clean-up)가 필요없는 경우에는 어떤 것도 반환하지 않습니다.

  useEffect(() => {
    document.title = `You clicked ${count} times`;
  });

이처럼 effect Hook은 두 가지 경우를 한 개의 API로 통합합니다.


effect hook이 어떻게 작동하는지에 대해 충분히 이해했거나, 내용이 이해하기 어렵다고 생각된다면 다음 페이지의 Hook의 규칙로 넘어가도 좋습니다.


effect를 이용하는 팁

이제 숙련된 리액트 사용자들이라면 보다 궁금해할 useEffect에 대해 좀 더 깊이 알아보겠습니다. 이 부분은 지금 바로 읽어야 하는 것은 아니며, 언제라도 effect hook의 자세한 이해가 필요할 때 돌아와서 읽어도 좋습니다.

팁: 관심사를 구분하려고 한다면 Multiple Effect를 사용합니다

Hook이 탄생한 동기가 된 문제 중의 하나가 생명주기 class 메서드가 관련이 없는 로직들은 모아놓고, 관련이 있는 로직들은 여러 개의 메서드에 나누어 놓는 경우가 자주 있다는 것입니다. 이전의 예시에서도 보았던 카운터와 친구의 상태 지표 로직을 결합한 컴포넌트를 보겠습니다.

class FriendStatusWithCounter extends React.Component {
  constructor(props) {
    super(props);
    this.state = { count: 0, isOnline: null };
    this.handleStatusChange = this.handleStatusChange.bind(this);
  }

  componentDidMount() {
    document.title = `You clicked ${this.state.count} times`;
    ChatAPI.subscribeToFriendStatus(
      this.props.friend.id,
      this.handleStatusChange
    );
  }

  componentDidUpdate() {
    document.title = `You clicked ${this.state.count} times`;
  }

  componentWillUnmount() {
    ChatAPI.unsubscribeFromFriendStatus(
      this.props.friend.id,
      this.handleStatusChange
    );
  }

  handleStatusChange(status) {
    this.setState({
      isOnline: status.isOnline
    });
  }
  // ...

document.title을 설정하는 로직이 componentDidMount와 componentDidUpdate에 나누어져 있습니다. 구독(subscription)로직 또한 componentDidMount와 componentWillUnmount에 나누어져 있네요. componentDidMount가 두 가지의 작업을 위한 코드를 모두 가지고 있습니다.

Hook을 이용하여 이 문제를 어떻게 해결할 수 있을까요? State Hook을 여러 번 사용할 수 있는 것처럼 effect 또한 여러 번 사용할 수 있습니다. Effect를 이용하여 서로 관련이 없는 로직들을 갈라놓을 수 있습니다.

function FriendStatusWithCounter(props) {
  const [count, setCount] = useState(0);
  useEffect(() => {    document.title = `You clicked ${count} times`;
  });

  const [isOnline, setIsOnline] = useState(null);
  useEffect(() => {    function handleStatusChange(status) {
      setIsOnline(status.isOnline);
    }

    ChatAPI.subscribeToFriendStatus(props.friend.id, handleStatusChange);
    return () => {
      ChatAPI.unsubscribeFromFriendStatus(props.friend.id, handleStatusChange);
    };
  });
  // ...
}

Hook을 이용하면 생명주기 메서드에 따라서가 아니라 코드가 무엇을 하는지에 따라 나눌 수가 있습니다. 리액트는 컴포넌트에 사용된 모든 effect를 지정된 순서에 맞춰 적용합니다.

설명: effect가 업데이트 시마다 실행되는 이유

class에 익숙하다면 왜 effect 정리(clean-up)가 마운트 해제되는 때에 한번만이 아니라 모든 리렌더링 시에 실행되는지가 궁금할 것입니다. 이러한 디자인이 버그가 적은 컴포넌트를 만드는 데에 어떻게 도움이 되는지 다음의 예시를 통해 알아봅시다.

이 페이지의 위에서 봤던 친구가 온라인인지 아닌지 표시하는 FriendStatus 컴포넌트 예시를 생각해봅시다. class는 this.props로부터 friend.id를 읽어내고 컴포넌트가 마운트된 이후에 친구의 상태를 구독하며 컴포넌트가 마운트를 해제할 때에 구독을 해지합니다.

  componentDidMount() {
    ChatAPI.subscribeToFriendStatus(
      this.props.friend.id,
      this.handleStatusChange
    );
  }

  componentWillUnmount() {
    ChatAPI.unsubscribeFromFriendStatus(
      this.props.friend.id,
      this.handleStatusChange
    );
  }

그런데 컴포넌트가 화면에 표시되어있는 동안 friend prop이 변한다면 무슨 일이 일어날까요? 컴포넌트는 다른 친구의 온라인 상태를 계속 표시할 것입니다. 버그인 거죠. 또한 마운트 해제가 일어날 동안에는 구독 해지 호출이 다른 친구 ID를 사용하여 메모리 누수나 충돌이 발생할 수도 있습니다.

클래스 컴포넌트에서는 이런 경우들을 다루기 위해 componentDidUpdate를 사용합니다.

  componentDidMount() {
    ChatAPI.subscribeToFriendStatus(
      this.props.friend.id,
      this.handleStatusChange
    );
  }

  componentDidUpdate(prevProps) {    // 이전 friend.id에서 구독을 해지합니다.    ChatAPI.unsubscribeFromFriendStatus(      prevProps.friend.id,      this.handleStatusChange    );    // 다음 friend.id를 구독합니다.    ChatAPI.subscribeToFriendStatus(      this.props.friend.id,      this.handleStatusChange    );  }
  componentWillUnmount() {
    ChatAPI.unsubscribeFromFriendStatus(
      this.props.friend.id,
      this.handleStatusChange
    );
  }

리액트 애플리케이션의 흔한 버그 중의 하나가 componentDidUpdate를 제대로 다루지 않는 것입니다.

이번에는 Hook을 사용하는 컴포넌트를 생각해봅시다.

function FriendStatus(props) {
  // ...
  useEffect(() => {
    // ...
    ChatAPI.subscribeToFriendStatus(props.friend.id, handleStatusChange);
    return () => {
      ChatAPI.unsubscribeFromFriendStatus(props.friend.id, handleStatusChange);
    };
  });

이 경우에는 버그에 시달리지 않습니다.(달리 바꾼 것도 없는데 말이죠.)

useEffect가 기본적으로 업데이트를 다루기 때문에 더는 업데이트를 위한 특별한 코드가 필요 없습니다. 다음의 effect를 적용하기 전에 이전의 effect는 정리(clean-up)합니다. 구독과 구독 해지 호출을 반복해서 만들어내는 컴포넌트를 통해 이를 가시화해봅시다.

// { friend: { id: 100 } } state을 사용하여 마운트합니다.
ChatAPI.subscribeToFriendStatus(100, handleStatusChange);     // 첫번째 effect가 작동합니다.

// { friend: { id: 200 } } state로 업데이트합니다.
ChatAPI.unsubscribeFromFriendStatus(100, handleStatusChange); // 이전의 effect를 정리(clean-up)합니다.
ChatAPI.subscribeToFriendStatus(200, handleStatusChange);     // 다음 effect가 작동합니다.

// { friend: { id: 300 } } state로 업데이트합니다.
ChatAPI.unsubscribeFromFriendStatus(200, handleStatusChange); // 이전의 effect를 정리(clean-up)합니다.
ChatAPI.subscribeToFriendStatus(300, handleStatusChange);     // 다음 effect가 작동합니다.

// 마운트를 해제합니다.
ChatAPI.unsubscribeFromFriendStatus(300, handleStatusChange); // 마지막 effect를 정리(clean-up)합니다.

이러한 방식으로 동작하는 것이 일관성을 유지해주며 클래스 컴포넌트에서는 흔히 업데이트 로직을 빼먹으면서 발생할 수 있는 버그를 예방합니다.

팁: Effect를 건너뛰어 성능 최적화하기

모든 렌더링 이후에 effect를 정리(clean-up)하거나 적용하는 것이 때때로 성능 저하를 발생시키는 경우도 있습니다. 클래스 컴포넌트의 경우에는 componentDidUpdate에서 prevProps나 prevState와의 비교를 통해 이러한 문제를 해결할 수 있습니다.

componentDidUpdate(prevProps, prevState) {
  if (prevState.count !== this.state.count) {
    document.title = `You clicked ${this.state.count} times`;
  }
}

이러한 요구 조건은 흔하기 때문에 useEffect Hook API에 이미 내재하여 있습니다. 특정 값들이 리렌더링 시에 변경되지 않는다면 리액트로 하여금 effect를 건너뛰도록 할 수 있습니다. useEffect의 선택적 인수인 두 번째 인수로 배열을 넘기면 됩니다.

useEffect(() => {
  document.title = `You clicked ${count} times`;
}, [count]); // count가 바뀔 때만 effect를 재실행합니다.

위의 예시에서 우리는 [count]를 두 번째 인수로 넘깁니다. 이것이 의미하는 바는 다음과 같습니다. 만약 count가 5이고 컴포넌트가 리렌더링된 이후에도 여전히 count는 변함없이 5라면 리액트는 이전 렌더링 시의 값 [5]를 그다음 렌더링 때의 [5]와 비교합니다. 배열 내의 모든 값이 같기 때문에(5 === 5) 리액트는 effect를 건너뛰게 됩니다. 이런 식으로 최적화가 가능합니다.

count가 6으로 업데이트된 뒤에 렌더링하면 리액트는 이전에 렌더링된 값 [5]를 그다음 렌더링 시의 [6]와 비교합니다. 이때 5 !== 6 이기 때문에 리액트는 effect를 재실행합니다. 배열 내에 여러 개의 값이 있다면 그중의 단 하나만 다를지라도 리액트는 effect를 재실행합니다.

이것은 정리(clean-up)를 사용하는 effect의 경우에도 동일하게 작용합니다.

useEffect(() => {
  function handleStatusChange(status) {
    setIsOnline(status.isOnline);
  }

  ChatAPI.subscribeToFriendStatus(props.friend.id, handleStatusChange);
  return () => {
    ChatAPI.unsubscribeFromFriendStatus(props.friend.id, handleStatusChange);
  };
}, [props.friend.id]); // props.friend.id가 바뀔 때만 재구독합니다.

두 번째 인자는 빌드 시 변환에 의해 자동으로 추가될 수도 있습니다.

주의

이 최적화 방법을 사용한다면 배열이 컴포넌트 범위 내에서 바뀌는 값들과 effect에 의해 사용되는 값들을 모두 포함하는 것을 기억해주세요. 그렇지 않으면 현재 값이 아닌 이전의 렌더링 때의 값을 참고하게 됩니다. 이에 대해서는 함수를 다루는 방법과 의존성 배열이 자주 바뀔 때는 어떻게 해야 하는가에서 더 자세히 알아볼 수 있습니다.

effect를 실행하고 이를 정리(clean-up)하는 과정을 (마운트와 마운트 해제 시에)딱 한 번씩만 실행하고 싶다면, 빈 배열([])을 두 번째 인수로 넘기면 됩니다. 이렇게 함으로써 리액트로 하여금 여러분의 effect가 prop이나 state의 그 어떤 값에도 의존하지 않으며 따라서 재실행되어야 할 필요가 없음을 알게 하는 것입니다. 이는 의존성 배열의 작동 방법을 그대로 따라서 사용하는 것일 뿐이며 특별한 방법인 것은 아닙니다.

빈 배열([])을 넘기게 되면, effect 안의 prop과 state는 초깃값을 유지하게 됩니다. 빈 배열([])을 두 번째 인수로 넘기는 것이 기존에 사용하던 componentDidMount와 componentWillUnmount 모델에 더 가깝지만, effect의 잦은 재실행을 피할 수 있는 더 나은 해결방법이 있습니다. 또한 리액트는 브라우저가 다 그려질 때까지 useEffect의 실행을 지연하기 때문에 추가적인 작업을 더하는 것이 큰 문제가 되지는 않습니다.

exhaustive-deps 규칙을 eslint-plugin-react-hooks 패키지에 포함하는 것을 추천합니다. 이 패키지는 의존성이 바르지 않게 지정되었을 때 경고하고 수정하도록 알려줍니다.


https://ko.reactjs.org/docs/hooks-state.html

Using the State Hook

Hook은 React 16.8버전에 새로 추가되었습니다. Hook은 클래스 컴포넌트를 작성하지 않아도 state와 같은 특징들을 사용할 수 있습니다.

Hook 소개에서 아래 예시를 통해 Hook과 친해졌습니다.

import React, { useState } from 'react';

function Example() {
  // 새로운 state 변수를 선언하고, count라 부르겠습니다.  const [count, setCount] = useState(0);
  return (
    <div>
      <p>You clicked {count} times</p>
      <button onClick={() => setCount(count + 1)}>
        Click me
      </button>
    </div>
  );
}

아래의 클래스 예시와 비교하며 Hook의 특징에 대해 배울 예정입니다.

Hook과 같은 기능을 하는 클래스 예시

React에서 클래스를 사용해봤다면, 아래의 코드는 익숙할 겁니다.

class Example extends React.Component {
  constructor(props) {
    super(props);
    this.state = {
      count: 0
    };
  }

  render() {
    return (
      <div>
        <p>You clicked {this.state.count} times</p>
        <button onClick={() => this.setState({ count: this.state.count + 1 })}>
          Click me
        </button>
      </div>
    );
  }
}

위 코드에서 state는 { count: 0 }이며 사용자가 this.setState()를 호출하는 버튼을 클릭했을 때 state.count를 증가시킵니다. 위의 클래스 예시를 해당 페이지에서 계속 사용할 예정입니다.

주의

좀 더 현실적인 예시가 아닌, counter 예시를 사용하는지 궁금할 수 있습니다. counter 예시를 사용한 이유는, Hook을 잘 이해할 수 있도록 도와주는 가장 기초적인 내용이 될 수 있기 때문입니다.

Hook과 함수 컴포넌트

React의 함수 컴포넌트는 이렇게 생겼습니다.

const Example = (props) => {
  // 여기서 Hook을 사용할 수 있습니다!
  return <div />;
}

또는 이렇게 생겼습니다.

function Example(props) {
  // 여기서 Hook을 사용할 수 있습니다!
  return <div />;
}

함수 컴포넌트를 “state가 없는 컴포넌트”로 알고 있었을 겁니다. 하지만 Hook은 React state를 함수 안에서 사용할 수 있게 해줍니다.

Hook은 클래스 안에서 동작하지 않습니다. 하지만 클래스를 작성하지 않고 사용할 수 있습니다.

Hook이란?

React의 useState Hook을 사용해봅시다!

import React, { useState } from 'react';
function Example() {
  // ...
}

Hook이란? Hook은 특별한 함수입니다. 예를 들어 useState는 state를 함수 컴포넌트 안에서 사용할 수 있게 해줍니다. 다른 Hook들은 나중에 살펴봅시다!

언제 Hook을 사용할까? 함수 컴포넌트를 사용하던 중 state를 추가하고 싶을 때 클래스 컴포넌트로 바꾸곤 했을 겁니다. 하지만 이제 함수 컴포넌트 안에서 Hook을 이용하여 state를 사용할 수 있습니다.

주의

컴포넌트 안에서 Hook을 사용할 때 몇 가지 특별한 규칙이 있습니다. 나중에 Hook의 규칙에서 살펴보도록 할게요!

state 변수 선언하기

클래스를 사용할 때, constructor 안에서 this.state를 { count: 0 }로 설정함으로써 count를 0으로 초기화했습니다.

class Example extends React.Component {
  constructor(props) {
    super(props);
    this.state = {      count: 0    };  }

함수 컴포넌트는 this를 가질 수 없기 때문에 this.state를 할당하거나 읽을 수 없습니다. 대신, useState Hook을 직접 컴포넌트에 호출합니다.

import React, { useState } from 'react';

function Example() {
  // 새로운 state 변수를 선언하고, 이것을 count라 부르겠습니다.  const [count, setCount] = useState(0);

useState를 호출하는 것은 무엇을 하는 걸까요? “state 변수”를 선언할 수 있습니다. 위에 선언한 변수는 count라고 부르지만 banana처럼 아무 이름으로 지어도 됩니다. useState는 클래스 컴포넌트의 this.state가 제공하는 기능과 똑같습니다. 일반적으로 일반 변수는 함수가 끝날 때 사라지지만, state 변수는 React에 의해 사라지지 않습니다.

useState의 인자로 무엇을 넘겨주어야 할까요? useState()Hook의 인자로 넘겨주는 값은 state의 초기 값입니다. 함수 컴포넌트의 state는 클래스와 달리 객체일 필요는 없고, 숫자 타입과 문자 타입을 가질 수 있습니다. 위의 예시는 사용자가 버튼을 얼마나 많이 클릭했는지 알기를 원하므로 0을 해당 state의 초기 값으로 선언했습니다. (2개의 다른 변수를 저장하기를 원한다면 useState()를 두 번 호출해야 합니다.)

useState는 무엇을 반환할까요? state 변수, 해당 변수를 갱신할 수 있는 함수 이 두 가지 쌍을 반환합니다. 이것이 바로 const [count, setCount] = useState()라고 쓰는 이유입니다. 클래스 컴포넌트의 this.state.count와 this.setState와 유사합니다. 만약 이러한 문법에 익숙하지 않다면 현재 페이지의 끝에서 살펴볼게요.

이제 useState를 이용하여 많은 것을 만들 수 있습니다.

import React, { useState } from 'react';

function Example() {
  // 새로운 state 변수를 선언하고, 이것을 count라 부르겠습니다.  const [count, setCount] = useState(0);

count라고 부르는 state 변수를 선언하고 0으로 초기화합니다. React는 해당 변수를 리렌더링할 때 기억하고, 가장 최근에 갱신된 값을 제공합니다. count 변수의 값을 갱신하려면 setCount를 호출하면 됩니다.

주의

왜 createState가 아닌, useState로 이름을 지었을까요?

컴포넌트가 렌더링할 때 오직 한 번만 생성되기 때문에 “Create”라는 이름은 꽤 정확하지 않을 수 있습니다. 컴포넌트가 다음 렌더링을 하는 동안 useState는 현재 state를 줍니다. Hook 이름이 항상 use로 시작하는 이유도 있습니다. Hook의 규칙에서 나중에 살펴보도록 할게요.

state 가져오기

클래스 컴포넌트는 count를 보여주기 위해 this.state.count를 사용합니다.

  <p>You clicked {this.state.count} times</p>

반면 함수 컴포넌트는 count를 직접 사용할 수 있습니다.

  <p>You clicked {count} times</p>

state 갱신하기

클래스 컴포넌트는 count를 갱신하기 위해 this.setState()를 호출합니다.

  <button onClick={() => this.setState({ count: this.state.count + 1 })}>    Click me
  </button>

반면 함수 컴포넌트는 setCount와 count 변수를 가지고 있으므로 this를 호출하지 않아도 됩니다.

  <button onClick={() => setCount(count + 1)}>    Click me
  </button>

요약

아래 코드를 한 줄 한 줄 살펴보고, 얼마나 이해했는지 체크해봅시다.

 1:  import React, { useState } from 'react'; 2:
 3:  function Example() {
 4:    const [count, setCount] = useState(0); 5:
 6:    return (
 7:      <div>
 8:        <p>You clicked {count} times</p>
 9:        <button onClick={() => setCount(count + 1)}>10:         Click me
11:        </button>
12:      </div>
13:    );
14:  }
  • 첫 번째 줄: useState Hook을 React에서 가져옵니다.
  • 네 번째 줄: useState Hook을 이용하면 state 변수와 해당 state를 갱신할 수 있는 함수가 만들어집니다. 또한, useState의 인자의 값으로 0을 넘겨주면 count 값을 0으로 초기화할 수 있습니다.
  • 아홉 번째 줄: 사용자가 버튼 클릭을 하면 setConut 함수를 호출하여 state 변수를 갱신합니다. React는 새로운 count 변수를 Example 컴포넌트에 넘기며 해당 컴포넌트를 리렌더링합니다.

많은 것들이 있기 때문에 처음에는 다소 어려울 수 있습니다. 설명이 이해가 잘 안 된다면, 위의 코드를 천천히 다시 읽어보세요. 클래스 컴포넌트에서 사용하던 state 동작 방식을 잊고, 새로운 눈으로 위의 코드를 보면 분명히 이해가 갈 것입니다.

팁: 대괄호가 의미하는 것은 무엇일까요?

대괄호를 이용하여 state 변수를 선언하는 것을 보셨을 겁니다.

  const [count, setCount] = useState(0);

대괄호 왼쪽의 state 변수는 사용하고 싶은 이름으로 선언할 수 있습니다.

  const [fruit, setFruit] = useState('banana');

위 자바스크립트 문법은 “배열 구조 분해”라고 하고, fruit과 setFruit, 총 2개의 값을 만들고 있습니다. 즉, useState를 사용하면 fruit이라는 첫 번째 값과 setFruit라는 두 번째 값을 반환합니다. 아래의 코드와 같은 효과를 낼 수 있습니다.

  var fruitStateVariable = useState('banana'); // 두 개의 아이템이 있는 쌍을 반환
  var fruit = fruitStateVariable[0]; // 첫 번째 아이템
  var setFruit = fruitStateVariable[1]; // 두 번째 아이템

useState를 이용하여 변수를 선언하면 2개의 아이템 쌍이 들어있는 배열로 만들어집니다. 첫 번째 아이템은 현재 변수를 의미하고, 두 번째 아이템은 해당 변수를 갱신해주는 함수입니다. 배열 구조 분해라는 특별한 방법으로 변수를 선언해주었기 때문에 [0]이나 [1]로 배열에 접근하는 것은 좋지 않을 수 있습니다.

주의

this를 React에 알리지 않았는데, 어떻게 React가 특정 컴포넌트에서 useState를 사용한 것을 아는 지 궁금해할 수 있습니다. 이 질문과 다른 궁금 사항들은 나중에 살펴보겠습니다.

팁: 여러 개의 state 변수를 사용하기

[something, setSomething]의 쌍처럼 state 변수를 선언하는 것은 유용합니다. 왜냐하면 여러 개의 변수를 선언할 때 각각 다른 이름을 줄 수 있기 때문입니다.

function ExampleWithManyStates() {
  // 여러 개의 state를 선언할 수 있습니다!
  const [age, setAge] = useState(42);
  const [fruit, setFruit] = useState('banana');
  const [todos, setTodos] = useState([{ text: 'Learn Hooks' }]);

위의 코드는 agefruittodos라는 지역 변수를 가지며 개별적으로 갱신할 수 있습니다.

  function handleOrangeClick() {
    // this.setState({ fruit: 'orange' })와 같은 효과를 냅니다.
    setFruit('orange');
  }

여러 개의 state 변수를 사용하지 않아도 됩니다. state 변수는 객체와 배열을 잘 가지고 있을 수 있으므로 서로 연관있는 데이터를 묶을 수 있습니다. 하지만 클래스 컴포넌트의 this.setState와 달리 state를 갱신하는 것은 병합하는 것이 아니라 대체하는 것입니다.

독립적인 state 변수 분할에 대한 추가적인 권장 사항을 자주 묻는 질문에서 볼 수 있습니다. 자주 묻는 질문.


https://superhahnah.com/redux-directory-petterns/


Reduxでのディレクトリ構成3パターンに見る「分割」と「分散」


Redux を使っていいて、ディレクトリ構成に悩んだことはないだろうか。
もしくは、見かけるディレクトリ構成が多様で、どれがいいのか分からないなんてことはなかっただろうか。

この記事では Redux を用いる際の代表的な3パターンの構成を紹介するとともに、それぞれをソースコードの分割・分散の度合いで比べてみる。

  1. redux-way
  2. ducks
  3. re-ducks

パターン1. redux-way (あるいは Rails-style)

redux-way では、 “Redux によって導入される概念” ごとにディレクトリを分ける。
以下のようにcomponents/,containers/,reducers/,actions/,types/などとディレクトリを設けるケースが多いようだ。
それぞれのディレクトリでは、対応する component 毎にさらにファイルを分ける (以下の例ではcomponent1.js, component2.js, …)。

src/
  ├ components/
  |    ├ component1.js
  |    └ component2.js
  ├ containers/
  |    ├ component1.js
  |    └ component2.js
  ├ reducers/
  |    ├ component1.js
  |    └ component2.js
  ├ actions/
  |    ├ component1.js
  |    └ component2.js
  └ types/
       ├ component1.js
       └ component2.js

Redux公式のFAQ には Rails-style というものが紹介されているが、これとほぼ同じ。

Rails-style: separate folders for “actions”, “constants”, “reducers”, “containers”, and “components”

redux-way の問題点

redux-way は至って普通のディレクトリ構成ではあるが、閲覧性が悪く関連性を理解しづらいという問題があり、これは 過剰な分割 と 過剰な分散 に起因している。

reducers, action creators, action types の3つは密結合になっているにも関わらず、それぞれが異なるファイルに 分割 されており、さらには異なるディレクトリに 分散 している。そのため関連性を把握しづらくなってしまう。

例えば、reducers/component1.js に定義する reducer は 受け取った action を計算に用いるのだが、どのような action を受け取り得るのかは action creator を定義する actions/component1.js を見なければ分からず、また action creator が返す action の構成要素である action type が取りうる値は types/component1.js を見なければ分からないようになっている。

パターン2. ducks

先に挙げた redux-way の 過剰な分割 と 過剰な分散 を解消するようなディレクトリ構成に、 ducks と呼ばれるものがある。

参考:

redux-way において reducers, action creators, actions types の関数・定数定義はreducers/actions/types/のディレクトリに分散していたが、 ducks ではこれら3つを単に1つのmodules/ ディレクトリとしてまとめ、 過剰な分散 が解消される。

このときmodules/配下において component1に関する reducers, action creators, action types の定義は別々のファイルに分割することもできるが、ducks においては 過剰な分割 の解消のため、単一のファイルにまとめる(modules/component1.js)。

src/
  ├ components/
  |    ├ component1.js
  |    └ component2.js
  ├ containers/
  |    ├ component1.js
  |    └ component2.js
  └ modules/
       ├ component1.js
       └ component2.js

ducks のディレクトリ構成では密結合な reducers, action creators, action types の定義が1ファイルで記述され、非常に簡潔で見通しが良くなる。

ducks の課題と対策

特に小規模なプロダクトにおいては ducks のシンプルな構成がマッチすると思われるが、中・大規模になってくると1ファイルがどうしても大きくなり、ファイル内での閲覧性が悪くなってしまう。

そうした場合には以下のようなファイル分割を行うのが良さそうだ。
ファイルを分割したものの 3つとも同一ディレクトリにあり、 分散はしていない。

modules/
  ├ component1/
  |    ├ reducer.js
  |    ├ actions.js
  |    └ types.js
  └ component2/
       ├ reducer.js
       ├ actions.js
       └ types.js

これと似たディレクトリ構成として re-ducks と呼ばれるものがあるので、次章で紹介する。
上記のように分割したくなるケースでは、re-ducks の構成にするのがより一般的だろう。

パターン3. re-ducks

先にも述べたように、中・大規模のプロダクトになってくるとファイル1つが大きくなり、ducks の構成が辛くなってくる。
その解消のために re-ducks という構成が考え出された。

参考:

re-ducks では次のようなディレクトリ構成となり、ducksにおける modules/ は duck/ で置き換わる。

src/
  ├ components/
  |    ├ component1.js
  |    └ component2.js
  ├ containers/
  |    ├ component1.js
  |    └ component2.js
  └ duck/
       ├ component1/
       |    ├ index.js
       |    ├ recucers.js
       |    ├ actions.js
       |    ├ types.js
       |    ├ operations.js
       |    └ selectors.js
       └ component2/
            ├ index.js
            ├ recucers.js
            ├ actions.js
            ├ types.js
            ├ operations.js
            └ selectors.js

duck/ の下では component 毎にディレクトリが分かれ、それぞれにreducer.jsactions.jstypes.jsを置く。これにより、ducks の構成で問題となり得る 長大な単一ファイル を分割することで解消しつつも、密結合なファイルたちが同一ディレクトリに集まっているので 分散 はしていない。

re-ducks では新しくoperations.jsselectors.jsが登場するが、ここまでの話とは異なる動機で追加されるものなので、説明は省く (というか、そもそも私が詳しく知らないので上手く説明できない)。

ちなみにindex.jsはそれぞれのファイルに散らばった定義を import して export し直すだけのファイル。
外から使う際にはindex.jsから必要な全てを import できるようになる。

まとめ

  • Redux を用いたプロダクトのディレクトリ構成には、代表的なものとして redux-way, ducks, re-ducks の3つがある。
  • redux-way では、 reducers, action creators, action types について 過剰な分割 と 過剰な分散が起こり得る。
  • ducks では分割も分散もなく、非常に簡潔にまとまる。小規模プロダクトに向く。
  • re-ducks では 分割はするが分散はしない。中・大規模プロダクトに向く。

ducks の構成でプロダクトを始め、成長にあわせて re-ducks に切り替えるのが良さそうだ。

また、Redux を使う場合に限らず、 ディレクトリ構成を考える際には 分割 と 分散 の度合いを意識することでより良い構成へ近づけるだろう。

'frameworks > react' 카테고리의 다른 글

How the useEffect Hook Works  (0) 2020.03.28
Using the Effect Hook  (0) 2020.03.28
Using the State Hook  (0) 2020.03.28
React tutorial 강의 요약  (0) 2020.02.12
React vs Angular vs Vue.js — What to choose in 2019? (updated)  (0) 2020.01.30

React 주요 커맨드 알아보기

$> npm install -g create-react-app

$> cd {application directory}

$> create-react-app .

$> npm run start

$> npm run build

$> npx serve -s build
  • 디펜던시 관리, 디플로이, jslint등 모든 것을 알아서 해준다는게 참 편하다.
  • 스크립트는 package.json에 기재되어 있다.

react라이브러리에서 Component 오브젝트 상속받아 사용해보기 : Component Class

  • component 상속한 후, render함수를 override 한다.

    import React, {Component} from 'react';
    import './App.css';
    
    class Subject extends Component {
      render (){
          return (
              <header>
                  <h1>WEB</h1>
                  world wide web!
              </header>
          );
      }
    }
    
    class App extends Component {
      render (){
          return (
              <Subject></Subject>
          );
      }
    }
    
    export default App;
  • Component를 상속한 클래스를 태그 <> 안에 넣고 객체처럼 사용할 수 있다

  • react문법을 jsx문법이라고 부른다.

  • 계속해서 html을 Component를 이용해 객체화해보자.

    import React, {Component} from 'react';
    import './App.css';
    
    class Subject extends Component {
      render (){
          return (
              <header>
                  <h1>WEB</h1>
                  world wide web!
              </header>
          );
      }
    }
    
    class TOC extends Component {
      render() {
          return (
              <nav>
                  <ul>
                      <li><a href="1.html">HTML</a></li>
                      <li><a href="2.html">CSS</a></li>
                      <li><a href="3.html">JS</a></li>
                  </ul>
              </nav>
          );
      }
    }
    
    class Content extends Component {
      render() {
          return(
              <article>
                  <h2>HTML</h2>
                  HTML is Hyper Text Markup Language
              </article>
          )
      }
    }
    
    class App extends Component {
      render (){
          return (
              <div>
                  <Subject/>
                  <TOC/>
                  <Content/>
              </div>
          );
      }
    }
    
    export default App;
  • 각 태그들이 class에 의해 객체화 된 것을 볼 수 있다.

상위 Component에서 하위 Compoment로 값 넘겨주기 : props

위의 연습코드에서 App 클래스는 Subject클래스를 태그로 받았다.

이때 태그에 파라미터를 입력하고, Subject클래스에서 받을수는 없을까? 그렇게 할수만 잇다면 파라미터에 의해 내용이 변하는 재사용성이 높은 오브젝트를 만들 수 잇을 텐데말이다.

물론 가능하다. 아래 수정 전후의 소스코드를 눈여거 보길 바란다.

참고: react doc- Components and Props

수정전

...

class Subject extends Component {
    render (){
        return (
            <header>
                <h1>WEB</h1>
                world wide web!
            </header>
        );
    }
}

class App extends Component {
    render (){
        return (
            <div>
                <Subject/>
                <TOC/>
                <Content/>
            </div>
        );
    }
}

수정후

class Subject extends Component {
    render (){
        return (
            <header>
                <h1>{this.props.title}</h1>
                {this.props.sub}
            </header>
        );
    }
}

class App extends Component {
    render (){
        return (
            <div>
                <Subject title="WEB" sub="world wide web"/>
                <TOC/>
                <Content/>
            </div>
        );
    }
}

React developer tool

  1. chrome extention for react : React developer tool(https://reactjs.org/community/debugging-tools.html)
    • react 로 작성된 페이지에 대해, html태그만 으로는 파악하기 어려운 react components들을 보여준다. 대.박

Compoent파일로 분리하기

  • componets라는 디렉토리를 src직하에 만든후, class 별로 구분한 각 component 객체들을 파일별로 분리한다.
  • 이때 각 클래스의 export 방법은 다음과 같은 두 가지가 있다.
    1. export default {ClassName} : 디폴트로 export하는 방법으로, 각 모듈에서 하나의 모듈만 default 키워드를 사용할 수 있다.
    2. export {ClassName}

state 개념 살펴보기

  • Component를 다룰 때, 외부적으로는 Props를 사용한다는 것을 위에서 배웠다.
    state란 Component를 움직이게해주는 내부논리이다.

  • 코드상 state는 그저 초기화함수(constructor)에 포함된 프로퍼티로 보일 것이다. 하지만 내부적으로, state라는 이름의 프로퍼티는 특별하게 사용된다. 예를 들어, 생성자 바깥에서 setState과 같은 함수로 state의 내용을 바꿀 수 있다.

    수정전

    class App extends Component {
      render (){
          return (
              <div>
                  <Subject title="WEB" sub="world wide web"/>
                  <TOC/>
                  <Content/>
              </div>
          );
      }
    }

수정후

class App extends Component {
    constructor(props) {
        super(props);
        this.state = {
            subject: {
                title: 'WEB',
                sub: 'world wide web'
            },
            content: {
                title: 'HTML',
                desc: 'HTML is Hyper Text Markup Language'
            }
        }
    }

    render (){
        return (
            <div>
                <Subject title={this.state.subject.title} sub={this.state.subject.sub}/>
                <TOC/>
                <Content title={this.state.content.title} desc={this.state.content.desc}/>
            </div>
        );
    }
}

export default App;
  • render에 하드코딩 된 부분을 state 인스턴트 프로퍼티를 이용해 은닉화했다.
  • jsx문법 내부에 자바스크립트를 사용하기 위해서는 {}중괄호를 사용하면 된다.

동적으로 html component 생성하기

App.js

import React, {Component} from 'react';
import Subject from './components/Subject'
import Content from './components/Content'
import TOC from './components/TOC'
import './App.css';

class App extends Component {
    constructor(props) {
        super(props);
        this.state = {
            subject: {
                title: 'WEB',
                sub: 'world wide web'
            },
            toc: [
                {
                    id: 1,
                    title: 'HTML',
                    desc: 'HTML is Hyper Text Markup Language'
                },
                {
                    id: 2,
                    title: 'CSS',
                    desc: 'CSS is for design'
                },
                {
                    id: 3,
                    title: 'JAVASCRIPT',
                    desc: 'Javascript is for control'
                }
            ],
            content: {
                title: 'HTML',
                desc: 'HTML is Hyper Text Markup Language'
            },
        }
    }

    render (){
        return (
            <div>
                <Subject title={this.state.subject.title} sub={this.state.subject.sub}/>
                <TOC data={this.state.toc}/>
                <Content title={this.state.content.title} desc={this.state.content.desc}/>
            </div>
        );
    }
}

export default App;

TOC.js

import {Component} from "react";
import React from "react";

class TOC extends Component {
    render() {
        const data = this.props.data;

        const list = [];
        data.forEach((obj) => {
            list.push(
                <li><a href={`/content/${obj.id}`}>{obj.title}</a></li>
            )
        });

        return (
            <nav>
                <ul>
                    {list}
                </ul>
            </nav>
        );
    }
}

// export {TOC};
export default TOC;
  • 여러개의 list를 자동으로 생성할때는 아래와 같은 오류가 발생한다.

    Each child in a list should have a unique "key" prop.
  • 이때 각 리스트가 다른 리스트와 구별될 수 있는 식별자를 attribute로 주면 해결 된다.

    TOC.js

    import {Component} from "react";
    import React from "react";
    
    class TOC extends Component {  
    render() {  
    const data = this.props.data;
    
        const list = [];
        data.forEach((obj) => {
            list.push(
                <li key={obj.id}><a href={`/content/${obj.id}`}>{obj.title}</a></li>
                      )
                  });
    
                  return (
                      <nav>
                          <ul>
                              {list}
                          </ul>
                      </nav>
                  );
              }
          }
    
          // export {TOC};  
          export default TOC;

event의 onClick 구현하기

  • 먼저 이벤트의 이해를 쉽게하기 위해, 기존 Subject 클래스의 Component지정을 멈추고, tag를 하드 코딩하여 보도록하자.

app.js

...
    render (){
        let _title, _desc = null;
        if(this.state.mode === 'welcome') {
            _title = this.state.welcome.title;
            _desc = this.state.welcome.desc;
        }else {
            _title = this.state.content.title;
            _desc = this.state.content.desc;
        }

        return (
            <div>
                {/*<Subject title={this.state.subject.title} sub={this.state.subject.sub}/>*/}
                {/* Temporary subject tag */}
                <header>
                    <h1 href="/" onClick={(e) => {
                        alert('hi');
                        e.preventDefault();
                        debugger;
                    }}>{this.state.subject.title}</h1>
                    {this.state.subject.sub}
                </header>
                <TOC data={this.state.toc}/>
                <Content title={_title} desc={_desc}/>
            </div>
        );
    }
...
  • jsx코드 내부에 debugger라는 함수를 넣으면 개발자도구에서 멈춘다.
  • onClick attribute를 활용해 클릭 이벤트를 넣을 수 있다.
  • e는 이벤트가 사용할 수 있는 다양한 프로퍼티를 갖는다.
    • e.preventDefault()는 태그가 갖는 기본적인 움직임을 막는 역할은 한다. 위의 코드에서는 href를 무력화하여 페이지 이동을 막는다.

event에서 state 변경하기

  • 클릭 이벤트에 의해 mode값이 변경되는 코드를 짜보도록하자.
    app.js

    ...
      render (){
          let _title, _desc = null;
          if(this.state.mode === 'welcome') {
              _title = this.state.welcome.title;
              _desc = this.state.welcome.desc;
          }else {
              _title = this.state.content.title;
              _desc = this.state.content.desc;
          }
    
          return (
              <div>
                  {/*<Subject title={this.state.subject.title} sub={this.state.subject.sub}/>*/}
                  {/* Temporary subject tag */}
                  <header>
                      <h1 href="/" onClick={function(e) {
                          alert('hi');
                          e.preventDefault();
                          debugger;
                      }}>{this.state.subject.title}</h1>
                      {this.state.subject.sub}
                  </header>
                  <TOC data={this.state.toc}/>
                  <Content title={_title} desc={_desc}/>
              </div>
          );
      }
    ...
    
  • 위의 코드는 두 가지의 문제점을 가지고 있다.
    • 첫번째 : this.state.mode = 'welcome';에서 this는 클래스의 인스턴스가 아닌 아무것도 아닌 것이다.
      • -> bind()로 해결한다.
    • 두번째 : react는 state를 변경하기 위해 setState라는 함수를 가지고 있으므로, 그 함수를 사용하여야 한다.
      • 이때 포인트는 생성자에 들어있는 state프로퍼티가 단순한 프로퍼티가 아니라는 점이다.
        react내에서 state프로퍼티는 특별한 취급을 받는다. setState를 하면 단순히
        생성자의 값을 바꾸는 것이 아니라 setState가 호출된 후 render들을 다시 호출하여
        새로운 state로 화면을 구성한다. 예에서는, App -> TOC -> Content 의 render함수를
        새로 호출하여 변경된 값으로 새로운 화면을 구성한다.
...
    render (){
        let _title, _desc = null;
        if(this.state.mode === 'welcome') {
            _title = this.state.welcome.title;
            _desc = this.state.welcome.desc;
        }else {
            _title = this.state.content.title;
            _desc = this.state.content.desc;
        }

        return (
            <div>
                {/*<Subject title={this.state.subject.title} sub={this.state.subject.sub}/>*/}
                {/* Temporary subject tag */}
                <header>
                    <h1 href="/" onClick={function(e) {
                        alert('hi');
                        e.preventDefault();
                        this.setStart({
                            mode: 'welcome'
                        });
                        debugger;
                    }.bind(this)}>{this.state.subject.title}</h1>
                    {this.state.subject.sub}
                </header>
                <TOC data={this.state.toc}/>
                <Content title={_title} desc={_desc}/>
            </div>
        );
    }
...

event에서 bind함수 이해하기

  • 아래의 Component를 상속받은 App클래스 내에서 this는 무엇을 가르킬까

App.js

class App extends Component {
    constructor(props) {
        super(props);
        this.state = {
            ...
        }    
    }

    render (){
        console.log('what is this?', this);

        ...

        return (

            ...
        );
    }
}
  • react에서 Component를 상속받을 경우 this는 App클래스를 가르키고 있다는 것을 알 수 있다.

  • (참고)일반적으로 this는 세가지의 다른 상황에 의해서 바인드 된다.
    this가 바인드되는 세 가지의 경우

    1. 객체 내부의 메서드에 바인딩 되는 경우
    2. 메서드 내부에서 바인딩 되는 경우
    3. 생성자 new로 생성해 그 인스턴스에 바인딩 되는 경우
  • 이때 onClick 내부에 this는 아무것도 가르키지 않는다.

     <h1 href="/" onClick={function(e) {
          alert('hi');
          e.preventDefault();
          this.setState({
              mode: 'welcome'
          });
          debugger;
      }.bind(this)}>{this.state.subject.title}</h1>
    
  • 따라서 상위 블록에 존재하는 this를 가져와 bind를 해줄 수 있다.

event에서 setState함수 이해하기

  • 동적으로 state값을 변경할 경우 this.setState를 사용하여야 한다.
  • 포인트는 생성자에 들어있는 state프로퍼티가 단순한 프로퍼티가 아니라는 점이다.
    react내에서 state프로퍼티는 특별한 취급을 받는다. setState를 하면 단순히
    생성자의 값을 바꾸는 것이 아니라 setState가 호출된 후 render들을 다시 호출하여
    새로운 state로 화면을 구성한다. 예에서는, App -> TOC -> Content 의 render함수를
    새로 호출하여 변경된 값으로 새로운 화면을 구성한다.

component 이벤트 만들기

  • 소스보고 알아서하기 별로 어렵지 않음

App.js

class App extends Component {
    constructor(props) {
        super(props);
        this.state = {
            mode: 'read',
            subject: {
                title: 'WEB',
                sub: 'world wide web'
            },
            welcome: {
                title: 'welcome',
                desc: 'Hello, React'
            },
            toc: [
                {
                    id: 1,
                    title: 'HTML',
                    desc: 'HTML is Hyper Text Markup Language'
                },
                {
                    id: 2,
                    title: 'CSS',
                    desc: 'CSS is for design'
                },
                {
                    id: 3,
                    title: 'JAVASCRIPT',
                    desc: 'Javascript is for control'
                }
            ],
            content: {
                title: 'HTML',
                desc: 'HTML is Hyper Text Markup Language'
            },
        }
    }

    render (){
        let _title, _desc = null;
        if(this.state.mode === 'welcome') {
            _title = this.state.welcome.title;
            _desc = this.state.welcome.desc;
        }else {
            _title = this.state.content.title;
            _desc = this.state.content.desc;
        }
        console.log('what is this?', this);
        return (

            <div>
                <Subject
                    title={this.state.subject.title}
                    sub={this.state.subject.sub}
                    onChangePage={function() {
                        if(this.state.mode === 'welcome') {
                            this.setState({
                                mode: 'read'
                            })
                        } else {
                            this.setState({
                                mode: 'welcome'
                            })
                        }

                    }.bind(this)}
                />
                <TOC data={this.state.toc}/>
                <Content title={_title} desc={_desc}/>
            </div>
        );
    }
}

Subject.js

import {Component} from "react";
import React from "react";

class Subject extends Component {
    render (){
        return (
            <header>
                <h1 href="/" onClick={function(e) {
                    e.preventDefault();
                    this.props.onChangePage();
                }.bind(this)}>{this.props.title}</h1>
                {this.props.sub}
            </header>
        );
    }
}

export default Subject;

html의 어트리뷰트 값을 받아 서버에서 처리하기 : 클라이언트에서 값을 받아 서버로 전달하기

App.js

import React, {Component} from 'react';
import Subject from './components/Subject'
import Content from './components/Content'
import TOC from './components/TOC'
import './App.css';

class App extends Component {
    constructor(props) {
        super(props);
        this.state = {
            mode: 'read',
            subject: {
                title: 'WEB',
                sub: 'world wide web'
            },
            content: {
                title: 'welcome',
                desc: 'Hello, React'
            },
            toc: [
                {
                    id: 1,
                    title: 'HTML',
                    desc: 'HTML is Hyper Text Markup Language'
                },
                {
                    id: 2,
                    title: 'CSS',
                    desc: 'CSS is for design'
                },
                {
                    id: 3,
                    title: 'JAVASCRIPT',
                    desc: 'Javascript is for control'
                }
            ]
        }
    }

    render (){
        console.log('App');
        return (
            <div>
                <Subject
                    title={this.state.subject.title}
                    sub={this.state.subject.sub}
                />
                <TOC
                    data={this.state.toc}
                    onChangePage={function(id) {
                        debugger;
                        for (var key of this.state.toc) {
                            debugger;
                            if (key.id === id) {
                                this.setState({
                                    content: {
                                        title: key.title,
                                        desc: key.desc
                                    }
                                });
                                break;
                            }

                        }
                    }.bind(this)}
                />
                <Content
                    title={this.state.content.title}
                    desc={this.state.content.desc}
                />
            </div>
        );
    }
}

export default App;

TOC.js

import {Component} from "react";
import React from "react";

class TOC extends Component {
    render() {
        console.log('TOC');
        const data = this.props.data;

        const list = [];
        data.forEach((obj) => {
            list.push(
                <li key={obj.id}
                    onClick={function(e) { // Event Listener
                        debugger;
                        e.preventDefault();
                        this.props.onChangePage(obj.id);
                    }.bind(this)}>
                    <a href={`/content/${obj.id}`}>{obj.title}</a>
                </li>
            )
        });

        return (
            <nav>
                <ul>
                    {list}
                </ul>
            </nav>
        );
    }
}

// export {TOC};
export default TOC;

이벤트 setState함수 이해하기

  • 상위 컴퍼넌트 (APP)가 하위 컴퍼턴트(TOC, Subject, Content)를 조작할 때는 props 사용
  • 컴퍼넌트가 자기 자신의 상태를 바꿀 때는 state
  • 하위 컴퍼턴트(TOC, Subject, Content)가 상위 컴퍼넌트 (APP)를 조작할 때는 event 사용
  • (props vs state 이미지)

create 구현, 소개 : 각 버튼 클릭시 mode 변경하기

App.js

import React, {Component} from 'react';
import Subject from './components/Subject'
import Content from './components/Content'
import TOC from './components/TOC'
import Control from './components/Control'
import './App.css';

class App extends Component {
    constructor(props) {
        super(props);
        this.state = {
            mode: 'read',
            subject: {
                title: 'WEB',
                sub: 'world wide web'
            },
            content: {
                title: 'welcome',
                desc: 'Hello, React'
            },
            toc: [
                {
                    id: 1,
                    title: 'HTML',
                    desc: 'HTML is Hyper Text Markup Language'
                },
                {
                    id: 2,
                    title: 'CSS',
                    desc: 'CSS is for design'
                },
                {
                    id: 3,
                    title: 'JAVASCRIPT',
                    desc: 'Javascript is for control'
                }
            ]
        }
    }

    render (){
        console.log('App');
        return (
            <div>
                <Subject
                    title={this.state.subject.title}
                    sub={this.state.subject.sub}
                />
                <TOC
                    data={this.state.toc}
                    onChangePage={function(id) {
                        debugger;
                        for (var key of this.state.toc) {
                            debugger;
                            if (key.id === id) {
                                this.setState({
                                    content: {
                                        title: key.title,
                                        desc: key.desc
                                    }
                                });
                                break;
                            }

                        }
                    }.bind(this)}
                />
                <Control
                    onChangeMode={function(mode){
                        this.setState({
                           mode: mode
                        });
                    }.bind(this)}
                />
                <Content
                    title={this.state.content.title}
                    desc={this.state.content.desc}
                />
            </div>
        );
    }
}

export default App;

Control.js : 새로 생성된 파일

import {Component} from "react";
import React from "react";

class Control extends Component {


    render (){
        // 함수내의 this는 전역 windows를 가르키기 때문에 Control 클래스의 this로 바인드해주어야함
        const onClick = function(e, mode){
                e.preventDefault();
                this.props.onChangeMode(mode)
            }.bind(this);

        return (
            <div>
                <button href="/create" id="create" onClick={function(e){onClick(e, 'create')}}>create</button>
                <button href="/update" id="update" onClick={function(e){onClick(e, 'update')}}>update</button>
                <button id="delete" onClick={function(e){onClick(e, 'delete')}}>delete</button>
            </div>
        );
    }
}

export default Control;

동적으로 컴포넌트 바꿔넣기

App.js

import React, {Component} from 'react';
import Subject from './components/Subject'
import ReadContent from './components/ReadContent'
import CreateContent from './components/CreateContent'
import TOC from './components/TOC'
import Control from './components/Control'
import './App.css';

class App extends Component {
    constructor(props) {
        super(props);
        this.state = {
            mode: 'read',
            subject: {
                title: 'WEB',
                sub: 'world wide web'
            },
            content: {
                title: 'welcome',
                desc: 'Hello, React'
            },
            toc: [
                {
                    id: 1,
                    title: 'HTML',
                    desc: 'HTML is Hyper Text Markup Language'
                },
                {
                    id: 2,
                    title: 'CSS',
                    desc: 'CSS is for design'
                },
                {
                    id: 3,
                    title: 'JAVASCRIPT',
                    desc: 'Javascript is for control'
                }
            ]
        }
    }

    render (){
        // Change Component according to mode
        let _article = null;
        if(this.state.mode === 'read') {
            _article = <ReadContent
                title={this.state.content.title}
                desc={this.state.content.desc}
            />
        } else if(this.state.mode === 'create') {
            _article = <CreateContent
                title={this.state.content.title}
                desc={this.state.content.desc}
            />
        }

        return (

            <div>
                <Subject
                    title={this.state.subject.title}
                    sub={this.state.subject.sub}
                />
                <TOC
                    data={this.state.toc}
                    onChangePage={function(id) {
                        for (var key of this.state.toc) {
                            if (key.id === id) {
                                this.setState({
                                    mode: 'read',
                                    content: {
                                        title: key.title,
                                        desc: key.desc
                                    }
                                });
                                break;
                            }

                        }
                    }.bind(this)}
                />
                <Control
                    onChangeMode={function(mode){
                        this.setState({
                           mode: mode
                        });
                    }.bind(this)}
                />
                { _article }
            </div>
        );
    }
}

export default App;
  • _article변수에 mode에 따라 Component객체가 바뀔 수 있도록 설정해줍니다.
    • 위의 코드에서는 mode에따라 ReadContent, CreateContent가 동적으로 _article에 담깁니다.
  • TOC component 내부에 mode: 'read'를 추가하여 list를 클릭했을 때 mode가 read로 바뀌도록 합니다.
  • 재밌는건 { _article } 부분인데, 변수에 Component객체를 넣고 그 변수를 사용할 수 있다는 점입니다.

input의 값을 추출해 서버로 가져오기

CreateContents.js

import {Component} from "react";
import React from "react";

class CreateContent extends Component {
    render() {
        console.log('CreateContent');
        return(
            <article>
                <h2>Create</h2>
                <form action="/create" method="post"
                      onSubmit={function(e) {
                            e.preventDefault();
                            debugger;
                            let title = e.target.title.value;
                            let desc = e.target.desc.value;
                            this.props.onSubmit(title, desc);
                            alert('submit');
                        }.bind(this)}>

                    <p>
                        <input type="text" name="title" placeholder="title"/>
                    </p>
                    <p>
                        <textarea name="desc" placeholder="description"/>
                    </p>
                    <p>
                        <input type="submit"/>
                    </p>

                </form>
            </article>
        )
    }
}

export default CreateContent;
  • html의 값들은 e를 경유해서 받을 수 있다. 크롬 개발자 모드에서 e를 탐색해 보면
    많은 값들이 들어있는데, form값은 target 변수 안에 들어있다.
  • 이때 중요한 것은 e는 각 태그의 name attribute 값을 보고 있는 것이다.
  • 첫번째 input 태그의 name은 title 이였기 때문에 e.target.title.value으로 그 값을 추출할 수 있다.

App.js

class App extends Component {
    constructor(props) {
        super(props);
        this.state = {
            mode: 'read',
            subject: {
                title: 'WEB',
                sub: 'world wide web'
            },
            content: {
                title: 'welcome',
                desc: 'Hello, React'
            },
            toc: [
                {
                    id: 1,
                    title: 'HTML',
                    desc: 'HTML is Hyper Text Markup Language'
                },
                {
                    id: 2,
                    title: 'CSS',
                    desc: 'CSS is for design'
                },
                {
                    id: 3,
                    title: 'JAVASCRIPT',
                    desc: 'Javascript is for control'
                }
            ]
        }
    }

    render (){
        // Change Component according to mode
        let _article = null;
        if(this.state.mode === 'read') {
            _article = <ReadContent
                title={this.state.content.title}
                desc={this.state.content.desc}
            />
        } else if(this.state.mode === 'create') {
            _article = <CreateContent
                title={this.state.content.title}
                desc={this.state.content.desc}
                onSubmit={function(title, desc) {
                    let lToc = this.state.toc;

                    let addedConent = lToc.concat(
                        {
                            id: (lToc.length)+1,
                            title: title,
                            desc: desc
                        }
                    );

                    this.setState({
                            toc: addedConent
                        }
                    );
                    console.log(this.state.toc);
                    this.forceUpdate();
                }.bind(this)
                }
            />
        }

        return
        (
            <div>
                <Subject
                    title={this.state.subject.title}
                    sub={this.state.subject.sub}
                />
                <TOC
                    data={this.state.toc}
                    onChangePage={function(id) {
                        for (var key of this.state.toc) {
                            if (key.id === id) {
                                this.setState({
                                    mode: 'read',
                                    content: {
                                        title: key.title,
                                        desc: key.desc
                                    }
                                });
                                break;
                            }

                        }
                    }.bind(this)}
                />
                <Control
                    onChangeMode={function(mode){
                        this.setState({
                           mode: mode
                        });
                    }.bind(this)}
                />
                { _article }
            </div>
        );
    }
}

export default App;
  • 여기서 this.setState의 또다른 특징을 알 수 있다.

     this.setState({
             toc: addedConent
         }
     );
    • setState로 toc에 새로운 값을 넣어줬음에도 불구하고, console.log(this.state.toc);
      변화되기 전의 toc 값을 나타내고 있다. 이는 state가 불변성을 유지하기 때문이다.
    • 따라서 toc값을 변화시킬때, push와 같은 본 객체의 불변성을 훼손시키는 값으로 객체를 변화시키는 것보다
      새로운 독립된 객체를 만들어서 setState로 값을 전달하는 것을 추천한다.

shouldComponentUpdate 함수

  • shouldComponentUpdate함수의 특징
    1. render 이전에 shouldComponentUpdate함수가 실행된다.
    2. shouldComponentUpdate함수의 return값이 true이면 render가 호출되고,
      false이면 render는 호출되지 않는다.
    3. shouldComponentUpdate의 인수를 통해,
      새롭게 업데이트된 props의 값과 초기props의 값에 접근할 수 있다.

TOC.js

import {Component} from "react";
import React from "react";

class TOC extends Component {
    shouldComponentUpdate(newProps, newState) {
        console.log('shouldComponentUpdate');
        if(newProps.data == this.props.data) {
            return false;
        }else {
            return true;
        }
    }

    render() {
        console.log('TOC');
        const data = this.props.data;

        const list = [];
        data.forEach((obj) => {
            list.push(
                <li key={obj.id}
                    onClick={function(e) { // Event Listener
                        e.preventDefault();
                        this.props.onChangePage(obj.id);
                    }.bind(this)}>
                    <a href={`/content/${obj.id}`}>{obj.title}</a>
                </li>
            )
        });

        return (
            <nav>
                <ul>
                    {list}
                </ul>
            </nav>
        );
    }
}
// export {TOC};
export default TOC;
  • 앞에서 본바에 의하면 setState로 인해 state값에 변화가 인지될시
    모든 render값이 재호출 되게 된다. 하지만 이것은 값이 변화하지 않은 Component에 대해서도
    render을 호출하기 때문에 매우 비효율적이다.
    • shouldComponentUpdate의 3번의 특징을 이용해 값이 변화하지 않은 Component값에
      대해서는 render가 시행되지 않도록 하게 컨트롤할 수 있다.
  • state값의 원본을 초기값을 유지하지 않으면 위와같은 컨트롤이 불가능하므로
    state값은 초기값을 불변값으로써 유지하는 것이 중요하다.

immutable 불변성

  • 불변성을 유지할 수 있도록 값을 복사해주는 함수들

    • 배열 : Array.from(a)

      const a = [1,2,3,4];
      const b = Array.from(a);
      console.log(b, a===b)
      // Array from은 배열값을 복사하지만 단순히 a를 참조하는 참조값이 아닌 deepCopy이다.
    • 객체 : Object.assign({}, a)

      const a = {a:1, b:2};
      const b = Object.assign({}, a)
      console.log(b, a===b)
      //  Object.assign는 객체값을 복사하지만 단순히 a를 참조하는 참조값이 아닌 deepCopy이다.

update기능 추가하기

app.js

import React, {Component} from 'react';
import Subject from './components/Subject'
import ReadContent from './components/ReadContent'
import CreateContent from './components/CreateContent'
import UpdateContent from './components/UpdateContent'
import TOC from './components/TOC'
import Control from './components/Control'
import './App.css';

class App extends Component {
    constructor(props) {
        super(props);
        this.state = {
            mode: 'read',
            subject: {
                title: 'WEB',
                sub: 'world wide web'
            },
            content: {
                id: 0,
                title: 'welcome',
                desc: 'Hello, React'
            },
            toc: [
                {
                    id: 1,
                    title: 'HTML',
                    desc: 'HTML is Hyper Text Markup Language'
                },
                {
                    id: 2,
                    title: 'CSS',
                    desc: 'CSS is for design'
                },
                {
                    id: 3,
                    title: 'JAVASCRIPT',
                    desc: 'Javascript is for control'
                }
            ]
        }
    }

    getContent() {
        // Change Component according to mode
        let _article = null;
        if(this.state.mode === 'read') {
            _article = <ReadContent
                title={this.state.content.title}
                desc={this.state.content.desc}
            />
        }else if(this.state.mode === 'create') {
            _article = <CreateContent
                onSubmit={function(title, desc) {
                    let lToc = this.state.toc;

                    let addedConent = lToc.concat(
                        {
                            id: (lToc.length)+1,
                            title: title,
                            desc: desc
                        }
                    );

                    this.setState({
                            toc: addedConent
                        }
                    );
                    console.log(this.state.toc);
                }.bind(this)
                }
            />
        }else if(this.state.mode === 'update') {
            _article = <UpdateContent
                title={this.state.content.title}
                desc={this.state.content.desc}
                id={this.state.content.id}

                onSubmit={function(id, title, desc) {
                    const toc = Array.from(this.state.toc);
                    console.log(typeof(toc));
                    toc.forEach(function(obj) {
                        if (obj.id === id) {
                            obj.title = title;
                            obj.desc = desc;
                            return;
                        }
                    });

                    const content = Array.from(this.state.content);
                    content.id = id;
                    content.title = title;
                    content.desc = desc;

                    this.setState({
                        mode: 'read',
                        content: content,
                        toc: toc
                    });
                }.bind(this)
                }
            />

        }

        return _article;
    }

    render() {
        return(
            <div>
                <Subject
                    title={this.state.subject.title}
                    sub={this.state.subject.sub}
                />
                <TOC
                    data={this.state.toc}
                    onChangePage={function(id) {
                        for (var key of this.state.toc) {
                            if (key.id === id) {
                                this.setState({
                                    mode: 'read',
                                    content: {
                                        id: id,
                                        title: key.title,
                                        desc: key.desc
                                    }
                                });
                                break;
                            }
                        }
                    }.bind(this)}
                />
                <Control
                    onChangeMode={function(mode){
                        this.setState({
                            mode: mode
                        });
                    }.bind(this)}
                />
                { this.getContent() }
            </div>
        );
    }
}

export default App;
  • update후에는 바뀐 내용을 content에 덮어씌우고 setState로 re-rendering한다.

UpdateContent.js

import {Component} from "react";
import React from "react";

class UpdateContent extends Component {
    render() {
        console.log('CreateContent');
        return(
            <article>
                <h2>Update</h2>
                <form action="/create" method="post"
                      onSubmit={function(e) {
                            e.preventDefault();
                            debugger;
                            let id = this.props.id;
                            let title = e.target.title.value;
                            let desc = e.target.desc.value;
                            this.props.onSubmit(id, title, desc);
                            alert('submit');
                        }.bind(this)}>

                    <p>
                        <input type="text" name="title" placeholder="title" defaultValue={this.props.title}/>
                    </p>
                    <p>
                        <textarea name="desc" placeholder="description" defaultValue={this.props.desc}/>
                    </p>
                    <p>
                        <input type="submit"/>
                    </p>

                </form>
            </article>
        )
    }
}

export default UpdateContent;

+ Recent posts