함수 print_hello 안에서 다시 def로 함수 print_message를 만들었습니다. 그리고 print_hello 안에서 print_message()처럼 함수를 호출했습니다. 하지만 아직 함수를 정의만 한 상태이므로 아무것도 출력되지 않습니다.
두 함수가 실제로 동작하려면 바깥쪽에 있는 print_hello를 호출해주어야 합니다. 즉, print_hello > print_message 순으로 실행됩니다.
33.2.1지역 변수의 범위
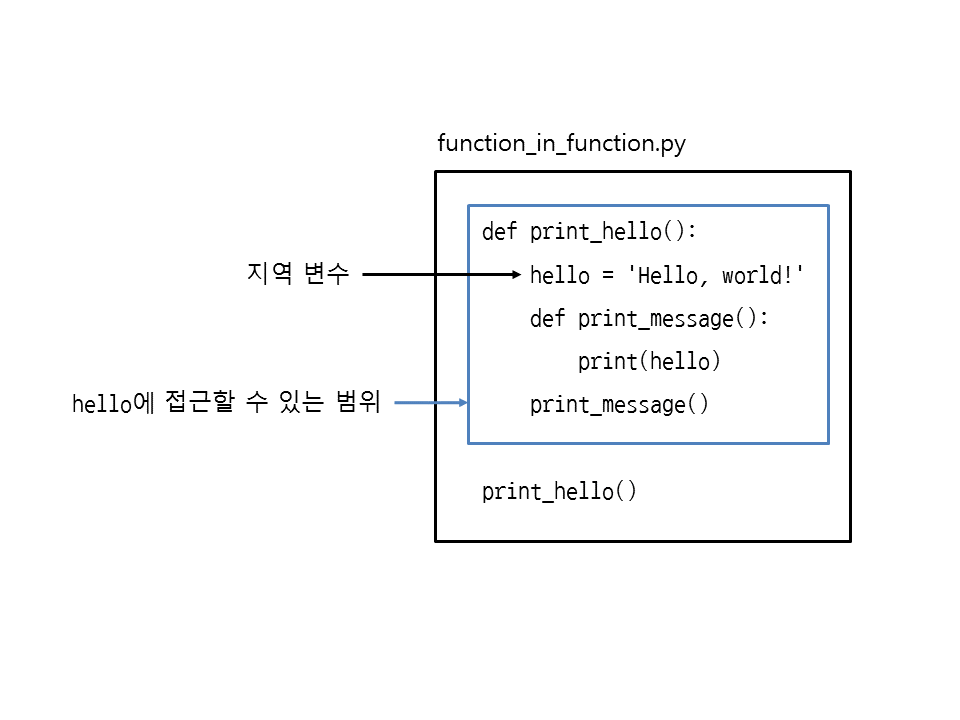
그럼 print_hello 함수와 print_message 함수에서 지역 변수의 범위를 살펴보겠습니다. 안쪽 함수 print_message에서는 바깥쪽 함수 print_hello의 지역 변수 hello를 사용할 수 있습니다.
defprint_hello():hello='Hello, world!'defprint_message():print(hello)# 바깥쪽 함수의 지역 변수를 사용
즉, 바깥쪽 함수의 지역 변수는 그 안에 속한 모든 함수에서 접근할 수 있습니다.
이 지역 변수의 접근 범위를 그림으로 나타내면 다음과 같은 모양이 됩니다.
▼ 그림 33-3 함수의 지역 변수에 접근할 수 있는 범위
33.2.2지역 변수 변경하기
지금까지 바깥쪽 함수의 지역 변수를 안쪽 함수에서 사용해봤습니다. 그럼 바깥쪽 함수의 지역 변수를 안쪽 함수에서 변경하면 어떻게 될까요?
다음과 같이 안쪽 함수 B에서 바깥쪽 함수 A의 지역 변수 x를 변경해봅니다.
function_local_error.py
defA():x=10# A의 지역 변수 xdefB():x=20# x에 20 할당B()print(x)# A의 지역 변수 x 출력A()
실행 결과
10
실행을 해보면 20이 나와야 할 것 같은데 10이 나왔습니다. 왜냐하면 겉으로 보기에는 바깥쪽 함수 A의 지역 변수 x를 변경하는 것 같지만, 실제로는 안쪽 함수 B에서 이름이 같은 지역 변수 x를 새로 만들게 됩니다. 즉, 파이썬에서는 함수에서 변수를 만들면 항상 현재 함수의 지역 변수가 됩니다.
defA():x=10# A의 지역 변수 xdefB():x=20# B의 지역 변수 x를 새로 만듦
현재 함수의 바깥쪽에 있는 지역 변수의 값을 변경하려면 nonlocal 키워드를 사용해야 합니다. 다음과 같이 함수 안에서 nonlocal에 지역 변수의 이름을 지정해줍니다.
nonlocal 지역변수
function_nonlocal_keyword.py
defA():x=10# A의 지역 변수 xdefB():nonlocalx# 현재 함수의 바깥쪽에 있는 지역 변수 사용x=20# A의 지역 변수 x에 20 할당B()print(x)# A의 지역 변수 x 출력A()
실행 결과
20
이제 함수 B에서 함수 A의 지역 변수 x를 변경할 수 있습니다. 즉, nonlocal은 현재 함수의 지역 변수가 아니라는 뜻이며 바깥쪽 함수의 지역 변수를 사용합니다.
33.2.3nonlocal이 변수를 찾는 순서
nonlocal은 현재 함수의 바깥쪽에 있는 지역 변수를 찾을 때 가장 가까운 함수부터 먼저 찾습니다. 이번에는 함수의 단계를 A, B, C로 만들었습니다.
함수 C에서 nonlocal x를 사용하면 바깥쪽에 있는 함수 B의 지역 변수 x = 20을 사용하게 됩니다. 따라서 x = x + 30은 50이 나옵니다. 그리고 함수 C에서 nonlocal y를 사용하면 바깥쪽에 있는 함수의 지역 변수 y를 사용해야 하는데 함수 B에는 y가 없습니다. 이때는 한 단계 더 바깥으로 나가서 함수 A의 지역 변수 y를 사용하게 됩니다. 즉, 가까운 함수부터 지역 변수를 찾고, 지역 변수가 없으면 계속 바깥쪽으로 나가서 찾습니다.
실무에서는 이렇게 여러 단계로 함수를 만들 일은 거의 없습니다. 그리고 함수마다 이름이 같은 변수를 사용하기 보다는 변수 이름을 다르게 짓는 것이 좋습니다.
33.2.4global로 전역 변수 사용하기
특히, 함수가 몇 단계든 상관없이 global 키워드를 사용하면 무조건 전역 변수를 사용하게 됩니다.
참고로 클로저는 개념이 다소 어려울 수 있으므로 변수의 사용 범위부터 알아본 뒤에 설명하겠습니다.
33.1 변수의 사용 범위 알아보기
파이썬 스크립트에서 변수를 만들면 다음과 같이 함수 안에서도 사용할 수 있습니다.
global_variable.py
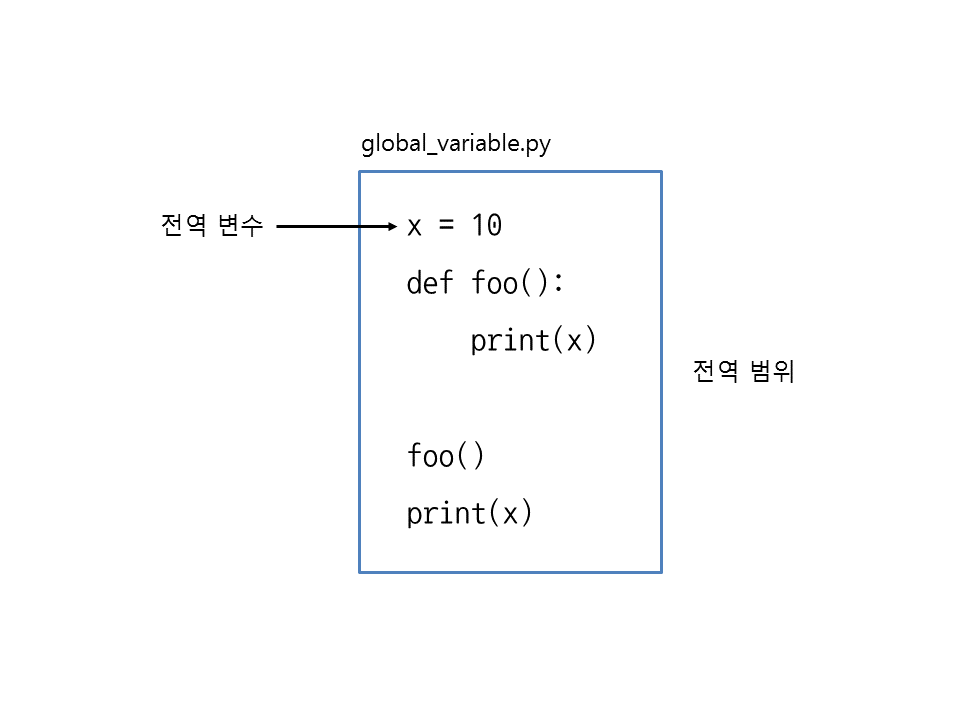
x=10# 전역 변수deffoo():print(x)# 전역 변수 출력foo()print(x)# 전역 변수 출력
실행 결과
10
10
foo 함수에서 함수 바깥에 있는 변수 x의 값을 출력했습니다. 물론 함수 바깥에서도 x의 값을 출력할 수 있습니다. 이처럼 함수를 포함하여 스크립트 전체에서 접근할 수 있는 변수를 전역 변수(global variable)라고 부릅니다. 특히 전역 변수에 접근할 수 있는 범위를 전역 범위(global scope)라고 합니다.
▼ 그림 33-1 전역 변수와 전역 범위
그럼 변수 x를 함수 foo 안에서 만들면 어떻게 될까요?
local_variable.py
deffoo():x=10# foo의 지역 변수print(x)# foo의 지역 변수 출력foo()print(x)# 에러. foo의 지역 변수는 출력할 수 없음
실행 결과
10
Traceback (most recent call last):
  File "C:\project\local_variable.py", line 6, in <module>
    print(x)        # 에러. foo의 지역 변수는 출력할 수 없음
NameError: name 'x' is not defined
실행을 해보면 x가 정의되지 않았다는 에러가 발생합니다. 왜냐하면 변수 x는 함수 foo 안에서 만들었기 때문에 foo의 지역 변수(local variable)입니다. 따라서 지역 변수는 변수를 만든 함수 안에서만 접근할 수 있고, 함수 바깥에서는 접근할 수 없습니다. 특히 지역 변수를 접근할 수 있는 범위를 지역 범위(local scope)라고 합니다.
▼ 그림 33-2 지역 변수와 지역 범위
이렇게 전역 변수와 지역 변수를 사용해보았습니다.
33.1.1함수 안에서 전역 변수 변경하기
만약 함수 안에서 전역 변수의 값을 변경하면 어떻게 될까요?
global_local_variable.py
x=10# 전역 변수deffoo():x=20# x는 foo의 지역 변수print(x)# foo의 지역 변수 출력foo()print(x)# 전역 변수 출력
실행 결과
20
10
분명 함수 foo 안에서 x = 20처럼 x의 값을 20으로 변경했습니다. 하지만 함수 바깥에서 print로 x의 값을 출력해보면 10이 나옵니다. 겉으로 보기에는 foo 안의 x는 전역 변수인 것 같지만 실제로는 foo의 지역 변수입니다. 즉, 전역 변수 x가 있고, foo에서 지역 변수 x를 새로 만들게 됩니다. 이 둘은 이름만 같을 뿐 서로 다른 변수입니다.
함수 안에서 전역 변수의 값을 변경하려면 global 키워드를 사용해야 합니다. 다음과 같이 함수 안에서 global에 전역 변수의 이름을 지정해줍니다.
global 전역변수
function_global_keyword.py
x=10# 전역 변수deffoo():globalx# 전역 변수 x를 사용하겠다고 설정x=20# x는 전역 변수print(x)# 전역 변수 출력foo()print(x)# 전역 변수 출력
실행 결과
20
20
이제 함수 안에서 x를 20으로 변경하면 함수 바깥에서 x를 출력했을 때 20이 나옵니다. 이렇게 함수 안에서 변수를 global로 지정하면 전역 변수를 사용하게 됩니다.
만약 전역 변수가 없을 때 함수 안에서 global을 사용하면 해당 변수는 전역 변수가 됩니다.
# 전역 변수 x가 없는 상태deffoo():globalx# x를 전역 변수로 만듦x=20# x는 전역 변수print(x)# 전역 변수 출력foo()print(x)# 전역 변수 출력
참고 | 네임스페이스
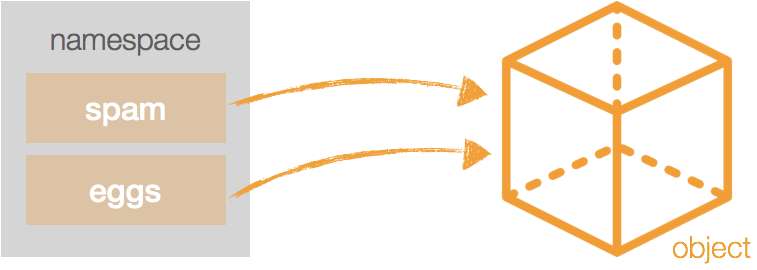
파이썬에서 변수는 네임스페이스(namespace, 이름공간)에 저장됩니다. 다음과 같이 locals 함수를 사용하면 현재 네임스페이스를 딕셔너리 형태로 출력할 수 있습니다.
>>> a = [1, 2, 3]
>>> id(a)
4393788808>>> a[0] = 5>>> a
[5, 2, 3]
>>> id(a)
4393788808
set도 mutable입니다.
|= set에서 or 연산입니다. 합집합이 됩니다.
값은 변경되었으나 id는 변함없습니다.
>>> x = {1, 2, 3}
>>> x
{1, 2, 3}
>>> id(x)
4396095304>>> x|={4,5,6}
>>> x
{1, 2, 3, 4, 5, 6}
>>> id(x)
4396095304
str은 immutable 입니다.
s 변수에 첫번째 글자를 변경 시도하면 에러가 발생합니다.
s에 다른 값을 할당하면, id가 변경됩니다. 재할당은 애초에 변수를 다시할당하는 것이므로 mutable과 immutable과는 다른 문제입니다. list또한 값을 재할당하면 id가 변경됩니다.
>>> s= "abc">>> s
'abc'>>> id(s)
4387454680>>> s[0]
'a'>>> s[0] = 's'
Traceback (most recent call last):
File "<stdin>", line 1, in <module>
TypeError: 'str' object does not support item assignment
>>> s = 'def'>>> s
'def'>>> id(s)
4388970768
2. 변수 간 대입(단순 복사)
2-1 mutable한 객체의 변수 간 대입
list의 얕은 복사를 확인 해봅니다.
b 에 a를 할당하면 값이 할당되는 것이 아니라 같은 메모리 주소를 바라봅니다.
b를 변경하면 같이 a도 바뀝니다.
mutable한 다른 객체 또한 똑같은 현상이 나타납니다.
>>> a = [1, 2, 3]
>>> b = a # shallow copy>>> b[0]= 5>>> a
[5, 2, 3]
>>> b
[5, 2, 3]
>>> id(a)
4396179528>>> id(b)
4396179528
2-2 immutable한 객체의 변수간 대입
str 문자열의 얕은 복사를 확인해봅니다.
list와 똑같이 b를 a에 할당하면 같은 메모리 주소를 바라보게 됩니다.
하지만 b에 다른 값을 할당하면 재할당이 이루어지며 메모리 주소가 변경됩니다.
고로 a와 b는 다른 값을 가집니다.
>>> a = "abc">>> b = a
>>> a
'abc'>>> b
'abc'>>> id(a)
4387454680>>> id(b)
4387454680>>> b = "abcd">>> a
'abc'>>> b
'abcd'>>> id(a)
4387454680>>> id(b)
4396456400
3. 얕은 복사(shallow copy)
list의 슬라이싱을 통한 새로운 값을 할당해봅니다.
아래의 결과와 같이 슬라이싱을 통해서 값을 할당하면 새로운 id가 부여되며, 서로 영향을 받지 않습니다.
>>> a = [1,2,3]
>>> b = a[:] # copy.copy(a)와 동일>>> id(a)
4396179528>>> id(b)
4393788808>>> a == b
True>>> a is b
False>>> b[0] = 5>>> a
[1, 2, 3]
>>> b
[5, 2, 3]
하지만, 이러한 슬라이싱 또한 얕은 복사에 해당합니다.
리스트안에 리스트 mutable객체 안에 mutable객체인 경우 문제가 됩니다.
id(a) 값과 id(b) 값은 다르게 되었지만, 그 내부의 객체 id(a[0])과 id(b[0])은 같은 주소를 바라보고 있습니다.
>>> a = [[1,2], [3,4]]
>>> b = a[:]
>>> id(a)
4395624328>>> id(b)
4396179592>>> id(a[0])
4396116040>>> id(b[0])
4396116040
이런 경우처럼 함수가 받을 인자의 갯수를 유연하게 지정할 수 있다면 보다 유연하게 코드를 작성할 수 있습니다.
파이썬은 이런 경우를 지원하기 위해 packing을 지원합니다.
패킹은 인자로 받은 여러개의 값을 하나의 객체로 합쳐서 받을 수 있도록 합니다.
위치인자 패킹은 *한개를 매개변수 앞에 붙임으로 사용합니다.
deffunc(*args):
print(args)
print(type(args))
이런식으로 매개변수 이름 앞에 *을 붙여준다면, 위치인자로 보낸 모든 객체들을 하나의 객체로 관리해줍니다.
func(1, 2, 3, 4, 5, 6, 'a', 'b')
결과
(1, 2, 3, 4, 5, 6, 'a', 'b')
<class 'tuple'>
이러한 packing을 통해 받은 모든 숫자들의 합을 구하는 연산도 구할 수 있습니다. 몇개든 상관없이 가능합니다.
defsum_all(*numbers):
result = 0for number in numbers:
result += number
return result
print(sum_all(1, 2, 3)) # 6
print(sum_all(1, 2, 3, 4, 5, 6)) # 21
packing을 이용해서 반드시 받아야하는 매개변수와 여러개를 받을수있는 매개변수를 구분해서 작성할 수 있습니다.
defprint_family_name(father, mother, *sibling):
print("아버지 :", father)
print("어머니 :", mother)
if sibling:
print("호적 메이트..")
for name in sibling:
print(name)
print_family_name("홍길동", '심사임당', '김태희', '윤아')
결과값
아버지 : 홍길동
어머니 : 심사임당
호적 메이트..
김태희
윤아
위치인자가 패킹하는 매개변수를 만나면 그 이후에 위치인자가 몇개이던지, tuple로 하나의 객체가되어서 관리됩니다.
동일한 방식으로 키워드인자로 unpacking할 수 있습니다. unpacking하기 위해선 인자가 key와 인자로 구성되어 있는 mapping타입, 즉 dict가 필요합니다.
defcal(first, op, second):if op == '+':
return first + second
if op == '/':
return first / second
if op == '-':
return first - second
if op == '*':
return first * second
prob = {
'first': 12,
'second': 34,
'op': '*'
}
cal(**prob) # 결과 : 408
전역(globals) 네임스페이스를 확인하는 globals함수를 실행하면 함수의 네임스페이스를 볼 수 있습니다. 정의한적 없는 변수들도 여럿 보입니다. a라는 이름에 객체 3이 지정되있는걸 확인할 수 있습니다.
함수는 전역과 별개의 네임스페이스를 가집니다.
a = 3deffunc():
a = 100
b = 'python'
func()
print(globals())
함수안에서 변수 a의 값을 바꾸고, 새로운 변수 b를 생성했지만, globals의 네임스페이스에는 바뀐 값과, 새로 할당한 변수이름이 보이지 않습니다.
함수는 함수만에 별도 구분된 네임스페이스 공간을 가집니다.
a = 3
c = 'Hello'deffunc():
a = 100
b = 'python'
print('함수 내부 namespace', locals())
func()
locals() 함수는 실행하는 공간에 namespace를 출력해줍니다. 함수안에서 locals함수를 실행했기 때문에, 함수안에 namespace를 출력해줍니다.
만약 함수 밖에서, 즉 전역에서 locals함수를 실행한다면 globals함수를 실행한 결과와 동일한 값을 출력합니다.
현재 코드기 실행되는 공간의 namespace를 리턴하는 locals함수를 실행시켜서 확인합니다.
실행결과
함수 내부 namespace {'b': 'python', 'a': 100}
이처럼 함수는 별도의 namespace를 가집니다. 만약 함수안에 함수를 또 생성한다면 어떻게 될까요?
a = 3
c = 'Hello'deffunc():
a = 100
b = 'python'
print('외부 함수 내부 namespace', locals())
definner_func():
print('내부 함수 내부 namespace', locals())
inner_func()
func()
실행결과
외부 함수 내부 namespace {'b': 'python', 'a': 100}
내부 함수 내부 namespace {}
함수는 다른 함수안에 있을지라도, 별도의 namespace를 가지는걸 확인할 수 있습니다.
네임스페이스 참조
네임스페이스가 다르다면, 값을 참조할 수 없습니다.
deffunc():
a = 3
print(a)
실행결과
NameError: name 'a' is notdefined
하지만 함수는 globals의 변수를 참조할 수 있습니다.
a = 100deffunc():definner():
b = 'python'
inner()
print(a)
print(b)
func()
실행결과
100NameError: name 'b' is notdefined
함수는 globals 네임스페이스뿐 아니라 상위 함수의 변수도 참조할 수 있습니다.
a = 'fastcampus'deffunc1():
b = 'python'deffunc2():
print(a)
print(b)
func2()
func1()
실행결과
fastcampus
python
네임스페이스가 분리된 이유
함수별로 네임스페이스가 분리되어 있지 않고 전역과 함수내부에 네임스페이스가 하나로 관리된다면, 함수를 만드는데 복잡한 고려사항이 생기게됩니다.
네임스페이스가 변경되지 않으면, 함수내부에서 외부에 있는 변수가 참조하고 있는 객체를 변경할 수 있습니다.
a = 'python'deffunc():
a = 3
func()
print(a)
네임스페이스가 하나여서 함수내부에서 외부에 (전역 또는 외부함수)에 변수를 수정할 수 있게되면, 위 코드의 출력결과가 3이 됩니다.
네임스페이스가 하나라면 프로그래머는 복잡한 고려사항을 항상 생각하고 함수를 작성해야합니다. 바로 변수이름을 겹치지 않게 지어야 한다는 점입니다.
이러한 복잡한 고려사항을 생각해야하는 상황이라고 가정하고 다음의 코드를 실행시켜보겠습니다.
한변의 길이가 리스트로 주어져있을때, 그 변을 한변으로 하는 정사각형의 넓이를 구해서, 가장 큰 사각형의 넓이를 출력하는 코드입니다.
반복되는 연산인 정사각형의 넓이는 구하는 연산은 함수로 지정했습니다.
defsquare(n):
result = n ** 2return result
lines = [4, 3, 9, 8]
result = 0for line in lines:
area = square(line)
if area > result:
result = area
print(result)
이러한 코드에서 square함수가 실행될때 마다 함수안에서 전역에 result변수의 값을 계속 바꾸고 있기 때문에 즉 함수내부에서 전역에 있는 result변수의 참조를 변경시킨다면 의도한 결과가 나오지 않게 됩니다.
모든 함수의 변수가 하나의 네임스페이스에서 관리된다면, 모든 함수를 만들때 변수를 겹치지 않게 만들어야하는 노력을 해야합니다.
파이썬에서 함수는, 함수의 로직에만 신경쓸수 있도록, 함수내부에서 외부에 변수를 참조는 가능하지만, 새로운 변수를 만든다면 변수를 별도의 공간에 저장하도록 네임스페이스를 분리하였습니다.
외부 네임스페이스 변수 값 변경
함수별로 변수를 저장하는 네임스페이스는 분리되어 있습니다. 하지만, 함수에서 외부에 있는 네임스페이스에 값은 참조가능합니다.
만약 함수내부에서 외부에 변수를 변경하고 싶다면 어떻게 해야할까요?
함수에서 외부에 변수이름과 동일한 이름의 새로운 변수를 만들 수 있습니다. 이때 외부에 변수는 영향을 받지 않습니다.
lang = 'jython'deffunc():
lang = 'python'
print(lang)
func()
print(lang)
실행결과
python
jython
새로운 변수를 함수 local 네임스페이스에 생성하는게 아니라, 외부에 있는 변수를 변경하고 싶다면 global또는 nonlocal키워드를 사용해야 합니다.
lang = 'jython'deffunc():global lang
lang = 'python'
print(lang)
func()
print(lang)
실행결과
python
python
함수 내부에 선언한 global lang 부분은, 이름 lang을 global에 선언한 lang으로만 사용하겠다는 뜻입니다.
이후에 lang변수의 값을 변경하면, global에 있는 변수가 참조하고 있는 객체가 바뀌게 됩니다.
외부함수에 있는 값을 변경할때는 nonlocal키워드를 사용하면 됩니다.
deffunc():
var = 1deffunc2():nonlocal var
var = 3
func2()
print(var)
func()
This tutorial will go through the "what" and "why" of exceptions in Python, and then walk you through the process of creating and using your own types of exceptions. And more importantly, when not to. Enjoy!
What is an Exception?
If you have been coding in Python for any length of time, no doubt you have seen a traceback. Just in case you haven't, here we'll make one happen. You can open up a Python console and type in the statements that follow, or just read along:
>>> l = [1,2,3] #1>>> l['apples'] #2
Traceback (most recent call last):
File "<stdin>", line 1, in <module>
TypeError: list indices must be integers, not str
>>> l[4] #3
Traceback (most recent call last):
File "<stdin>", line 1, in <module>
IndexError: list index out of range
>>> l[1] #42
So here is what we just did. In line 1 we made a list with three elements in it. Line 2 tries to access the element at the index 'apples'. Now, since that's just really not cool, Python complains. It does so by raising a TypeError. TypeError is a kind of Exception. When an Exception gets raised and but does not get caught (we'll get to that later), then it ends up printing a traceback to the error output. In the case of the Python console, the error output is just the console. A traceback message gives some information about the actual error and gives some detail about how we got to the point where the error actually happened. If this last sentence was confusing don't worry, it should become clear with the next example.
The TypeError complains that it was expecting an integer and not a string. This seems like a pretty reasonable reaction. So in line 3 we give it an integer. Unfortunately the only indices available for l are 0,1 and 2, but we're trying to access l[4]. Naturally this also isn't cool. So Python complains again by raising an IndexError and printing an appropriate traceback.
Finally, we do something sensible and access l[1]. This, as compared to our other attempts, is cool. l[1] has the value 2.
Great. So what have we learned?
Python uses Exceptions to tell on bad code. Exceptions are raised when something doesn't work according to plan, where the program cannot proceed. And there are different types of exceptions for different situations.
The Traceback
Here's a more interesting example, just to demonstrate a bit more about the traceback and why this exception is cool as well:
So far nothing amazing has happened in the code above. We made three functions such that f3 calls f2 calls f1. Now let's do something with them:
>>> f1(1)
>>> f1(2)
Traceback (most recent call last):
  File "<stdin>", line 1, in <module>
  File "<stdin>", line 2, in f1
AssertionError
Here we meet the AssertionError. This exception gets raised every time x == 1 evaluates to False. Pretty straight-forward. As a side note, assertion statements like the one above are pretty useful for 'sanity checking' while running code.
>>> f2(1)
>>> f2(2)
Traceback (most recent call last):
  File "<stdin>", line 1, in <module>
  File "<stdin>", line 2, in f2
  File "<stdin>", line 2, in f1
AssertionError
This time the traceback is a little longer. From this traceback, you can see that the AssertionError was raised in f1, and that f1 was called by f2. It even has line numbers. The line numbers aren't too useful right now because we are just entering things into the console. However, writing and executing complex Python programs entirely in the console is not common practice; usually you'll be calling functions that are stored in files. If such a function raises an Exception, then the traceback will help you find exactly what line of what file raised the error.
>>> f3(1)
Traceback (most recent call last):
File "<stdin>", line 1, in <module>
File "<stdin>", line 3, in f3
NameError: global name 'not_cool'isnot defined
>>>
This time we are calling f3. The value of 1 gets passed to f1 and the assertion statement causes no error. The program then proceeds back to f3 where the statement not_cool caused an error. The traceback does not include any information about f1 and f2 because those functions had already executed without error.
>>> f3(2)
Traceback (most recent call last):
  File "<stdin>", line 1, in <module>
  File "<stdin>", line 2, in f3
  File "<stdin>", line 2, in f2
  File "<stdin>", line 2, in f1
AssertionError
This time we execute f3 and give it a value that will cause an AsserionError to be raised by f1. The traceback describes the process flow.
If you are having any trouble understanding how the program flow can be determined from a traceback message, then it will likely be worth your while to do some reading about 'call stacks'.
Catching Exceptions
The power of exceptions is that we can write code to react to them. To do this, we catch exceptions. Continuing from our previous code:
>>> try:
... f1(1)
... except:
... print"caught an exception"...
Aaaand nothing happens. Great, there was no exception.
>>> try:
... f1(2)
... except:
... print"caught an exception"...
caught an exception
This time there was one and we caught the bugger. Whatever you put inside an except block will only execute if it catches an exception. But there's more to it than that:
>>> try:
... f1(1)
... except:
... print"caught an exception"... else:
... print"no exception"... finally:
... print"the end"
no exception
the end
>>>
>>> try:
... f1(2)
... except:
... print"caught an exception"... else:
... print"no exception"... finally:
... print"the end"
caught an exception
the end
The else block only gets executed if no exception gets caught. And the finally block gets executed no matter what.
But not all exceptions are created equal. The reason we have different types of exceptions is because we might want to react to them differently.
For example:
>>> deffoo(i):... l = [1,2,3]
... try:
... assert i >= 1... return l[i]
... except TypeError,e: ####A... print"dealing with TypeError"... except IndexError, e: ####B... print"dealing with IndexError"... except: ####C... print"oh dear"... finally: ####D... print"the end"... >>> >>> foo('apples')
dealing with TypeError
the end
>>> >>> foo(-1)
oh dear
the end
>>> >>> foo(4)
dealing with IndexError
the end
>>> >>> foo(1)
the end
2
Whenever we call foo, we try to return the requested element of the list if it is positive. We have 3 different ways of catching exceptions. If an exception gets raised, then execution proceeds to the first except block that matches the exception. In other words, if an exception is raised, then Python first checks if it is a TypeError (A). If it is a TypeError, then it will process that except block before it proceeds to the finally block. If it is not a TypeError, then Python checks if it is an IndexError (B), etc.
Note that that means that the order of the except blocks matters. Let's edit foo to look like this:
>>> deffoo(i):... l = [1,2,3]
... try:
... assert i >= 1... return l[i]
... except: ####C... print"oh dear"... except TypeError,e: ####A... print"dealing with TypeError"... except IndexError, e: ####B... print"dealing with IndexError"... finally: ####D... print"the end"...
A good rule of thumb is to only catch exceptions you are willing to handle.
Raising Exceptions On Purpose
You can explicitly raise Exceptions in two ways (making an error in your code is more of an implicit method).
The first way is to reraise an exception you caught. For example:
try:
    do_important_stuff()
except:
    import traceback
    s = traceback.format_exc()
    send_error_message_to_responsible_adult(s)
    raise
Or, you can construct an Exception object and raise it yourself. Since Exceptions have different types, they sometimes expect different arguments. Here's a really basic example:
defgreet_person(sPersonName):"""
says hello
"""if sPersonName == "Robert":
raise Exception("we don't like you, Robert")
print"Hi there {0}".format(sPersonName)
Try to greet a few people and see what happens.
Subclassing Exceptions and Other Fancy Things
Since Exceptions are objects and can be constructed, it makes sense that we can subclass the Exception class. Or even subclass subclasses of the Exception class.
Now you can raise your own exceptions, just like any other exception. Note that when creating your except statements, inheritance matters. That is, an except statement aimed at IndexError will also catch MyIndexError. This is because a MyIndexError IS an IndexError. Conversely, if you have an except block aimed at MyIndexError, then it will NOT catch IndexError. This is because an IndexError IS NOT a MyIndexError.
So that is simple enough. But why would you want to do that? Well, best practice is really to avoid doing that sort of thing. modern versions of Python have a rich set of Exceptions already, so it often isn't worth creating more stuff. If you wanted to create MyIndexError, then ask yourself if a regular IndexError would do the trick. If it won't do the trick, then it's possibly worthwhile.
For example, if the context in which the exception was raised is extra meaningful, then it might be worth storing that context in the Exception:
classMyExceptionWithContext(Exception):def__init___(self,dErrorArguments):
Exception.__init__(self,"my exception was raised with arguments {0}".format(dErrArguments))
self.dErrorArguments = dErrorArguements
defdo_stuff(a,b,c):if some_complicated_thing(a,b,c):
raise MyExceptionWithContext({
'a' : a,
'b' : b,
'c' : c,
})
else:
return life_goes_on(a,b,c)
A lot of the time, the context of an exception is simple enough that it can be passed as a message to one of the built-in Exception types. In other cases, this sort of thing really makes sense. The urllib package demonstrates a good use of this method. If you ask urllib to access a specific URL it may just succeed, but if it doesn't, then it tries to give you as much information as possible to debug the problem. For example, it generates different kinds exceptions for a timeouts and 404s.
Sometimes you want an Exception that is very much like one of the built-in exceptions in every way, but it has some pre-determined message. Like so:
>>> classOhMyGoodnessExc(Exception):... def__init__(self):... Exception.__init__(self,"well, that rather badly didnt it?")
... >>> raise OhMyGoodnessExc()
Traceback (most recent call last):
File "<stdin>", line 1, in <module>
__main__.OhMyGoodnessExc: well, that rather badly didnt it?
>>>
>>> raise OhMyGoodnessExc()
Traceback (most recent call last):
File "<stdin>", line 1, in <module>
__main__.OhMyGoodnessExc: well, that rather badly didnt it?
Every time you raise an OhMyGoodnessExc, the same thing happens. The fact that it is anOhMyGoodnessExc doesn't matter much─what we care about is the message.
This is more easily and neatly achieved by just constructing a suitable exception beforehand and raising it when you need to:
>>> oh_my_goodness = Exception("well, that rather badly didnt it?")
>>>
>>> raise oh_my_goodness
Traceback (most recent call last):
  File "<stdin>", line 1, in <module>
Exception: well, that rather badly didnt it?
>>>
>>> raise oh_my_goodness
Traceback (most recent call last):
  File "<stdin>", line 1, in <module>
Exception: well, that rather badly didnt it?
The thing to note here is that an Exception doesn't need to be raised as soon as it is constructed. And when in doubt, KISS (Keep It Simple, Stupid).
Conclusion
We've covered a lot of ground here, specifically what exceptions do and how and when to catch them; how to make them happen and how to make your own exception classes. We also covered quite a bit of good practice regarding exceptions. Here's a little summary:
Not all exceptions are created equal: if you know what class of exception you are dealing with, then be specific about what you catch
Don't catch anything you can't deal with
If you need to deal with multiple exception types, then have multiple except blocks in the right order
custom exceptions can be very useful if complex or specific information needs to be stored in exception instances
don't make new exception classes when the built-in ones have all the functionality you need
you don't need to raise an Exception as soon as it is constructed, this makes it easy to pre-define a set of allowed errors in one place
While Python isn’t purely an object-oriented language, it’s flexible enough and powerful enough to allow you to build your applications using the object-oriented paradigm. One of the ways in which Python achieves this is by supporting inheritance, which it does with super().
In this tutorial, you’ll learn about the following:
The concept of inheritance in Python
Multiple inheritance in Python
How the super() function works
How the super() function in single inheritance works
How the super() function in multiple inheritance works
Free Bonus:5 Thoughts On Python Mastery, a free course for Python developers that shows you the roadmap and the mindset you'll need to take your Python skills to the next level.
If you have experience with object-oriented languages, you may already be familiar with the functionality of super().
If not, don’t fear! While the official documentation is fairly technical, at a high level super() gives you access to methods in a superclass from the subclass that inherits from it.
super() alone returns a temporary object of the superclass that then allows you to call that superclass’s methods.
Why would you want to do any of this? While the possibilities are limited by your imagination, a common use case is building classes that extend the functionality of previously built classes.
Calling the previously built methods with super() saves you from needing to rewrite those methods in your subclass, and allows you to swap out superclasses with minimal code changes.
super() in Single Inheritance
If you’re unfamiliar with object-oriented programming concepts, inheritance might be an unfamiliar term. Inheritance is a concept in object-oriented programming in which a class derives (or inherits) attributes and behaviors from another class without needing to implement them again.
For me at least, it’s easier to understand these concepts when looking at code, so let’s write classes describing some shapes:
In this example, you have two shapes that are related to each other: a square is a special kind of rectangle. The code, however, doesn’t reflect that relationship and thus has code that is essentially repeated.
By using inheritance, you can reduce the amount of code you write while simultaneously reflecting the real-world relationship between rectangles and squares:
classRectangle:def__init__(self,length,width):self.length=lengthself.width=widthdefarea(self):returnself.length*self.widthdefperimeter(self):return2*self.length+2*self.width# Here we declare that the Square class inherits from the Rectangle classclassSquare(Rectangle):def__init__(self,length):super().__init__(length,length)
Here, you’ve used super() to call the __init__() of the Rectangle class, allowing you to use it in the Square class without repeating code. Below, the core functionality remains after making changes:
>>>
>>> square=Square(4)>>> square.area()16
In this example, Rectangle is the superclass, and Square is the subclass.
Because the Square and Rectangle.__init__() methods are so similar, you can simply call the superclass’s .__init__() method (Rectangle.__init__()) from that of Square by using super(). This sets the .length and .width attributes even though you just had to supply a single length parameter to the Square constructor.
When you run this, even though your Square class doesn’t explicitly implement it, the call to .area() will use the .area() method in the superclass and print 16. The Square class inherited.area() from the Rectangle class.
So what can super() do for you in single inheritance?
Like in other object-oriented languages, it allows you to call methods of the superclass in your subclass. The primary use case of this is to extend the functionality of the inherited method.
In the example below, you will create a class Cube that inherits from Square and extends the functionality of .area() (inherited from the Rectangle class through Square) to calculate the surface area and volume of a Cube instance:
Caution: Note that in our example above, super() alone won’t make the method calls for you: you have to call the method on the proxy object itself.
Here you have implemented two methods for the Cube class: .surface_area() and .volume(). Both of these calculations rely on calculating the area of a single face, so rather than reimplementing the area calculation, you use super() to extend the area calculation.
Also notice that the Cube class definition does not have an .__init__(). Because Cube inherits from Square and .__init__() doesn’t really do anything differently for Cube than it already does for Square, you can skip defining it, and the .__init__() of the superclass (Square) will be called automatically.
super() returns a delegate object to a parent class, so you call the method you want directly on it: super().area().
Not only does this save us from having to rewrite the area calculations, but it also allows us to change the internal .area() logic in a single location. This is especially in handy when you have a number of subclasses inheriting from one superclass.
A super() Deep Dive
Before heading into multiple inheritance, let’s take a quick detour into the mechanics of super().
While the examples above (and below) call super() without any parameters, super() can also take two parameters: the first is the subclass, and the second parameter is an object that is an instance of that subclass.
First, let’s see two examples showing what manipulating the first variable can do, using the classes already shown:
In Python 3, the super(Square, self) call is equivalent to the parameterless super() call. The first parameter refers to the subclass Square, while the second parameter refers to a Square object which, in this case, is self. You can call super() with other classes as well:
In this example, you are setting Square as the subclass argument to super(), instead of Cube. This causes super() to start searching for a matching method (in this case, .area()) at one level above Square in the instance hierarchy, in this case Rectangle.
In this specific example, the behavior doesn’t change. But imagine that Square also implemented an .area() function that you wanted to make sure Cube did not use. Calling super() in this way allows you to do that.
Caution: While we are doing a lot of fiddling with the parameters to super() in order to explore how it works under the hood, I’d caution against doing this regularly.
The parameterless call to super() is recommended and sufficient for most use cases, and needing to change the search hierarchy regularly could be indicative of a larger design issue.
What about the second parameter? Remember, this is an object that is an instance of the class used as the first parameter. For an example, isinstance(Cube, Square) must return True.
By including an instantiated object, super() returns a bound method: a method that is bound to the object, which gives the method the object’s context such as any instance attributes. If this parameter is not included, the method returned is just a function, unassociated with an object’s context.
For more information about bound methods, unbound methods, and functions, read the Python documentation on its descriptor system.
Note: Technically, super() doesn’t return a method. It returns a proxy object. This is an object that delegates calls to the correct class methods without making an additional object in order to do so.
Now that you’ve worked through an overview and some examples of super() and single inheritance, you will be introduced to an overview and some examples that will demonstrate how multiple inheritance works and how super() enables that functionality.
Multiple Inheritance Overview
There is another use case in which super() really shines, and this one isn’t as common as the single inheritance scenario. In addition to single inheritance, Python supports multiple inheritance, in which a subclass can inherit from multiple superclasses that don’t necessarily inherit from each other (also known as sibling classes).
I’m a very visual person, and I find diagrams are incredibly helpful to understand concepts like this. The image below shows a very simple multiple inheritance scenario, where one class inherits from two unrelated (sibling) superclasses:
A diagrammed example of multiple inheritance (Image: Kyle Stratis)
To better illustrate multiple inheritance in action, here is some code for you to try out, showing how you can build a right pyramid (a pyramid with a square base) out of a Triangle and a Square:
Note: The term slant height may be unfamiliar, especially if it’s been a while since you’ve taken a geometry class or worked on any pyramids.
The slant height is the height from the center of the base of an object (like a pyramid) up its face to the peak of that object. You can read more about slant heights at WolframMathWorld.
This example declares a Triangle class and a RightPyramid class that inherits from both Square and Triangle.
You’ll see another .area() method that uses super() just like in single inheritance, with the aim of it reaching the .perimeter() and .area() methods defined all the way up in the Rectangle class.
Note: You may notice that the code above isn’t using any inherited properties from the Triangle class yet. Later examples will fully take advantage of inheritance from both Triangle and Square.
The problem, though, is that both superclasses (Triangle and Square) define a .area(). Take a second and think about what might happen when you call .area() on RightPyramid, and then try calling it like below:
>>>
>> pyramid = RightPyramid(2, 4)>> pyramid.area()Traceback (most recent call last):
File "shapes.py", line 63, in <module>print(pyramid.area())
File "shapes.py", line 47, in areabase_area=super().area()
File "shapes.py", line 38, in areareturn0.5*self.base*self.heightAttributeError: 'RightPyramid' object has no attribute 'height'
Did you guess that Python will try to call Triangle.area()? This is because of something called the method resolution order.
Note: How did we notice that Triangle.area() was called and not, as we hoped, Square.area()? If you look at the last line of the traceback (before the AttributeError), you’ll see a reference to a specific line of code:
return0.5*self.base*self.height
You may recognize this from geometry class as the formula for the area of a triangle. Otherwise, if you’re like me, you might have scrolled up to the Triangle and Rectangle class definitions and seen this same code in Triangle.area().
Method Resolution Order
The method resolution order (or MRO) tells Python how to search for inherited methods. This comes in handy when you’re using super() because the MRO tells you exactly where Python will look for a method you’re calling with super() and in what order.
Every class has an .__mro__ attribute that allows us to inspect the order, so let’s do that:
This tells us that methods will be searched first in Rightpyramid, then in Triangle, then in Square, then Rectangle, and then, if nothing is found, in object, from which all classes originate.
The problem here is that the interpreter is searching for .area() in Triangle before Square and Rectangle, and upon finding .area() in Triangle, Python calls it instead of the one you want. Because Triangle.area() expects there to be a .height and a .base attribute, Python throws an AttributeError.
Luckily, you have some control over how the MRO is constructed. Just by changing the signature of the RightPyramid class, you can search in the order you want, and the methods will resolve correctly:
Notice that RightPyramid initializes partially with the .__init__() from the Square class. This allows .area() to use the .length on the object, as is designed.
Now, you can build a pyramid, inspect the MRO, and calculate the surface area:
You see that the MRO is now what you’d expect, and you can inspect the area of the pyramid as well, thanks to .area() and .perimeter().
There’s still a problem here, though. For the sake of simplicity, I did a few things wrong in this example: the first, and arguably most importantly, was that I had two separate classes with the same method name and signature.
This causes issues with method resolution, because the first instance of .area() that is encountered in the MRO list will be called.
When you’re using super() with multiple inheritance, it’s imperative to design your classes to cooperate. Part of this is ensuring that your methods are unique so that they get resolved in the MRO, by making sure method signatures are unique—whether by using method names or method parameters.
In this case, to avoid a complete overhaul of your code, you can rename the Triangle class’s .area() method to .tri_area(). This way, the area methods can continue using class properties rather than taking external parameters:
The next issue here is that the code doesn’t have a delegated Triangle object like it does for a Square object, so calling .area_2() will give us an AttributeError since .base and .height don’t have any values.
You need to do two things to fix this:
All methods that are called with super() need to have a call to their superclass’s version of that method. This means that you will need to add super().__init__() to the .__init__() methods of Triangle and Rectangle.
Redesign all the .__init__() calls to take a keyword dictionary. See the complete code below.
There are a number of important differences in this code:
kwargs is modified in some places (such as RightPyramid.__init__()): This will allow users of these objects to instantiate them only with the arguments that make sense for that particular object.
Setting up named arguments before **kwargs: You can see this in RightPyramid.__init__(). This has the neat effect of popping that key right out of the **kwargs dictionary, so that by the time that it ends up at the end of the MRO in the object class, **kwargs is empty.
Note: Following the state of kwargs can be tricky here, so here’s a table of .__init__() calls in order, showing the class that owns that call, and the contents of kwargs during that call:
Class
Named Arguments
kwargs
RightPyramid
base, slant_height
Square
length
base, height
Rectangle
length, width
base, height
Triangle
base, height
Now, when you use these updated classes, you have this:
It works! You’ve used super() to successfully navigate a complicated class hierarchy while using both inheritance and composition to create new classes with minimal reimplementation.
As you can see, multiple inheritance can be useful but also lead to very complicated situations and code that is hard to read. It’s also rare to have objects that neatly inherit everything from more than multiple other objects.
If you see yourself beginning to use multiple inheritance and a complicated class hierarchy, it’s worth asking yourself if you can achieve code that is cleaner and easier to understand by using composition instead of inheritance.
With composition, you can add very specific functionality to your classes from a specialized, simple class called a mixin.
Since this article is focused on inheritance, I won’t go into too much detail on composition and how to wield it in Python, but here’s a short example using VolumeMixin to give specific functionality to our 3D objects—in this case, a volume calculation:
In this example, the code was reworked to include a mixin called VolumeMixin. The mixin is then used by Cube and gives Cube the ability to calculate its volume, which is shown below:
This mixin can be used the same way in any class that has an area defined for it and for which the formula area * height returns the correct volume.
A super() Recap
In this tutorial, you learned how to supercharge your classes with super(). Your journey started with a review of single inheritance and then showed how to call superclass methods easily with super().
You then learned how multiple inheritance works in Python, and techniques to combine super() with multiple inheritance. You also learned about how Python resolves method calls using the method resolution order (MRO), as well as how to inspect and modify the MRO to ensure appropriate methods are called at appropriate times.
For more information about object-oriented programming in Python and using super(), check out these resources:
Python is Object oriented language, every thing is an object in python. Python is having special type of methods called magic methods named with preceded and trailing double underscores.
When we talk about magic method __new__ we also need to talk about __init__
These methods will be called when you instantiate(The process of creating instance from class is called instantiation). That is when you create instance. The magic method __new__ will be called when instance is being created. Using this method you can customize the instance creation. This is only the method which will be called first then __init__ will be called to initialize instance when you are creating instance.
Method __new__ will take class reference as the first argument followed by arguments which are passed to constructor(Arguments passed to call of class to create instance). Method __new__ is responsible to create instance, so you can use this method to customize object creation. Typically method __new__ will return the created instance object reference. Method __init__ will be called once __new__ method completed execution.
You can create new instance of the class by invoking the superclass’s __new__ method using super. Something like super(currentclass, cls).__new__(cls, [,….])
Usual class declaration and instantiation
Python
1
2
3
4
5
6
7
8
9
classFoo(object):
def__init__(self,a,b):
self.a=a
self.b=b
defbar(self):
pass
i=Foo(2,3)
A class implementation with __new__ method overridden
You can create instance inside __new__ method either by using superfunction or by directly calling __new__ method over object Where if parent class is object. That is,
If __new__ return instance of it’s own class, then the __init__ method of newly created instance will be invoked with instance as first (like __init__(self, [, ….]) argument following by arguments passed to __new__ or call of class. So, __init__ will called implicitly.
If __new__ method return something else other than instance of class, then instances __init__ method will not be invoked. In this case you have to call __init__ method yourself.
Applications
Usually it’s uncommon to override __new__ method, but some times it is required if you are writing APIs or customizing class or instance creation or abstracting something using classes.
SINGLETON USING __NEW__
You can implement the singleton design pattern using __new__ method. Where singleton class is a class that can only have one object. That is, instance of class.
Here is how you can restrict creating more than one instance by overriding __new__
Singleton implementation using __new__
Python
1
2
3
4
5
6
7
classSingleton(object):
_instance=None# Keep instance reference
def__new__(cls,*args,**kwargs):
ifnotcls._instance:
cls._instance=object.__new__(cls,*args,**kwargs)
returncls._instance
It is not limited to singleton. You can also impose limit on total number created instances
Limiting total number of instances can be created using __new__
Python
1
2
3
4
5
6
7
8
9
10
11
12
13
14
classLimitedInstances(object):
_instances=[]# Keep track of instance reference
limit=5
def__new__(cls,*args,**kwargs):
ifnotlen(cls._instances)<=cls.limit:
raiseRuntimeError,"Count not create instance. Limit %s reached"%cls.limit
instance=object.__new__(cls,*args,**kwargs)
cls._instances.append(instance)
returninstance
def__del__(self):
# Remove instance from _instances
self._instance.remove(self)
CUSTOMIZE INSTANCE OBJECT
You can customize the instance created and make some operations over it before initializer __init__ being called.Also you can impose restriction on instance creation based on some constraints
Python
1
2
3
4
5
6
7
8
9
10
11
12
13
14
15
defcreateInstance():
# Do what ever you want to determie if instance can be created
Usually when you instantiate class it will return the instance of that class.You can customize this behaviour and you can return some random object you want.
Following one is simple example to demonstrate that returning random object other than class instance
Python
1
2
3
4
5
6
7
8
9
classAbstractClass(object):
def__new__(cls,a,b):
instance=super(AbstractClass,cls).__new__(cls)
instance.__init__(a,b)
return3
def__init__(self,a,b):
print"Initializing Instance",a,b
Output:
Python
1
2
3
4
>>>a=AbstractClass(2,3)
Initializing Instance23
>>>a
3
Here you can see when we instantiate class it returns 3 instead of instance reference. Because we are returning 3 instead of created instance from __new__ method. We are calling __init__ explicitly. As I mentioned above, we have to call __init__ explicitly if we are not returning instance object from __new__ method.
The __new__ method is also used in conjunction with meta classes to customize class creation
Conclusion
There are many possibilities on how you can use this feature. Mostly it is not always required to override __new__ method unless you are doing something regarding instance creation.
Simplicity is better than complexity. Try to make life easier use this method only if it is necessary to use.