Amazon ElastiCache for Redisの通信暗号化とクライアント認証をやってみた
2017年10月末のアップデートにより、Amazon ElastiCache for Redis が通信の暗号化とクライアント認証に対応しました。
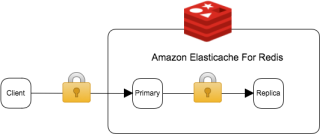
通信の暗号化(encryption in-transit)を使うと
- アプリとRedis間の通信(encrypted connections)
- プライマリ↔レプリカなどのRedis間の通信(encrypted replication)
が暗号化されます。
また、Redis の AUTH コマンドによるクライアント認証にも対応したため、認証レベルを強化できます。
これらの機能追加により、個人を特定できる情報(PII)など機密度の高い情報を扱うシステムでAmazon ElastiCache for Redisを導入しやすくなりました。
それでは、実際に使ってみましょう。
なお、同時に機能追加された、保管時の暗号化は次のブログをご確認下さい。
通信の暗号化
Redis の公式ドキュメント "Redis Security" では "Redis general security model" について次のように記載されています。
この前提の上で、Redis サーバーとは TCP や UNIX ソケットで通信します。
一方で、よりセキュアなシステムが求められるシステムには、 Redis Labs が提供する Redis Enterprise Pack (RP)のような通信の暗号化に対応した Redis が利用されてきました。
今回の機能追加は以下のような通信の暗号化機能を提供するというものです。
- TLS 1.2
- 追加費用なし
- サーバ証明書の発行・更新も含めてフルマネージド
クライアントとサーバー間(encrypted connections)だけでなく、プライマリ↔レプリカのようにRedis間の通信(encrypted replication)も含めて暗号化されます。
TLS 通信には AmazonがOSSとして開発する S2N が利用されている点も見逃せません。
設定
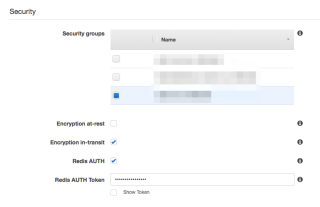
Redisクラスター作成時に「Encryption in-transit」をチェックするだけです。
2017/11/15時点では、最新の 3.2.10 では利用出来ませんでした。お気をつけ下さい。
作成済みのクラスターで有効にすることは出来ません。クラスターの再作成が必要です。
サーバー接続を試す
Redisクラスター作成後、実際に接続を試してみましょう。
telnet コマンドから暗号化通信を試す
Redis への通信が暗号化されていない場合の接続方法は、過去に次のブログにまとめました。
telnet で暗号化されたRedisに接続してみましょう。
1 2 3 4 5 6 | $ telnet $REDIS-ENDPOINT 6379Trying 172.31.31.65...Connected to dummy.euc1.cache.amazonaws.com.Escape character is '^]'.PINGConnection closed by foreign host. |
telnet は TLS をしゃべれないので接続をきられました。
openssl コマンドから暗号化通信を試す
TLS 通信のクライアントとして、Linux 系 OS であれば必ず入っている openssl を利用します。
Redis クラスターのエンドポイントに接続し、PING コマンドを実行します。
1 2 3 4 5 6 7 8 9 10 11 12 13 14 15 | $ HOST=REDIS-ENDPOINT$ openssl s_client -connect $HOST:6379 -quietdepth=4 C = US, O = "Starfield Technologies, Inc.", OU = Starfield Class 2 Certification Authorityverify return:1depth=3 C = US, ST = Arizona, L = Scottsdale, O = "Starfield Technologies, Inc.", CN = Starfield Services Root Certificate Authority - G2verify return:1depth=2 C = US, O = Amazon, CN = Amazon Root CA 1verify return:1depth=1 C = US, O = Amazon, OU = Server CA 1B, CN = Amazonverify return:1depth=0 CN = *.security.dummy.euc1.cache.amazonaws.comverify return:1+OKPING+PONG |
無事 PONG がかってきました。
サーバーの証明書も確認してみましょう
1 2 3 4 5 6 7 8 9 10 11 12 13 14 15 16 17 18 19 20 21 22 23 24 25 26 27 28 29 30 31 32 33 34 35 36 37 38 39 40 41 42 43 44 45 46 47 48 49 50 51 52 53 54 55 | $ openssl s_client -connect $HOST:6379 < /dev/nullCONNECTED(00000003)depth=4 C = US, O = "Starfield Technologies, Inc.", OU = Starfield Class 2 Certification Authorityverify return:1depth=3 C = US, ST = Arizona, L = Scottsdale, O = "Starfield Technologies, Inc.", CN = Starfield Services Root Certificate Authority - G2verify return:1depth=2 C = US, O = Amazon, CN = Amazon Root CA 1verify return:1depth=1 C = US, O = Amazon, OU = Server CA 1B, CN = Amazonverify return:1depth=0 CN = *.xxx.dummy.euc1.cache.amazonaws.comverify return:1---Certificate chain 0 s:/CN=*.xxx.dummy.euc1.cache.amazonaws.com i:/C=US/O=Amazon/OU=Server CA 1B/CN=Amazon 1 s:/C=US/O=Amazon/OU=Server CA 1B/CN=Amazon i:/C=US/O=Amazon/CN=Amazon Root CA 1 2 s:/C=US/O=Amazon/CN=Amazon Root CA 1 i:/C=US/ST=Arizona/L=Scottsdale/O=Starfield Technologies, Inc./CN=Starfield Services Root Certificate Authority - G2 3 s:/C=US/ST=Arizona/L=Scottsdale/O=Starfield Technologies, Inc./CN=Starfield Services Root Certificate Authority - G2 i:/C=US/O=Starfield Technologies, Inc./OU=Starfield Class 2 Certification Authority---Server certificate-----BEGIN CERTIFICATE-----...-----END CERTIFICATE-----subject=/CN=*.xxx.dummy.euc1.cache.amazonaws.comissuer=/C=US/O=Amazon/OU=Server CA 1B/CN=Amazon---No client certificate CA names sentServer Temp Key: ECDH, prime256v1, 256 bits---SSL handshake has read 5071 bytes and written 375 bytes---New, TLSv1/SSLv3, Cipher is ECDHE-RSA-AES128-GCM-SHA256Server public key is 2048 bitSecure Renegotiation IS supportedCompression: NONEExpansion: NONESSL-Session: Protocol : TLSv1.2 Cipher : ECDHE-RSA-AES128-GCM-SHA256 Session-ID: Session-ID-ctx: Master-Key: 42B1B59938BA4CE3B6667D4CDB65F1E80BDF31105D75EE1993C98333F1AA1FB9664DE0271A68E1AD1BC230F81204C4A6 Key-Arg : None Krb5 Principal: None PSK identity: None PSK identity hint: None Start Time: 1510421807 Timeout : 300 (sec) Verify return code: 0 (ok)---DONE |
Redis-Py から試す
Python の Redis クライアント Redis-Py から通信が暗号化された Redis に接続してみます。
pip 経由で Redis-Py をインストールします。
1 | $ pip install redis |
まずは暗号化せずに接続してみます
1 2 3 4 5 6 7 | >>> import redis>>> redis.Redis( host="REDIS-ENDPOINT", port=6379).ping()Traceback (most recent call last):...redis.exceptions.ConnectionError: Error while reading from socket: (104, 'Connection reset by peer') |
ConnectionError エラーが発生しました。
TLSで接続するには、接続時の引数で ssl=True を追加するだけです。
1 2 3 4 5 6 | >>> import redis>>> redis.Redis( host="REDIS-ENDPOINT", port=6379, ssl=True).ping()True |
クライアント認証
Redis には認証トークンでサーバーと認証する AUTH コマンドが存在します。 素の Redis では redis.conf の requirepass ディレクティブで設定可能です。
1 | requirepass foobared |
今回の機能追加は、Amazon ElastiCache for Redis でもこの機能を提供するというものです。
設定
encryption in-transit を有効にする場合のみ、クライアント認証もオプションで有効にできます。
また、トークンには16文字〜128文字まで長さで、' '(半角スペース)、"(ダブルクオート)、/(スラッシュ)、@(アットマーク)を除いた printableアスキー文字を利用出来ます。
サーバー接続を試す
Redisクラスター作成後、実際に接続を試してみましょう。
openssl コマンドから試す
まずは先程と同じコマンドでサーバーに接続します。
1 2 | $ openssl s_client -connect REDIS-HOST:6379 -quiet... |
認証なしに PING コマンドを呼び出します
1 2 3 4 | $ openssl s_client -connect REDIS-HOST:6379 -quiet...PING-NOAUTH Authentication required. |
NOAUTH エラーが発生しました。
次にクラスター作成時に設定したトークンを利用してAUTH コマンドで認証し、PING コマンドを呼び出します。
1 2 3 4 5 6 | $ openssl s_client -connect REDIS-HOST:6379 -quiet...AUTH YOUR_PASSWORD_COMES_HERE+OKPING+PONG |
無事 PONG がかってきました。
Redis-Py から試す
Redis-Pyからも認証なしにPINGを呼び出してみます
1 2 3 4 5 6 7 8 | >>> import redis>>> redis.Redis( host='HOST.cache.amazonaws.com', port=6379, ssl=True).ping()Traceback (most recent call last):...redis.exceptions.ResponseError: NOAUTH Authentication required. |
NOAUTH エラーが発生しました。
接続時のオプションに認証トークンを渡します。
1 2 3 4 5 6 7 | >>> import redis>>> redis.Redis( host='HOST.cache.amazonaws.com', port=6379, ssl=True, password='YOUR_PASSWORD_COMES_HERE').ping()True |
無事疎通に成功しました。
通信の暗号/Authを有効にしたクラスターの識別方法
管理コンソール
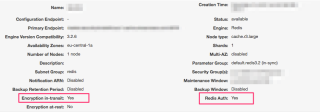
Redis クラスターで赤枠を確認下さい。
CLI
aws elasticache describe-cache-clusters のレスポンスの
TransitEncryptionEnabledAuthTokenEnabled
を確認します。
1 2 3 4 5 6 7 8 9 10 11 12 13 14 15 | $ aws elasticache describe-cache-clusters{ "CacheClusters": [ { ... "TransitEncryptionEnabled": true, "Engine": "redis", ... "AuthTokenEnabled": true, "AtRestEncryptionEnabled": true, "EngineVersion": "3.2.6", ... } ]} |
注意
パフォーマンスへの影響
通信を暗号化すると、データの暗号・復号のオーバーヘッドが発生します。
パフォーマンスが求められるシステムでは、暗号の有無によるパフォーマンスへの影響をベンチマークするようにお願いします。
対応バージョン
通信の暗号化は 3.2.6 にしか対応しておりません。 2017/11/15時点で最新の 3.2.10 では利用出来ないため、お気をつけ下さい。
新規インスタンスのみ対象
作成済みRedisクラスターに対して、通信の暗号化は行なえません。 クラスターの再構築が必要です。
まとめ
通信の暗号化・クライアント認証と、地味ではありますが、セキュリティが重要視されるお客様・システム向けには、要件を満たす上で非常に大事な機能追加です。
通信の暗号の際にはオーバーヘッドが発生するため、パフォーマンスへのインパクトにお気をつけ下さい。
また、システムを見守る人にとっては、Redisの通信が暗号化されていると、これまで慣れ親しんできたコマンドでは接続できなくなります。障害時に接続できずにパニクらないように、接続方法を再確認していただければと思います。
参考
- http://docs.aws.amazon.com/AmazonElastiCache/latest/UserGuide/in-transit-encryption.html#in-transit-encryption-enable
- https://aws.amazon.com/about-aws/whats-new/2017/10/amazon-elasticache-for-redis-now-supports-in-transit-and-at-rest-encryption-to-help-protect-sensitive-information/
- https://aws.amazon.com/blogs/security/amazon-elasticache-now-supports-encryption-for-elasticache-for-redis/
- https://redis.io/topics/security
- https://redis.io/commands/auth
- https://docs.objectrocket.com/redis_py.html#configuration
'Cloud > AWS' 카테고리의 다른 글
| [新機能] Amazon API GatewayプライベートAPIとVPCエンドポイントでプライベートなサーバーレスアプリ構築 (0) | 2020.02.17 |
|---|---|
| S3버켓을 람다 함수에서 읽기(파이썬) (0) | 2019.11.19 |
| Windows 10에서 Linux 인스톨하기 (0) | 2019.10.21 |
| Transit Gateway로 VPC간 통신하기 (0) | 2019.10.16 |
| Lambda layers에 디렉토리 구조로 라이브러리 실기 (0) | 2019.10.10 |


