
What is ESlint ?
ES ( EcmaScript ) + Lint ( 에러 코드 표식 )
코드에 특정 스타일과 규칙을 적용해서 문제를 사전에 찾고 패턴을 적용시킬 수 있는 정적 분석 툴입니다.
airbnb 등 미리 스타일과 규칙이 정해진 rule 을 적용시킬 수도 있습니다.
개발자가 자신만의 스타일과 규칙을 유동적으로 정해서 적용할 수 있습니다.
Tip* ( airbnb 와 airbnb-base 의 차이는, airbnb-base 에는 리액트 관련 규칙이 들어있지 않습니다. )
Why use ESlint ?
다양한 플러그인을 사용해서 새로운 규칙을 추가하고 커스텀할 수 있습니다.
즉 뛰어난 확장성을 바탕으로 다른 사람들과 같은 환경에서 개발을 진행할 수 있습니다.
A씨의 test.js파일
 import {util} from "../nbUtil"

const LalaLand = () => {
    console.log('this is test');
 }
B씨의 test.js파일
import { util } from '../nbUtil';

const LalaLand = () => {
console.log('this is test');
}
위처럼 누구는 인덴트에 spacing을 2개 주고, 누구는 4개 준다던가, {}사이에 spacing을 준다던가, 싱글 쿼테이션 대신 더블 쿼테이션을 쓴다던가 하는 부정합이 발생하면 코드를 머지할때도 상당히 불편하고 일관성을 보장하기 어렵습니다.
How to Start ?
이번 포스트에서는 많은 개발자들이 사용하는 airbnb 룰 설치 https://www.npmjs.com/package/eslint를 예로 들어볼게요.
- eslint 설치
$ npm install -g eslint eslint-config-airbnb-base eslint-plugin-import
$ cd
$ npm init -y
$ npm install eslint --save-dev- .eslintrc.js 설정파일 생성
.eslintrc.js 파일을 생성하고 정해진 rule 혹은 자신만의 rule 을 적용할 수 있습니다.
ESLint 의 세부 설정은 package.json 파일의 eslintConfig 부분에서 설정하거나 또는
.eslintrc.js 파일에서 rule 을 json 형식으로 설정할 수 있습니다.
.eslintrc.js
module.exports = {
env: {
node: true,
es6: true
},
extends: \[
'fbjs',
'react-app',
'airbnb',
'airbnb/hooks',
'eslint:recommended',
'plugin:jsx-a11y/recommended',
'plugin:react/recommended',
'plugin:import/recommended',
'plugin:flowtype/recommended',
'plugin:relay/recommended'
\],
globals: {
Atomics: 'readonly',
SharedArrayBuffer: 'readonly'
},
parserOptions: {
ecmaFeatures: {
jsx: true
},
ecmaVersion: 2018,
sourceType: 'module'
},
plugins: \[
'jsx-a11y',
'react',
'import',
'babel',
'flowtype',
'relay',
\],
rules: {
indent: \[
'error',
2,
{
SwitchCase: 1
}
\],
// 'prefer-const': 'error',
'linebreak-style': \[
'off',
'unix'
\],
quotes: \[
'error',
'single',
{
avoidEscape: true
}
\],
semi: \[
'warn',
'always'
\],
'react/jsx-filename-extension': \[
'error',
{
extensions: \[
'.js',
'.jsx'
\]
}
\],
'comma-dangle': \['off', 'never'\],
'object-shorthand': 'off',
'max-len': \[
'error',
{
'code': 400,
'ignoreComments': true,
'ignoreTrailingComments': true,
'ignoreUrls': true,
'ignoreStrings': true,
'ignoreTemplateLiterals': true,
'ignoreRegExpLiterals': true
}
\]
},
settings: {
react: {
createClass: 'createReactClass', // Regex for Component Factory to use,
// default to 'createReactClass'
pragma: 'React', // Pragma to use, default to 'React'
version: 'detect', // React version. 'detect' automatically picks the version you have installed.
// You can also use `16.0`, `16.3`, etc, if you want to override the detected value.
// default to latest and warns if missing
// It will default to 'detect' in the future
flowVersion: '0.53' // Flow version
},
propWrapperFunctions: \[
// The names of any function used to wrap propTypes, e.g. `forbidExtraProps`. If this isn't set, any propTypes wrapped in a function will be skipped.
'forbidExtraProps',
{ 'property': 'freeze', 'object': 'Object' },
{ 'property': 'myFavoriteWrapper' }
\],
linkComponents: \[
// Components used as alternatives to for linking, eg. <Link to={ url } />
'Hyperlink',
{
'name': 'Link',
'linkAttribute': 'to'
}
\]
}

};
.stylelintrc.js
module.exports = {
plugins: ['stylelint-scss'\],
extends: [
'stylelint-config-standard',
],
rules: {
'at-rule-no-unknown': null,
'scss/at-rule-no-unknown': true,
}
};
Tip* ( ESLint 검사에서 제외할 파일들을 설정할 때는 .eslintignore 파일을 만듭니다. )
.eslintignore / Ex: node_modules
webstorm에서 eslint사용하기
https://www.jetbrains.com/help/webstorm/eslint.html#ws_js_eslint_activate
In the Settings/Preferences dialog Ctrl+Alt+S, go to Languages and Frameworks | JavaScript | Code Quality Tools | ESLint.
Select the Manual Configuration option to use a custom ESLint package and configuration.
In the Node Interpreter field, specify the path to Node.js. If you followed the standard installation procedure, WebStorm detects the path and fills in the field itself.
In the ESLint Package field, specify the location of the eslint or standard package.
Choose the configuration to use.
- With Automatic search, WebStorm looks for a .eslintrc file or tries to detect a configuration defined under eslintConfig in a package.json. WebStorm first looks for a .eslintrc or package.json in the folder with the file to be linted, then in its parent folder, and so on up to the project root.
- Choose Configuration File to use a custom file and specify the file location in the Path field.
Learn more about configuring ESLint from the ESLint official website.
To fix all detected problems automatically when your project files are saved, select the Run eslint --fix on save checkbox.
- With this option on, ESLint will fix the problems every time your changes are saved either manually, with Ctrl+S, or automatically, when you launch a run/debug configuration, or close WebStorm, or perform version control actions, see Autosave for details.
Optionally:
- In the Extra ESLint Options field, specify additional command-line options to run ESLint with, use spaces as separators.
Learn more about ESLint CLI options from the ESLint official website.
- In the Additional Rules Directory field, specify the location of the files with additional code verification rules. These rules will be applied after the rules from .eslintrc or the above specified custom configuration file and accordingly will override them.
See the ESLint official website for more information about ESLint configuration files and adding rules.

webstorm에서 autofix적용하기
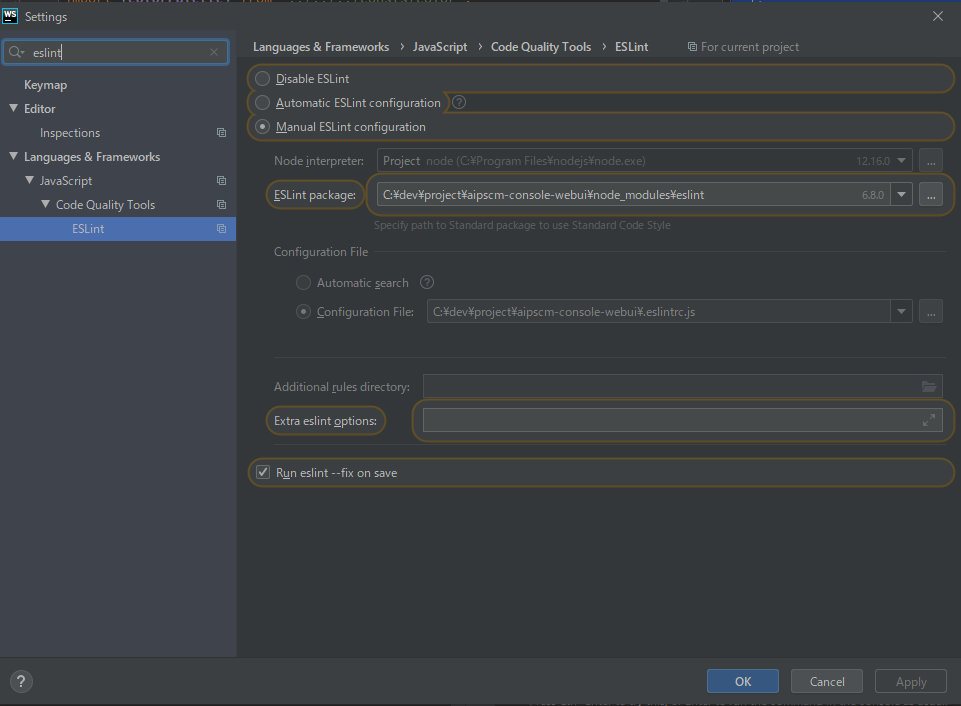
Run eslint --fix on save 클릭해줍니다.
'C Lang > JS Technic' 카테고리의 다른 글
| CORS란 무엇인가: CORS는 브라우저 하는 일 (0) | 2021.07.11 |
|---|---|
| promise.all 에 대해 (0) | 2019.11.08 |
| nodejs, react웹개발의 에러핸들링 (0) | 2019.10.28 |
| Airbnb JavaScript 스타일 가이드() { (0) | 2019.10.28 |
| 객체와 변경불가성(Immutability) (0) | 2019.10.28 |