프로그래밍 공부를 하다보면 오픈 API에 요청보내고 응답받는 일을 굉장히 많이 하게 된다.


그러다보면 CORS 에러도 필연적으로 만나게 되는데, 대체 CORS란 무엇인가?


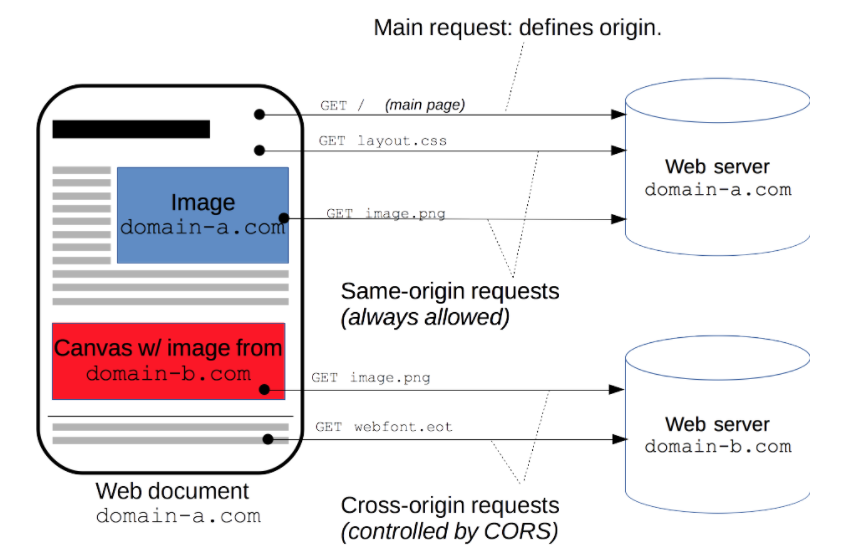
이미지 출처: https://developer.mozilla.org/ko/docs/Web/HTTP/Access_control_CORS


Cross-Origin Resource Sharing (CORS)

많은 웹 어플리케이션들이 이미지 파일이나 폰트, css 파일 같은 리소스들을 각각의 출처로부터 읽어온다. 만약에 웹 어플리케이션이 자기 자신이 속하지 않은 다른 도메인, 다른 프로토콜, 혹은 다른 포트에 있는 리소스를 요청하면 웹 어플리케이션은 cross-origin HTTP 요청을 실행한다. 만약에 프론트엔드 자바스크립트 코드가 https://domain-a.com에서 https://domain-b.com/data.json으로 json 데이터 요청을 보낸다면 이것이 바로 cross-origin HTTP 요청이 된다.


이 때 브라우저는 보안상의 이유로 스크립트 안에서 시작되는 cross-origin HTTP 요청들을 제한한다. 예를 들어서 XMLHttpRequest와 Fetch API는 동일 출처 원칙이 적용된다. 이 말은 웹 어플리케이션이 자기가 로드되었던 그 origin과 동일한 origin으로 리소스를 요청하는 것만 허용한다는 뜻이다. 다른 origin으로부터의 응답이 올바른 CORS header를 포함하지 않는다면 말이다.


정리해서 말하면 이렇다.


다른 도메인의 img파일이나 css파일을 가져오는 것은 모두 가능하다. 그러나 <script></script>로 감싸여진 script에서 생성된 Cross-site HTTP Request는 Same-origin policy를 적용받아 Cross-site HTTP Request가 제한된다.


동일 출처로 요청을 보내는 것(Same-origin requests)은 항상 허용되지만 다른 출처로의 요청(Cross-origin requests)은 보안상의 이유로 제한된다는 뜻이다. 그러나 AJAX가 널리 퍼지면서 <script></script> 안의 스크립트에서 생겨난 XMLHTTPRequest에서도 Cross-site HTTP Requests의 필요성이 매우 커졌다. 그러나 W3C에서 CORS라는 이름으로 새로운 표준을 내놓게되었다.


즉, 기존에는 보안상의 이유로 XMLHttpRequest가 자신과 동일한 도메인으로만 HTTP 요청을 보내도록 제한하였으나 웹 개발에서 다른 도메인으로의 요청이 꼭 필요하게 되었다. 그래서 XMLHttpRequest가 cross-domain을 요청할 수 있도록 CORS라는 것이 만들어졌다!


Preflight request


이미지 출처: https://www.popit.kr/cors-preflight-%EC%9D%B8%EC%A6%9D-%EC%B2%98%EB%A6%AC-%EA%B4%80%EB%A0%A8-%EC%82%BD%EC%A7%88/


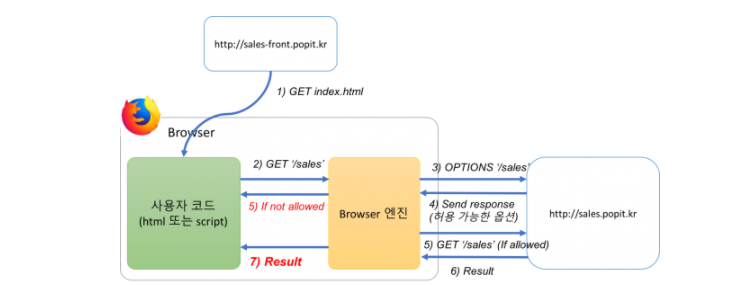
W3C 명세에 의하면 브라우저는 먼저 서버에 Preflight request(예비 요청)를 전송하여 실제 요청을 보내는 것이 안전한지 OPTIONS method로 확인한다. 그리고 서버로부터 유효하다는 응답을 받으면 그 다음 HTTP request 메소드와 함께 Actual request(본 요청)을 보낸다. 만약 유효하지 않다면 에러를 발생시키고 실제 요청은 서버로 전송하지 않는다.


이러한 예비 요청과 본 요청에 대한 서버의 응답은 프로그래머가 구분지어 처리하는 것은 아니다. 프로그래머가 Access-Control- 계열의 Response Header만 적절히 정해주면 Options 요청으로 오는 예비 요청과 GET, POST, PUT, DELETE 등으로 오는 본 요청의 처리는 서버가 알아서 처리한다.


Preflight request는 GET, HEAD, POST외 다른 방식으로도 요청을 보낼 수 있고 application/xml처럼 다른 Content-type으로 요청을 보낼 수도 있으며, 커스텀 헤더도 사용할 수 있다.


Simple Request

어떤 요청들은 CORS Preflight Request(사전 요청)을 발생시키지 않습니다. 보통 이런 요청들을 Simple Request라고 한다. 

Simple Request의 경우에는 아래 3가지 조건이 모두 만족되는 경우를 말한다.


  • GET / HEAD / POST 중 한 가지 메소드를 사용해야 한다.
  • User agent에 의해 자동으로 설정되는 헤더(Connection, User-Agent 또는 Fetch spec에서 '금지된 헤더 이름(forbidden header name)'으로 정의된 이름들을 가진 헤더들)을 제외하고, Fetch spec에서 'CORS-safelisted request-header'라고 정의되어있고 수동 설정이 허용된 헤더들은 다음과 같다.
  • 오직 아래의 Content Type만 지정해야 한다.
    • application / x-www-form-urlencoded
    • multipart/form-data
    • text/plain


Request with Credential

HTTP Cookie와 HTTP Authentication 정보를 인식할 수 있게 해주는 요청이다. 기본적으로 브라우저는 Non credential로 설정되어있기 때문에 credentials 전송을 위해선 설정을 해주어야 한다. 


Simple Credential Request 요청 시에는 xhr.withCredentials = true를 지정해서 Credential 요청을 보낼 수 있고, 서버는 Response Header에 반드시 Access-Control-Allow-Credentials: true를 포함해야한다.


또한 서버는 credential 요청에 응답할 때 반드시 Access-Control-Allow-Origin 헤더의 값으로 "*"와 같은 와일드카드 대신 구체적인 도메인을 명시해야한다.


CORS 에러를 피하는 방법

MDN 문서를 읽어보면 다음과 같은 문장이 있다.


  • Modern browsers use CORS in a APIs such as XMLHttpRequest or Fetch to mitigate the risks of cross-origin HTTP requests.
  • 모던 브라우저들은 cross-origin HTTP 요청들의 위험성을 완화하기 위해 XMLHttpRequest 또는 Fetch와 같은 APIs에서 CORS를 사용한다.


즉, CORS는 브라우저가 사용하는 것이다. 그러므로 서버에서 서버로 보내는 요청은 CORS가 적용되지 않는다.

그러므로 프록시 서버를 추가로 만들어서 클라이언트에서 우리가 새로 만든 프록시 서버로 요청을 보내고 프록시 서버에서 원하는 타겟 서버에 요청을 보내면 브라우저가 개입되지 않았기 때문에 CORS 오류를 회피할 수 있다.


출처

https://im-developer.tistory.com/165 [Code Playground]

What is ESlint ?

ES ( EcmaScript ) + Lint ( 에러 코드 표식 )

코드에 특정 스타일과 규칙을 적용해서 문제를 사전에 찾고 패턴을 적용시킬 수 있는 정적 분석 툴입니다.
airbnb 등 미리 스타일과 규칙이 정해진 rule 을 적용시킬 수도 있습니다.

개발자가 자신만의 스타일과 규칙을 유동적으로 정해서 적용할 수 있습니다.
Tip* ( airbnb 와 airbnb-base 의 차이는, airbnb-base 에는 리액트 관련 규칙이 들어있지 않습니다. )

Why use ESlint ?

다양한 플러그인을 사용해서 새로운 규칙을 추가하고 커스텀할 수 있습니다.

즉 뛰어난 확장성을 바탕으로 다른 사람들과 같은 환경에서 개발을 진행할 수 있습니다.

A씨의 test.js파일

 import {util} from "../nbUtil"

const LalaLand = () => {
    console.log('this is test');
 }

B씨의 test.js파일

import { util } from '../nbUtil';

const LalaLand = () => {  
console.log('this is test');  
}

위처럼 누구는 인덴트에 spacing을 2개 주고, 누구는 4개 준다던가, {}사이에 spacing을 준다던가, 싱글 쿼테이션 대신 더블 쿼테이션을 쓴다던가 하는 부정합이 발생하면 코드를 머지할때도 상당히 불편하고 일관성을 보장하기 어렵습니다.

How to Start ?

이번 포스트에서는 많은 개발자들이 사용하는 airbnb 룰 설치 https://www.npmjs.com/package/eslint를 예로 들어볼게요.

  1. eslint 설치
$ npm install -g eslint eslint-config-airbnb-base eslint-plugin-import  
$ cd  
$ npm init -y  
$ npm install eslint --save-dev
  1. .eslintrc.js 설정파일 생성
    .eslintrc.js 파일을 생성하고 정해진 rule 혹은 자신만의 rule 을 적용할 수 있습니다.
    ESLint 의 세부 설정은 package.json 파일의 eslintConfig 부분에서 설정하거나 또는
    .eslintrc.js 파일에서 rule 을 json 형식으로 설정할 수 있습니다.

.eslintrc.js


module.exports = {  
env: {  
node: true,  
es6: true  
},  
extends: \[  
'fbjs',  
'react-app',  
'airbnb',  
'airbnb/hooks',  
'eslint:recommended',  
'plugin:jsx-a11y/recommended',  
'plugin:react/recommended',  
'plugin:import/recommended',  
'plugin:flowtype/recommended',  
'plugin:relay/recommended'  
\],  
globals: {  
Atomics: 'readonly',  
SharedArrayBuffer: 'readonly'  
},  
parserOptions: {  
ecmaFeatures: {  
jsx: true  
},  
ecmaVersion: 2018,  
sourceType: 'module'  
},  
plugins: \[  
'jsx-a11y',  
'react',  
'import',  
'babel',  
'flowtype',  
'relay',  
\],  
rules: {  
indent: \[  
'error',  
2,  
{  
SwitchCase: 1  
}  
\],  
// 'prefer-const': 'error',  
'linebreak-style': \[  
'off',  
'unix'  
\],  
quotes: \[  
'error',  
'single',  
{  
avoidEscape: true  
}  
\],  
semi: \[  
'warn',  
'always'  
\],  
'react/jsx-filename-extension': \[  
'error',  
{  
extensions: \[  
'.js',  
'.jsx'  
\]  
}  
\],  
'comma-dangle': \['off', 'never'\],  
'object-shorthand': 'off',  
'max-len': \[  
'error',  
{  
'code': 400,  
'ignoreComments': true,  
'ignoreTrailingComments': true,  
'ignoreUrls': true,  
'ignoreStrings': true,  
'ignoreTemplateLiterals': true,  
'ignoreRegExpLiterals': true  
}  
\]  
},  
settings: {  
react: {  
createClass: 'createReactClass', // Regex for Component Factory to use,  
// default to 'createReactClass'  
pragma: 'React', // Pragma to use, default to 'React'  
version: 'detect', // React version. 'detect' automatically picks the version you have installed.  
// You can also use `16.0`, `16.3`, etc, if you want to override the detected value.  
// default to latest and warns if missing  
// It will default to 'detect' in the future  
flowVersion: '0.53' // Flow version  
},  
propWrapperFunctions: \[  
// The names of any function used to wrap propTypes, e.g. `forbidExtraProps`. If this isn't set, any propTypes wrapped in a function will be skipped.  
'forbidExtraProps',  
{ 'property': 'freeze', 'object': 'Object' },  
{ 'property': 'myFavoriteWrapper' }  
\],  
linkComponents: \[  
// Components used as alternatives to for linking, eg. <Link to={ url } />  
'Hyperlink',  
{  
'name': 'Link',  
'linkAttribute': 'to'  
}  
\]  
}

};

.stylelintrc.js


module.exports = {  
plugins: ['stylelint-scss'\],  
extends: [  
'stylelint-config-standard',  
],  
rules: {  
'at-rule-no-unknown': null,  
'scss/at-rule-no-unknown': true,  
}  
};

Tip* ( ESLint 검사에서 제외할 파일들을 설정할 때는 .eslintignore 파일을 만듭니다. )
.eslintignore / Ex: node_modules

webstorm에서 eslint사용하기

https://www.jetbrains.com/help/webstorm/eslint.html#ws_js_eslint_activate

  1. In the Settings/Preferences dialog Ctrl+Alt+S, go to Languages and Frameworks | JavaScript | Code Quality Tools | ESLint.

  2. Select the Manual Configuration option to use a custom ESLint package and configuration.

  3. In the Node Interpreter field, specify the path to Node.js. If you followed the standard installation procedure, WebStorm detects the path and fills in the field itself.

  4. In the ESLint Package field, specify the location of the eslint or standard package.

  5. Choose the configuration to use.

    • With Automatic search, WebStorm looks for a .eslintrc file or tries to detect a configuration defined under eslintConfig in a package.json. WebStorm first looks for a .eslintrc or package.json in the folder with the file to be linted, then in its parent folder, and so on up to the project root.
  • Choose Configuration File to use a custom file and specify the file location in the Path field.

Learn more about configuring ESLint from the ESLint official website.

  1. To fix all detected problems automatically when your project files are saved, select the Run eslint --fix on save checkbox.

    • With this option on, ESLint will fix the problems every time your changes are saved either manually, with Ctrl+S, or automatically, when you launch a run/debug configuration, or close WebStorm, or perform version control actions, see Autosave for details.
  2. Optionally:

    • In the Extra ESLint Options field, specify additional command-line options to run ESLint with, use spaces as separators.

    Learn more about ESLint CLI options from the ESLint official website.

    • In the Additional Rules Directory field, specify the location of the files with additional code verification rules. These rules will be applied after the rules from .eslintrc or the above specified custom configuration file and accordingly will override them.

    See the ESLint official website for more information about ESLint configuration files and adding rules.

webstorm에서 autofix적용하기

Run eslint --fix on save 클릭해줍니다.

概要

説明

Promise.all ( iterable )

引数(iterable)には、実行したいPrimiseのインスタンスを任意の数だけ配列で指定する。この引数の配列に例えば文字列や数値など、インスタンス以外の値が含まれる場合、その値は、その値をfulfilledの結果として返すインスタンスに変換されます。

全ての結果が履行(fulfilled)だった場合は、fulfilledの値を集めた配列を返す。1つでも拒否(rejected)があった場合は、最初に発生したrejectedの値を返す。

チュートリアル

  • Promiseのインスタンスを3つ用意します。
// Promise関数 (1)
var promise1 = new Promise( function( resolve, reject ) {
  setTimeout( function () {
      resolve( "3秒経過" ) ;
  }, 3000 ) ;
} ) ;
// Promise関数 (2)  
var promise2 = new Promise( function( resolve, reject ) {  
    setTimeout( function () {  
      resolve( "1秒経過" ) ;  
    }, 1000 ) ;  
} ) ;

// Promise関数 (3)  
var promise3 = new Promise( function( resolve, reject ) {  
    setTimeout( function () {  
        resolve( "2秒経過" ) ;  
    }, 2000 ) ;  
} ) ;
  • 用意した3つのインスタンスをall()で実行します。全てのインスタンスの状態が履行(fulfilled)になった時点で処理が完了し、then()の第1引数が実行されます。
Promise.all( [ promise1, promise2, promise3 ] ).then( function ( message ) {
    console.log( message ) ;    // [ "3秒経過", "1秒経過", "2秒経過", ]
} ) ;
  • または、いずれかのインスタンスの状態が拒否(rejected)になった場合は、そこで処理が完了し、その値が返ります。
// Promise関数 (3)
var promise3 = new Promise( function( resolve, reject ) {
    setTimeout( function () {
        reject( "失敗!!" ) ;
    }, 2000 ) ;
} ) ;

Promise.all( [ promise1, promise2, promise3 ] )
.then( function ( message ) {
    console.log( message ) ;    // rejectedがある場合は実行されない
} )
.catch( function ( reason ) {
    console.log( reason ) ;    // "失敗!!"
} ) ;

デモ

<!-- このコードは編集できます。 -->
​
<!DOCTYPE html>
<html>
<head>
    <style>
pre {
    white-space: pre-wrap ;
}
    </style>
</head>
<button id="run">実行</button>
<hr>
<pre id="result"></pre>
<body>
<script>
document.getElementById( "run" ).onclick = function () {
document.getElementById( "result" ).textContent = "" ;
​
/** try it! **/
var promise1 = new Promise( function( resolve, reject ) {
    setTimeout( function () {
        resolve( "3秒経過" ) ;
//  reject( "promise1で失敗!!" ) ;
    }, 3000 ) ;
} ) ;
​
var promise2 = new Promise( function( resolve, reject ) {
    setTimeout( function () {
        resolve( "1秒経過" ) ;
//  reject( "promise2で失敗!!" ) ;
    }, 1000 ) ;
} ) ;
​
var promise3 = new Promise( function( resolve, reject ) {
    setTimeout( function () {
        resolve( "2秒経過" ) ;
//  reject( "promise3で失敗!!" ) ;
    }, 2000 ) ;
} ) ;
​
Promise.all( [ promise1, promise2, promise3 ] )
.then( function ( message ) {
    console.log( message ) ;
    document.getElementById( "result" ).appendChild( new Text( JSON.stringify( message ) + "\n" ) ) ;
} )
.catch( function ( reason ) {
    console.log( reason ) ;
    document.getElementById( "result" ).appendChild( new Text( JSON.stringify( reason ) + "\n" ) ) ;
} ) ;
/** try it! **/
​
}
</script>
</body>
</html>


https://medium.com/@Dongmin_Jang/javascript-%EC%97%90%EB%9F%AC-%EC%B2%98%EB%A6%AC-%EB%B0%A9%EB%B2%95-e6cecca61974


I. JavaScript Errors and generic handling

throw new Error(‘something went wrong’)

위와 같은 코드는 에러 인스턴스를 생성하고, 에러 처리를 하지 않으면 스크립트 실행을 멈춥니다. 자바스크립트 개발자로 커리어를 시작할 때, 당신은 아마도 직접 이를 처리하지 않을 것입니다. 대신에 다른 라이브러리를 통해 보게 될 것입니다.

e.g. `ReferenceError: fs is not defined`

The Error Object

Error object 에는 우리가 사용할 두가지 properties 가 들어있습니다. 그 중 하나는 message 입니다. 이것은 우리가 argument 로 Error 에 전달한 값 입니다.
아래와 같이 작성 된 코드에서 ‘please improve your code’ 에 접근 하려면, message 값을 보면 됩니다.

const myError = new Error(‘please improve your code’)

두번째는 Error stack trace 인데, 아주 중요한 요소 입니다. stack property 를 통해 접근 할 수 있습니다. error stack 은 에러를 일으킨 파일에 대한 history 를 전달해 줍니다. 또한 stack 은 메세지를 갖고 있으며, 이는 실제 stack 에서 문제가 되는 부분으로 유도하는 역할을 합니다.

Error: please improve your code
at Object.<anonymous> (/Users/gisderdube/Documents/_projects/hacking.nosync/error-handling/src/general.js:1:79)
at Module._compile (internal/modules/cjs/loader.js:689:30)
at Object.Module._extensions..js (internal/modules/cjs/loader.js:700:10)
at Module.load (internal/modules/cjs/loader.js:599:32)
at tryModuleLoad (internal/modules/cjs/loader.js:538:12)
at Function.Module._load (internal/modules/cjs/loader.js:530:3)
at Function.Module.runMain (internal/modules/cjs/loader.js:742:12)
at startup (internal/bootstrap/node.js:266:19)
at bootstrapNodeJSCore (internal/bootstrap/node.js:596:3)

Throwing and Handling Errors

이제 에러 인스턴스는 홀로 무엇인가를 발생시키지 않을 겁니다.

e.g. new Error(‘…’) ← 어느 것도 하지 않을 것입니다.

에러가 throw 와 함께 있을 때는 더 흥미로워집니다. 그땐, 전에 말한 바와 같이(원글 참조) 당신이 무엇인가를 처리하는 코드를 넣지 않는 한, 스크립트 코드는 실행을 멈출 것입니다. 잊지마세요. 당신이 Error 를 직접 throw 했다거나, 라이브러리에 의해 throw 되었거나, 런타임 시정에 스스로 생성 되었든(node or the browser)이는 중요하지 않습니다. 몇가지 시나리오에서 이러한 에러를 어떻게 다루는지 함께 보도록 합니다.

try …. catch

아주 간단한 예제입니다만, 종종 에러를 다루는 방법을 잊곤 합니다. async/await 때문에이는 요즘 다시 많이 사용되는 코드입니다.
이는 여러 종류의 에러를 잡을 때 사용되곤 합니다.

const a = 5

try, catch 블록으로 console.log(b) 를 감싸지 않으면, 스크립트 실행은 멈추게 됩니다.

… finally

때로는 에러 유무와 상관 없이 실행시키고 싶은 코드가 있을 것입니다. 그럴 때는 finally를 사용하면 됩니다. try…catch 뒤에 코드가 있는 듯하지만, 이게 아주 유용할 때가 있습니다.

Enter asynchronity — Callbacks (비동기 콜백 함수)

비동기, 자바스크립트로 개발하시는 분이라면 항상 고려하는 부분입니다.
비동기 함수가 있을 때, 그 함수안에서 에러가 발생한다해도 스크립트 코드는 계속 실행되고 있을 것입니다. 그래서 에러가 즉각적으로 나오지 않을 것입니다. 콜백함수로 에러를 핸들링 할 때( 추천하지 않아요 ), 아래 보는 바와 같이 콜백 함수로 2가지 parameters를 받을 것입니다.

에러가 발생하면, err parameter 는 Error 와 동일해집니다. 만약 그렇지 않다면, parameter 는 `undefined` or `null`가 될 것입니다. if(err)에서 return 이 될지, else 에서 다른 작업을 처리할지는 중요합니다. 이에 따라 Error 가 추가로 발생할 수 있습니다. result가 undefined 이거나, 또는 result.data값을 쓰려는 상황 등에서 발생할 수 있습니다.

Asynchronity — Promises

비동기로 좀 더 나은 처리를 하는 방법은 promise를 사용하는 것입니다. 여기에 개선된 에러 핸들링과 함께 코드를 좀 더 남기겠습니다. catch 블럭을 사용하는 한, 우리는 더이상 정확한 Error 를 잡아내는데 집중할 필요가 없습니다. promise chaining 을 하게 되면, catch 블럭은 promise 실행과 마지막 catch 블럭 덕분에 모든 에러를 잡아낼 수 있게 됩니다. catch블럭이 없는 promise 는 스크립트를 종료시키지 않을 것이지만, 가독성 떨어지는 메세지를 던져줄 것입니다.

(node:7741) UnhandledPromiseRejectionWarning: Unhandled promise rejection (rejection id: 1): Error: something went wrong
(node:7741) DeprecationWarning: Unhandled promise rejections are deprecated. In the future, promise rejections that are not handled will terminate the Node.js process with a non-zero exit code. */

그러므로 항상 catch블럭을 promise 에 넣어주세요. 아래를 보시죠.

try … catch — again

자바스크립트에서의 async/await 소개하면서 try…catch…finally를 이용해서 에러를 핸들링 하는 원래의 방법으로 돌아왔습니다.

동기 오류를 처리하는 일반적인 방법과 비슷하기에, 만약 원한다면 더 넓은 catch 구문을 사용하는 것이 처리하는데 더 쉽습니다.


II. Generating and handling Errors in the Server

이제 에러를 처리할 수 있는 툴이 생겼으므로, 실제 환경에서 이 툴을 가지고 무엇을 할수 있는지 봅니다. 백엔드에서 에러를 생성하고 그것들을 정상적으로 처리하는 것은 앱에서 중요한 부분입니다. 에러를 어떻게 다루느냐에 따라서 다른 몇가지 접근법들이 있습니다. 커스텀 에러 생성자와 프론트엔드( 또는 다른 api 사용자)로 쉽게 전달 할 수 있는 코드들을 가지고 접근하는 방법을 보여드리겠습니다. 백엔드를 어떻게 상세히 설계하는지는 중요하지 않습니다.

Express.js를 framework 로 사용할 것입니다. 가장 효율적인 에러 처리를 할 수 있는 구조에 대해서 생각해 봅시다.

1.포괄적인 에러 처리, 몇가지 종류의 fallback, 이런 것들은 보통 이렇게 얘기합니다. ‘ 무엇인가 잘못 되었습니다. 다시 시도 하시거나 연락주세요.’ 이것은 좋은 방법이 아닙니다. 그러나 유저에게 무한 로딩 대신에 최소한의 알림은 전달 합니다.

2. 무엇이 문제인지, 어떻게 고칠 수 있는지에 대해서 구체적인 정보를 유저에게 전달하기 위해 특정한 에러 처리 방법

Building a custom Error constructor

기본적인 Error 생성자를 사용할 것이고, 이것을 확장 할 것입니다. 자바스크립트에서의 상속은 위험을 띄고 있습니다만, 이런 상황에서는 아주 유용할 것입니다. 왜 그런걸까요? 우리는 디버깅을 위해서 stack trace 가 필요합니다. native 자바스크립트 에러 생성자를 확장하면 이를 그냥 가져다 쓸 수 있습니다. 우리가 유일하게 해야 할 것은 나중에 err.code 로 접근할 수 있는 code와 프론트엔드에 전달할 http status 를 작성하는 것입니다.

How to handle routing

커스텀 에러 사용준비와 함께 라우팅 구조를 셋팅해야 합니다.

얘기했듯이, 모든 라우트에서 동일하게 에러 핸들링을 할 수 있는 단일 포인트가 필요합니다. 일반적으로 express 는 라우트들이 캡슐화 되어있어 지원하지 않습니다.

이러한 이슈를 처리하기 위해, 라우트 핸들러와 기본적인 기능을 처리할 실제 로직을 구현할 수 있습니다. 이 때, 라우트 함수는 error 를 던질 것입니다. 그리고 프론트엔드로 전달되도록 라우트 함수에게 return 할 것입니다. 백엔드에서 에러가 날 때마다 우리는 프론트엔드에 response 가 전달 되기를 원합니다. (아래 json api 포함해서)

{
error: 'SOME_ERROR_CODE',
description: 'Something bad happened. Please try again or contact support.'
}

압도할 수 있도록 준비하세요. 제 학생은 제가 말 할때 저(글쓴이)에게 화를 냅니다.

처음부터 모든 것을 알지 못해도 괜찮아요. 우선 사용하고 그 다음에 왜 되는 것인지 찾아보세요.

이를 top-down 학습법이라 부르는데, 내가 상당히 좋아한다.(글쓴이)

아래가 당신이 스스로 확인해야 하는 라우트 핸들러이다.

코드속에 주석을 읽을 수 있기를 바랍니다. 그게 아마 여기에 구구절절 설명하는 것보다 훨씬 나을 것입니다. 이제 실제 라우트 파일이 어떻게 보이는지 확인하겠습니다.

이 예제에서 실제 request 에 아무것도 하지 않았습니다. 다른 에러 시나리오를 가짜로 만들고 있습니다. 예를 들면, GET /city 는 3번째 줄에서, POST /city 는 8째줄에서 끝납니다. 이것 또한 쿼리 params 와 함께 작동합니다. 예를 들면 GET /city?startsWith=R. 프론트엔드가 전달 받을 에러를 처리하지 않는 다거나, 커스텀 error 를 수동으로 전달하지 않을 것입니다.

{
error: 'GENERIC',
description: 'Something went wrong. Please try again or contact support.'
}

위는 아래와 같이 바뀔것입니다.

{
error: 'MY_CODE',
description: 'Error description'
}

이제 우리는 프론트엔드에 부족한 에러 로그를 전달하는게 아닌, 언제나 무엇이 문제인지 유용한 정보를 전달하는 훌륭한 백엔드를 셋업하게 되었습니다.

전체 코드를 보고 싶다면 아래 링크로 가세요. 언제나 수정해서 사용하셔도 괜찮습니다.


III. Displaying Errors to the User

이제 마지막은 프론트엔드에서 error 를 처리하는 것입니다. 첫 과정에서 만들었던 툴과 함께 프론트엔드에서 만들어낸 에러를 처리할 것입니다. 그리고 백엔드로 부터 온 에러는 노출 되어야 합니다. 먼저 어떻게 에러를 노출할지 봅시다. 우리는 react 를 사용할 것입니다.

Photo by Andersen Jensen on Unsplash

Saving Errors in React state

다른 데이터처럼 Error와 Error 메세지는 바뀔 수 있습니다. 그러므로 컴포넌트의 state 에 넣어둬야 합니다. 기본적으로 마운팅이 되면, error 를 리셋하려 할 것입니다. 그래야 유저가 처음 페이지를 볼 때, 에러가 보이지 않을 것입니다.

다음으로 우리가 명확히 해야 할 것은 각기 다른 타입의 에러들을 화면의 표현과 매칭 시키는 것입니다. 백엔드에는 3가지 타입이 있습니다.

  1. 글로벌 에러, e.g. 백엔드로부터 오는 포괄적인 에러들 중 하나, 유저가 sign in 을 안했다거나..
  2. 백엔드로 부터 오는 특정 에러, e.g. 유저가 sign-in 정보를 백엔드에 넘겼는데, 백엔드가 패스워드가 틀렸다고 응답. 이는 프론트가 확인할 수 없으니, 백엔드로 부터 확인 되야함.
  3. 프론트엔드 스스로가 생성하는 에러, e.g. email 형식 틀림.

2, 3 은 비슷하기도 하고, 같은 state로 처리할 수도 있습니다. 그러나 그 원인은 다릅니다. 다음에서 코드를 통해서 처리해 나가겠습니다.

React의 native state 를 이용할 것입니다. Mobx 나 Redux 를 사용해도 무방합니다.

Global Errors

보통 이러한 Error 는 가장 밖에 있는 stateful 컴포넌트에 저장합니다. 그리고 static UI Element 를 이용해서 렌더합니다. 아래 상단의 빨간 배너 처럼 디자인 구현은 당신 몫입니다.

Sample UI Element for global Errors

코드를 확인해 보겠습니다.

보시다시피, Application.js 안에 Error 가 state 에 담겨 있습니다. 또한 error 를 리셋하거나 바꿀 수 있는 methods 도 가지고 있습니다. 우리는 error 와 리셋 method 를 GlobalError 컴포넌트로 넘겨줄 것입니다. GlobalError 컴포넌트는 메세지를 노출 시킬 것이고, x 버튼을 누르면 error 값을 리셋 시킬 것입니다. 다음 코드를 통해 GlobalError 컴포넌트를 확인해봅시다.

5번째 줄을 보면, Error 가 없다면 아무런 값을 노출시키지 않을 것입니다. 이는 빈 빨간 박스가 화면에 항상 떠 있는 것을 막아줍니다. 예제를 수정해서 x 를 누르면 몇초 뒤에 error 값이 초기화 되도록 할 수 있습니다.

이제 Applications.js 로부터 _setError 를 건내 줌으로써, 당신이 원하는 아무 때나 global error state 를 사용할 수 있습니다. 그리고 global Error 를 설정할 수 있습니다. 예를 들면, 백엔드로 부터 error: ‘GENERIC’ 으로 응답이 올 경우 입니다.


만약 못마땅하다면 여기서 멈추세요. 이미 에러가 발생된다면, global error state 를 수정하고, 페이지 상단에 에러 박스를 띄울 수 있습니다. 계속해서 특정 에러를 어떻게 처리하고 노출할지에 대해서 이어질 것입니다. 왜냐구요? 먼저, 이 글은 에러를 어떻게 다루는지에 대한 글이기 때문입니다. 그래서 여기서 멈출 수가 없습니다. 그리고 UX 유저들은 모든 에러를 globally 하게 노출할지에 대해서 꽤 고민을 많이 할것입니다. … (번역 맞아?)


Handling specific request Errors

global error 와 비슷하게 다른 컴포넌트 안에서 local error state 를 가질 수 있습니다. 다음과 같습니다.

한가지 기억할 것은 error 들은 대게 다른 작업을 유발 시킨다는 것입니다. 에러를 삭제하기 위해서 ‘x’ 를 만드는 것은 상황에 맞지 않을 수 있습니다. 새로운 요청이 있을 때, error 를 지우는 것이 더 맞을 수도 있습니다. 또는 유저가 새로운 변화를 만들어 낼 때, error 를 삭제 할 수 있습니다. e.g. 입력 정보가 바뀔 때.

Frontend origin errors

앞에서 언급했듯이, 이러한 에러들은 백엔드로부터 전달된 특정 에러들 처럼 같은 방법으로 처리 될 수 있습니다. 이번에는 input 이 한개인 예제를 이용해 봅시다. 그리고 유저는 도시를 지울 수 있습니다. 단, 입력이 허용된 도시를 입력했을 때만 입니다.

Error internationalisation using the Error code

아마도 error codes 를 사용하는 것에 대해서 궁금해 할 수 있습니다. e.g. GENERIC 우리는 단순히 백엔드로부터 전달된 에러 메세지를 노출 하였습니다. 당신의 앱이 확대 된다면, 새로운 국가로 확장하기를 희망 할 것이고, 다양한 언어들을 지원하게 되면서 몇가지 문제를 직면하게 될것입니다. 그 시점에 error code를 사용함으로써 유저의 언어에 맞게 올바른 설명을 노출 할 수 있습니다.


원문:https://github.com/airbnb/javascript

Airbnb JavaScript 스타일 가이드() {

JavaScript에 대한 대부분 합리적인 접근 방법

다른 스타일 가이드들

목차

  1. 형(Types)
  2. 참조(References)
  3. 오브젝트(Objects)
  4. 배열(Arrays)
  5. 구조화대입(Destructuring)
  6. 문자열(Strings)
  7. 함수(Functions)
  8. Arrow함수(Arrow Functions)
  9. Classes & Constructors
  10. 모듈(Modules)
  11. 이터레이터와 제너레이터(Iterators and Generators)
  12. 프로퍼티(Properties)
  13. 변수(Variables)
  14. Hoisting
  15. 조건식과 등가식(Comparison Operators & Equality)
  16. 블록(Blocks)
  17. 코멘트(Comments)
  18. 공백(Whitespace)
  19. 콤마(Commas)
  20. 세미콜론(Semicolons)
  21. 형변환과 강제(Type Casting & Coercion)
  22. 명명규칙(Naming Conventions)
  23. 억세서(Accessors)
  24. 이벤트(Events)
  25. jQuery
  26. ECMAScript 5 Compatibility
  27. ECMAScript 6 Styles
  28. Testing
  29. Performance
  30. Resources
  31. In the Wild
  32. Translation
  33. The JavaScript Style Guide Guide
  34. Chat With Us About JavaScript
  35. Contributors
  36. License

형(Types)

  • 1.1 Primitives: When you access a primitive type you work directly on its value.

  • 1.1 Primitives: primitive type은 그 값을 직접 조작합니다.

    • string
    • number
    • boolean
    • null
    • undefined
    const foo = 1;
    let bar = foo;
    
    bar = 9;
    
    console.log(foo, bar); // => 1, 9
  • 1.2 Complex: When you access a complex type you work on a reference to its value.

  • 1.2 참조형: 참조형(Complex)은 참조를 통해 값을 조작합니다.

    • object
    • array
    • function
    const foo = [1, 2];
    const bar = foo;
    
    bar[0] = 9;
    
    console.log(foo[0], bar[0]); // => 9, 9

⬆ back to top

참조(References)

  • 2.1 Use const for all of your references; avoid using var.

  • 2.1 모든 참조는 const 를 사용하고, var 를 사용하지 마십시오.

    Why? This ensures that you can't reassign your references, which can lead to bugs and difficult to comprehend code.

    왜? 참조를 재할당 할 수 없으므로, 버그로 이어지고 이해하기 어려운 코드가 되는것을 방지합니다.

    // bad
    var a = 1;
    var b = 2;
    
    // good
    const a = 1;
    const b = 2;
  • 2.2 If you must reassign references, use let instead of var.

  • 2.2 참조를 재할당 해야한다면 var 대신 let 을 사용하십시오.

    Why? let is block-scoped rather than function-scoped like var.

    왜? var 같은 함수스코프 보다는 오히려 블록스코프의 let

    // bad
    var count = 1;
    if (true) {
      count += 1;
    }
    
    // good, use the let.
    let count = 1;
    if (true) {
      count += 1;
    }
  • 2.3 Note that both let and const are block-scoped.

  • 2.3 letconst 는 같이 블록스코프라는것을 유의하십시오.

    // const and let only exist in the blocks they are defined in.
    // const 와 let 은 선언된 블록의 안에서만 존재합니다.
    {
      let a = 1;
      const b = 1;
    }
    console.log(a); // ReferenceError
    console.log(b); // ReferenceError

⬆ back to top

오브젝트(Objects)

  • 3.1 Use the literal syntax for object creation.

  • 3.1 오브젝트를 작성할때는, 리터럴 구문을 사용하십시오.

    // bad
    const item = new Object();
    
    // good
    const item = {};
  • 3.2 If your code will be executed in browsers in script context, don't use reserved words as keys. It won't work in IE8. More info. It’s OK to use them in ES6 modules and server-side code.

  • 3.2 코드가 브라우저상의 스크립트로 실행될때 예약어를 키로 이용하지 마십시오. IE8에서 작동하지 않습니다. More info 하지만 ES6 모듈안이나 서버사이드에서는 이용가능합니다.

    // bad
    const superman = {
      default: { clark: 'kent' },
      private: true,
    };
    
    // good
    const superman = {
      defaults: { clark: 'kent' },
      hidden: true,
    };
  • 3.3 Use readable synonyms in place of reserved words.

  • 3.3 예약어 대신 알기쉬운 동의어를 사용해 주십시오.

    // bad
    const superman = {
      class: 'alien',
    };
    
    // bad
    const superman = {
      klass: 'alien',
    };
    
    // good
    const superman = {
      type: 'alien',
    };

  • 3.4 Use computed property names when creating objects with dynamic property names.

  • 3.4 동적 프로퍼티명을 갖는 오브젝트를 작성할때, 계산된 프로퍼티명(computed property names)을 이용해 주십시오.

    Why? They allow you to define all the properties of an object in one place.

    왜? 오브젝트의 모든 프로퍼티를 한 장소에서 정의 할 수 있습니다.

    function getKey(k) {
      return a `key named ${k}`;
    }
    
    // bad
    const obj = {
      id: 5,
      name: 'San Francisco',
    };
    obj[getKey('enabled')] = true;
    
    // good
    const obj = {
      id: 5,
      name: 'San Francisco',
      [getKey('enabled')]: true
    };

  • 3.5 Use object method shorthand.

  • 3.5 메소드의 단축구문을 이용해 주십시오.

    // bad
    const atom = {
      value: 1,
    
      addValue: function (value) {
        return atom.value + value;
      },
    };
    
    // good
    const atom = {
      value: 1,
    
      addValue(value) {
        return atom.value + value;
      },
    };

  • 3.6 Use property value shorthand.

  • 3.6 프로퍼티의 단축구문을 이용해 주십시오.

    Why? It is shorter to write and descriptive.

    왜? 기술과 설명이 간결해지기 때문입니다.

    const lukeSkywalker = 'Luke Skywalker';
    
    // bad
    const obj = {
      lukeSkywalker: lukeSkywalker,
    };
    
    // good
    const obj = {
      lukeSkywalker,
    };
  • 3.7 Group your shorthand properties at the beginning of your object declaration.

  • 3.7 프로퍼티의 단축구문은 오브젝트 선언의 시작부분에 그룹화 해주십시오.

    Why? It's easier to tell which properties are using the shorthand.

    왜? 어떤 프로퍼티가 단축구문을 이용하고 있는지가 알기쉽기 때문입니다.

    const anakinSkywalker = 'Anakin Skywalker';
    const lukeSkywalker = 'Luke Skywalker';
    
    // bad
    const obj = {
      episodeOne: 1,
      twoJediWalkIntoACantina: 2,
      lukeSkywalker,
      episodeThree: 3,
      mayTheFourth: 4,
      anakinSkywalker,
    };
    
    // good
    const obj = {
      lukeSkywalker,
      anakinSkywalker,
      episodeOne: 1,
      twoJediWalkIntoACantina: 2,
      episodeThree: 3,
      mayTheFourth: 4,
    };

⬆ back to top

배열(Arrays)

  • 4.1 Use the literal syntax for array creation.

  • 4.1 배열을 작성 할 때는 리터럴 구문을 사용해 주십시오.

    // bad
    const items = new Array();
    
    // good
    const items = [];
  • 4.2 Use Array#push instead of direct assignment to add items to an array.

  • 4.2 직접 배열에 항목을 대입하지 말고, Array#push를 이용해 주십시오.

    const someStack = [];
    
    // bad
    someStack[someStack.length] = 'abracadabra';
    
    // good
    someStack.push('abracadabra');

  • 4.3 Use array spreads ... to copy arrays.

  • 4.3 배열을 복사할때는 배열의 확장연산자 ... 를 이용해 주십시오.

    // bad
    const len = items.length;
    const itemsCopy = [];
    let i;
    
    for (i = 0; i < len; i++) {
      itemsCopy[i] = items[i];
    }
    
    // good
    const itemsCopy = [...items];
  • 4.4 To convert an array-like object to an array, use Array#from.

  • 4.4 array-like 오브젝트를 배열로 변환하는 경우는 Array#from을 이용해 주십시오.

    const foo = document.querySelectorAll('.foo');
    const nodes = Array.from(foo);

⬆ back to top

구조화대입(Destructuring)

  • 5.1 Use object destructuring when accessing and using multiple properties of an object.

  • 5.1 하나의 오브젝트에서 복수의 프로퍼티를 억세스 할 때는 오브젝트 구조화대입을 이용해 주십시오.

    Why? Destructuring saves you from creating temporary references for those properties.

    왜? 구조화대입을 이용하는 것으로 프로퍼티를 위한 임시적인 참조의 작성을 줄일 수 있습니다.

    // bad
    function getFullName(user) {
      const firstName = user.firstName;
      const lastName = user.lastName;
    
      return `${firstName} ${lastName}`;
    }
    
    // good
    function getFullName(obj) {
      const { firstName, lastName } = obj;
      return `${firstName} ${lastName}`;
    }
    
    // best
    function getFullName({ firstName, lastName }) {
      return `${firstName} ${lastName}`;
    }
  • 5.2 Use array destructuring.

  • 5.2 배열의 구조화대입을 이용해 주십시오.

    const arr = [1, 2, 3, 4];
    
    // bad
    const first = arr[0];
    const second = arr[1];
    
    // good
    const [first, second] = arr;
  • 5.3 Use object destructuring for multiple return values, not array destructuring.

  • 5.3 복수의 값을 반환하는 경우는 배열의 구조화대입이 아닌 오브젝트의 구조화대입을 이용해 주십시오.

    Why? You can add new properties over time or change the order of things without breaking call sites.

    왜? 이렇게 함으로써 나중에 호출처에 영향을 주지않고 새로운 프로퍼티를 추가하거나 순서를 변경할수 있습니다.

    // bad
    function processInput(input) {
      // then a miracle occurs
      // 그리고 기적이 일어납니다.
      return [left, right, top, bottom];
    }
    
    // the caller needs to think about the order of return data
    // 호출처에서 반환된 데이터의 순서를 고려할 필요가 있습니다.
    const [left, __, top] = processInput(input);
    
    // good
    function processInput(input) {
      // then a miracle occurs
      // 그리고 기적이 일어납니다.
      return { left, right, top, bottom };
    }
    
    // the caller selects only the data they need
    // 호출처에서는 필요한 데이터만 선택하면 됩니다.
    const { left, right } = processInput(input);

⬆ back to top

문자열(Strings)

  • 6.1 Use single quotes '' for strings.

  • 6.1 문자열에는 싱크쿼트 '' 를 사용해 주십시오.

    // bad
    const name = "Capt. Janeway";
    
    // good
    const name = 'Capt. Janeway';
  • 6.2 Strings longer than 100 characters should be written across multiple lines using string concatenation.

  • 6.2 100문자 이상의 문자열은 문자열연결을 사용해서 복수행에 걸쳐 기술할 필요가 있습니다.

  • 6.3 Note: If overused, long strings with concatenation could impact performance. jsPerf & Discussion.

  • 6.3 주의: 문자연결을 과용하면 성능에 영향을 미칠 수 있습니다. jsPerf & Discussion.

    // bad
    const errorMessage = 'This is a super long error that was thrown because of Batman. When you stop to think about how Batman had anything to do with this, you would get nowhere fast.';
    
    // bad
    const errorMessage = 'This is a super long error that was thrown because \
    of Batman. When you stop to think about how Batman had anything to do \
    with this, you would get nowhere \
    fast.';
    
    // good
    const errorMessage = 'This is a super long error that was thrown because ' +
      'of Batman. When you stop to think about how Batman had anything to do ' +
      'with this, you would get nowhere fast.';

  • 6.4 When programmatically building up strings, use template strings instead of concatenation.

  • 6.4 프로그램에서 문자열을 생성하는 경우는 문자열 연결이 아닌 template strings를 이용해 주십시오.

    Why? Template strings give you a readable, concise syntax with proper newlines and string interpolation features.

    왜? Template strings 는 문자열 보간기능과 적절한 줄바꿈 기능을 갖는 간결한 구문으로 가독성이 좋기 때문입니다.

    // bad
    function sayHi(name) {
      return 'How are you, ' + name + '?';
    }
    
    // bad
    function sayHi(name) {
      return ['How are you, ', name, '?'].join();
    }
    
    // good
    function sayHi(name) {
      return `How are you, ${name}?`;
    }
  • 6.5 Never use eval() on a string, it opens too many vulnerabilities.

  • 6.5 절대로 eval() 을 이용하지 마십시오. 이것은 많은 취약점을 만들기 때문입니다.

⬆ back to top

함수(Functions)

  • 7.1 Use function declarations instead of function expressions.

  • 7.1 함수식 보다 함수선언을 이용해 주십시오.

    Why? Function declarations are named, so they're easier to identify in call stacks. Also, the whole body of a function declaration is hoisted, whereas only the reference of a function expression is hoisted. This rule makes it possible to always use Arrow Functions in place of function expressions.

    왜? 이름이 부여된 함수선언은 콜스택에서 간단하게 확인하는 것이 가능합니다. 또한 함수선언은 함수의 본체가 hoist 되어집니다. 그에 반해 함수식은 참조만이 hoist 되어집니다.
    이 룰에 의해 함수식의 부분을 항상 Arrow함수에서 이용하는것이 가능합니다.

    // bad
    const foo = function () {
    };
    
    // good
    function foo() {
    }
  • 7.2 Function expressions:

  • 7.2 함수식

    // immediately-invoked function expression (IIFE)
    // 즉시 실행 함수식(IIFE)
    (() => {
      console.log('Welcome to the Internet. Please follow me.');
    })();
  • 7.3 Never declare a function in a non-function block (if, while, etc). Assign the function to a variable instead. Browsers will allow you to do it, but they all interpret it differently, which is bad news bears.

  • 7.3 함수이외의 블록 (if나 while같은) 안에서 함수를 선언하지 마십시오. 변수에 함수를 대입하는 대신 브라우저들은 그것을 허용하지만 모두가 다르게 해석합니다.

  • 7.4 Note: ECMA-262 defines a block as a list of statements. A function declaration is not a statement. Read ECMA-262's note on this issue.

  • 7.4 주의: ECMA-262 사양에서는 block 은 statements의 일람으로 정의되어 있지만 함수선언은 statements 가 아닙니다. Read ECMA-262's note on this issue.

    // bad
    if (currentUser) {
      function test() {
        console.log('Nope.');
      }
    }
    
    // good
    let test;
    if (currentUser) {
      test = () => {
        console.log('Yup.');
      };
    }
  • 7.5 Never name a parameter arguments. This will take precedence over the arguments object that is given to every function scope.

  • 7.5 절대 파라메터에 arguments 를 지정하지 마십시오. 이것은 함수스코프에 전해지는 arguments 오브젝트의 참조를 덮어써 버립니다.

    // bad
    function nope(name, options, arguments) {
      // ...stuff...
    }
    
    // good
    function yup(name, options, args) {
      // ...stuff...
    }

  • 7.6 Never use arguments, opt to use rest syntax ... instead.

  • 7.6 절대 arguments 를 이용하지 마십시오. 대신에 rest syntax ... 를 이용해 주십시오.

    Why? ... is explicit about which arguments you want pulled. Plus rest arguments are a real Array and not Array-like like arguments.

    왜? ... 을 이용하는것으로 몇개의 파라메터를 이용하고 싶은가를 확실하게 할 수 있습니다. 더해서 rest 파라메터는 arguments 와 같은 Array-like 오브젝트가 아닌 진짜 Array 입니다.

    // bad
    function concatenateAll() {
      const args = Array.prototype.slice.call(arguments);
      return args.join('');
    }
    
    // good
    function concatenateAll(...args) {
      return args.join('');
    }

  • 7.7 Use default parameter syntax rather than mutating function arguments.

  • 7.7 함수의 파라메터를 변이시키는 것보다 default 파라메터를 이용해 주십시오.

    // really bad
    function handleThings(opts) {
      // No! We shouldn't mutate function arguments.
      // Double bad: if opts is falsy it'll be set to an object which may
      // be what you want but it can introduce subtle bugs.
    
      // 안돼!함수의 파라메터를 변이시키면 안됩니다.
      // 만약 opts가 falsy 하다면 바라는데로 오브젝트가 설정됩니다.
      // 하지만 미묘한 버그를 일으킬지도 모릅니다.
      opts = opts || {};
      // ...
    }
    
    // still bad
    function handleThings(opts) {
      if (opts === void 0) {
        opts = {};
      }
      // ...
    }
    
    // good
    function handleThings(opts = {}) {
      // ...
    }
  • 7.8 Avoid side effects with default parameters.

  • 7.8 side effect가 있을 default 파라메터의 이용은 피해 주십시오.

    Why? They are confusing to reason about.

    왜? 혼란을 야기하기 때문입니다.

    var b = 1;
    // bad
    function count(a = b++) {
      console.log(a);
    }
    count();  // 1
    count();  // 2
    count(3); // 3
    count();  // 3
  • 7.9 Always put default parameters last.

  • 7.9 항상 default 파라메터는 뒤쪽에 두십시오.

    // bad
    function handleThings(opts = {}, name) {
      // ...
    }
    
    // good
    function handleThings(name, opts = {}) {
      // ...
    }
  • 7.10 Never use the Function constructor to create a new function.

  • 7.10 절대 새 함수를 작성하기 위해 Function constructor를 이용하지 마십시오.

    Why? Creating a function in this way evaluates a string similarly to eval(), which opens vulnerabilities.

    왜? 이 방법으로 문자열을 평가시켜 새 함수를 작성하는것은 eval() 과 같은 수준의 취약점을 일으킬 수 있습니다.

    // bad
    var add = new Function('a', 'b', 'return a + b');
    
    // still bad
    var subtract = Function('a', 'b', 'return a - b');

⬆ back to top

Arrow함수(Arrow Functions)

  • 8.1 When you must use function expressions (as when passing an anonymous function), use arrow function notation.

  • 8.1 (무명함수를 전달하는 듯한)함수식을 이용하는 경우 arrow함수 표기를 이용해 주십시오.

    Why? It creates a version of the function that executes in the context of this, which is usually what you want, and is a more concise syntax.

    왜? arrow함수는 그 context의 this 에서 실행하는 버전의 함수를 작성합니다. 이것은 통상 기대대로의 동작을 하고, 보다 간결한 구문이기 때문입니다.

    Why not? If you have a fairly complicated function, you might move that logic out into its own function declaration.

    이용해야만 하지 않나? 복잡한 함수에서 로직을 정의한 함수의 바깥으로 이동하고 싶을때.

    // bad
    [1, 2, 3].map(function (x) {
      const y = x + 1;
      return x * y;
    });
    
    // good
    [1, 2, 3].map((x) => {
      const y = x + 1;
      return x * y;
    });
  • 8.2 If the function body consists of a single expression, feel free to omit the braces and use the implicit return. Otherwise use a return statement.

  • 8.2 함수의 본체가 하나의 식으로 구성된 경우에는 중괄호({})를 생략하고 암시적 return을 이용하는것이 가능합니다. 그 외에는 return 문을 이용해 주십시오.

    Why? Syntactic sugar. It reads well when multiple functions are chained together.

    왜? 문법 설탕이니까요. 복수의 함수가 연결된 경우에 읽기 쉬워집니다.

    Why not? If you plan on returning an object.

    사용해야만 하지 않아? 오브젝트를 반환할때.

    // good
    [1, 2, 3].map(number => `A string containing the ${number}.`);
    
    // bad
    [1, 2, 3].map(number => {
      const nextNumber = number + 1;
      `A string containing the ${nextNumber}.`;
    });
    
    // good
    [1, 2, 3].map(number => {
      const nextNumber = number + 1;
      return `A string containing the ${nextNumber}.`;
    });
  • 8.3 In case the expression spans over multiple lines, wrap it in parentheses for better readability.

  • 8.3 식이 복수행에 걸쳐있을 경우는 가독성을 더욱 좋게하기 위해 소괄호()로 감싸 주십시오.

    Why? It shows clearly where the function starts and ends.

    왜? 함수의 개시와 종료부분이 알기쉽게 보이기 때문입니다.

    // bad
    [1, 2, 3].map(number => 'As time went by, the string containing the ' +
      `${number} became much longer. So we needed to break it over multiple ` +
      'lines.'
    );
    
    // good
    [1, 2, 3].map(number => (
      `As time went by, the string containing the ${number} became much ` +
      'longer. So we needed to break it over multiple lines.'
    ));
  • 8.4 If your function only takes a single argument, feel free to omit the parentheses.

  • 8.4 함수의 인수가 하나인 경우 소괄호()를 생략하는게 가능합니다.

    Why? Less visual clutter.

    왜? 별로 보기 어렵지 않기 때문입니다.

    // good
    [1, 2, 3].map(x => x * x);
    
    // good
    [1, 2, 3].reduce((y, x) => x + y);

⬆ back to top

Classes & Constructors

  • 9.1 Always use class. Avoid manipulating prototype directly.

  • 9.1 prototype 을 직접 조작하는것을 피하고 항상 class 를 이용해 주십시오.

    Why? class syntax is more concise and easier to reason about.

    왜? class 구문은 간결하고 의미를 알기 쉽기 때문입니다.

    // bad
    function Queue(contents = []) {
      this._queue = [...contents];
    }
    Queue.prototype.pop = function() {
      const value = this._queue[0];
      this._queue.splice(0, 1);
      return value;
    }
    
    // good
    class Queue {
      constructor(contents = []) {
        this._queue = [...contents];
      }
      pop() {
        const value = this._queue[0];
        this._queue.splice(0, 1);
        return value;
      }
    }
  • 9.2 Use extends for inheritance.

  • 9.2 상속은 extends 를 이용해 주십시오.

    Why? It is a built-in way to inherit prototype functionality without breaking instanceof.

    왜? instanceof 를 파괴하지 않고 프로토타입 상속을 하기 위해 빌트인 된 방법이기 때문입니다.

    // bad
    const inherits = require('inherits');
    function PeekableQueue(contents) {
      Queue.apply(this, contents);
    }
    inherits(PeekableQueue, Queue);
    PeekableQueue.prototype.peek = function() {
      return this._queue[0];
    }
    
    // good
    class PeekableQueue extends Queue {
      peek() {
        return this._queue[0];
      }
    }
  • 9.3 Methods can return this to help with method chaining.

  • 9.3 메소드의 반환값으로 this 를 반환하는 것으로 메소드채이닝을 할 수 있습니다.

    // bad
    Jedi.prototype.jump = function() {
      this.jumping = true;
      return true;
    };
    
    Jedi.prototype.setHeight = function(height) {
      this.height = height;
    };
    
    const luke = new Jedi();
    luke.jump(); // => true
    luke.setHeight(20); // => undefined
    
    // good
    class Jedi {
      jump() {
        this.jumping = true;
        return this;
      }
    
      setHeight(height) {
        this.height = height;
        return this;
      }
    }
    
    const luke = new Jedi();
    
    luke.jump()
      .setHeight(20);
  • 9.4 It's okay to write a custom toString() method, just make sure it works successfully and causes no side effects.

  • 9.4 독자의 toString()을 작성하는것을 허용하지만 올바르게 동작하는지와 side effect 가 없는지만 확인해 주십시오.

    class Jedi {
      constructor(options = {}) {
        this.name = options.name || 'no name';
      }
    
      getName() {
        return this.name;
      }
    
      toString() {
        return `Jedi - ${this.getName()}`;
      }
    }

⬆ back to top

모듈(Modules)

  • 10.1 Always use modules (import/export) over a non-standard module system. You can always transpile to your preferred module system.

  • 10.1 비표준 모듈시스템이 아닌 항상 (import/export) 를 이용해 주십시오. 이렇게 함으로써 선호하는 모듈시스템에 언제라도 옮겨가는게 가능해 집니다.

    Why? Modules are the future, let's start using the future now.

    왜? 모듈은 미래가 있습니다. 지금 그 미래를 사용하여 시작합시다.

    // bad
    const AirbnbStyleGuide = require('./AirbnbStyleGuide');
    module.exports = AirbnbStyleGuide.es6;
    
    // ok
    import AirbnbStyleGuide from './AirbnbStyleGuide';
    export default AirbnbStyleGuide.es6;
    
    // best
    import { es6 } from './AirbnbStyleGuide';
    export default es6;
  • 10.2 Do not use wildcard imports.

  • 10.2 wildcard import 는 이용하지 마십시오.

    Why? This makes sure you have a single default export.

    왜? single default export 임을 주의할 필요가 있습니다.

    // bad
    import * as AirbnbStyleGuide from './AirbnbStyleGuide';
    
    // good
    import AirbnbStyleGuide from './AirbnbStyleGuide';
  • 10.3 And do not export directly from an import.

  • 10.3 import 문으로부터 직접 export 하는것은 하지말아 주십시오.

    Why? Although the one-liner is concise, having one clear way to import and one clear way to export makes things consistent.

    왜? 한줄짜리는 간결하지만 import 와 export 방법을 명확히 한가지로 해서 일관성을 갖는 것이 가능합니다.

    // bad
    // filename es6.js
    export { es6 as default } from './airbnbStyleGuide';
    
    // good
    // filename es6.js
    import { es6 } from './AirbnbStyleGuide';
    export default es6;

⬆ back to top

이터레이터와 제너레이터(Iterators and Generators)

  • 11.1 Don't use iterators. Prefer JavaScript's higher-order functions like map() and reduce() instead of loops like for-of.

  • 11.1 iterators를 이용하지 마십시오. for-of 루프 대신에 map()reduce() 와 같은 JavaScript 고급함수(higher-order functions)를 이용해 주십시오.

    Why? This enforces our immutable rule. Dealing with pure functions that return values is easier to reason about than side-effects.

    왜? 고급함수는 immutable(불변)룰을 적용합니다. side effect에 대해 추측하는거보다 값을 반환하는 순수 함수를 다루는게 간단하기 때문입니다.

    const numbers = [1, 2, 3, 4, 5];
    
    // bad
    let sum = 0;
    for (let num of numbers) {
      sum += num;
    }
    
    sum === 15;
    
    // good
    let sum = 0;
    numbers.forEach((num) => sum += num);
    sum === 15;
    
    // best (use the functional force)
    const sum = numbers.reduce((total, num) => total + num, 0);
    sum === 15;
  • 11.2 Don't use generators for now.

  • 11.2 현시점에서는 generators는 이용하지 마십시오.

    Why? They don't transpile well to ES5.

    왜? ES5로 잘 transpile 하지 않기 때문입니다.

⬆ back to top

프로퍼티(Properties)

  • 12.1 Use dot notation when accessing properties.

  • 12.1 프로퍼티에 억세스하는 경우는 점 . 을 사용해 주십시오.

    const luke = {
      jedi: true,
      age: 28,
    };
    
    // bad
    const isJedi = luke['jedi'];
    
    // good
    const isJedi = luke.jedi;
  • 12.2 Use subscript notation [] when accessing properties with a variable.

  • 12.2 변수를 사용해 프로퍼티에 억세스하는 경우는 대괄호 [] 를 사용해 주십시오.

    const luke = {
      jedi: true,
      age: 28,
    };
    
    function getProp(prop) {
      return luke[prop];
    }
    
    const isJedi = getProp('jedi');

⬆ back to top

변수(Variables)

  • 13.1 Always use const to declare variables. Not doing so will result in global variables. We want to avoid polluting the global namespace. Captain Planet warned us of that.

  • 13.1 변수를 선언 할 때는 항상 const 를 사용해 주십시오. 그렇게 하지 않으면 글로벌 변수로 선언됩니다. 글로벌 namespace 를 오염시키지 않도록 캡틴플래닛도 경고하고 있습니다.

    // bad
    superPower = new SuperPower();
    
    // good
    const superPower = new SuperPower();
  • 13.2 Use one const declaration per variable.

  • 13.2 하나의 변수선언에 대해 하나의 const 를 이용해 주십시오.

    Why? It's easier to add new variable declarations this way, and you never have to worry about swapping out a ; for a , or introducing punctuation-only diffs.

    왜? 이 방법의 경우, 간단히 새 변수를 추가하는게 가능합니다. 또한 ,; 로 바꿔버리는 것에 대해 걱정할 필요가 없습니다.

    // bad
    const items = getItems(),
        goSportsTeam = true,
        dragonball = 'z';
    
    // bad
    // (compare to above, and try to spot the mistake)
    const items = getItems(),
        goSportsTeam = true;
        dragonball = 'z';
    
    // good
    const items = getItems();
    const goSportsTeam = true;
    const dragonball = 'z';
  • 13.3 Group all your consts and then group all your lets.

  • 13.3 우선 const 를 그룹화하고 다음에 let 을 그룹화 해주십시오.

    Why? This is helpful when later on you might need to assign a variable depending on one of the previous assigned variables.

    왜? 이전에 할당한 변수에 대해 나중에 새 변수를 추가하는 경우에 유용하기 때문입니다.

    // bad
    let i, len, dragonball,
        items = getItems(),
        goSportsTeam = true;
    
    // bad
    let i;
    const items = getItems();
    let dragonball;
    const goSportsTeam = true;
    let len;
    
    // good
    const goSportsTeam = true;
    const items = getItems();
    let dragonball;
    let i;
    let length;
  • 13.4 Assign variables where you need them, but place them in a reasonable place.

  • 13.4 변수를 할당할때는 필요하고 합리적인 장소에 두시기 바랍니다.

    Why? let and const are block scoped and not function scoped.

    왜? letconst 는 블록스코프이기 때문입니다. 함수스코프가 아닙니다.

    // good
    function() {
      test();
      console.log('doing stuff..');
    
      //..other stuff..
    
      const name = getName();
    
      if (name === 'test') {
        return false;
      }
    
      return name;
    }
    
    // bad - unnecessary function call
    // 필요없는 함수 호출
    function(hasName) {
      const name = getName();
    
      if (!hasName) {
        return false;
      }
    
      this.setFirstName(name);
    
      return true;
    }
    
    // good
    function(hasName) {
      if (!hasName) {
        return false;
      }
    
      const name = getName();
      this.setFirstName(name);
    
      return true;
    }

⬆ back to top

Hoisting

  • 14.1 var declarations get hoisted to the top of their scope, their assignment does not. const and let declarations are blessed with a new concept called Temporal Dead Zones (TDZ). It's important to know why typeof is no longer safe.

  • 14.1 var 선언은 할당이 없이 스코프의 선두에 hoist 됩니다. constlet 선언은Temporal Dead Zones (TDZ) 라고 불리는 새로운 컨셉의 혜택을 받고 있습니다. 이것은 왜 typeof 는 더이상 안전하지 않은가를 알고있는 것이 중요합니다.

    // we know this wouldn't work (assuming there
    // is no notDefined global variable)
    // (notDefined 가 글로벌변수에 존재하지 않는다고 판정한 경우.)
    // 잘 동작하지 않습니다.
    function example() {
      console.log(notDefined); // => throws a ReferenceError
    }
    
    // creating a variable declaration after you
    // reference the variable will work due to
    // variable hoisting. Note: the assignment
    // value of `true` is not hoisted.
    // 그 변수를 참조하는 코드의 뒤에서 그 변수를 선언한 경우
    // 변수가 hoist 된 상태에서 동작합니다..
    // 주의:`true` 라는 값 자체는 hoist 되지 않습니다.
    function example() {
      console.log(declaredButNotAssigned); // => undefined
      var declaredButNotAssigned = true;
    }
    
    // The interpreter is hoisting the variable
    // declaration to the top of the scope,
    // which means our example could be rewritten as:
    // 인터프리터는 변수선언을 스코프의 선두에 hoist 합니다.
    // 위의 예는 다음과 같이 다시 쓸수 있습니다.
    function example() {
      let declaredButNotAssigned;
      console.log(declaredButNotAssigned); // => undefined
      declaredButNotAssigned = true;
    }
    
    // using const and let
    // const 와 let 을 이용한 경우
    function example() {
      console.log(declaredButNotAssigned); // => throws a ReferenceError
      console.log(typeof declaredButNotAssigned); // => throws a ReferenceError
      const declaredButNotAssigned = true;
    }
  • 14.2 Anonymous function expressions hoist their variable name, but not the function assignment.

  • 14.2 무명함수의 경우 함수가 할당되기 전의 변수가 hoist 됩니다.

    function example() {
      console.log(anonymous); // => undefined
    
      anonymous(); // => TypeError anonymous is not a function
    
      var anonymous = function() {
        console.log('anonymous function expression');
      };
    }
  • 14.3 Named function expressions hoist the variable name, not the function name or the function body.

  • 14.3 명명함수의 경우도 똑같이 변수가 hoist 됩니다. 함수명이나 함수본체는 hoist 되지 않습니다.

    function example() {
      console.log(named); // => undefined
    
      named(); // => TypeError named is not a function
    
      superPower(); // => ReferenceError superPower is not defined
    
      var named = function superPower() {
        console.log('Flying');
      };
    }
    
    // the same is true when the function name
    // is the same as the variable name.
    // 함수명과 변수명이 같은 경우도 같은 현상이 발생합니다.
    function example() {
      console.log(named); // => undefined
    
      named(); // => TypeError named is not a function
    
      var named = function named() {
        console.log('named');
      }
    }
  • 14.4 Function declarations hoist their name and the function body.

  • 14.4 함수선언은 함수명과 함수본체가 hoist 됩니다.

    function example() {
      superPower(); // => Flying
    
      function superPower() {
        console.log('Flying');
      }
    }
  • For more information refer to JavaScript Scoping & Hoisting by Ben Cherry.

  • 더 자세한건 이쪽을 참고해 주십시오. JavaScript Scoping & Hoisting by Ben Cherry.

⬆ back to top

조건식과 등가식(Comparison Operators & Equality)

  • 15.1 Use === and !== over == and !=.

  • 15.1 == 이나 != 보다 ===!== 을 사용해 주십시오.

  • 15.2 Conditional statements such as the if statement evaluate their expression using coercion with the ToBoolean abstract method and always follow these simple rules:

    • Objects evaluate to true
    • Undefined evaluates to false
    • Null evaluates to false
    • Booleans evaluate to the value of the boolean
    • Numbers evaluate to false if +0, -0, or NaN, otherwise true
    • Strings evaluate to false if an empty string '', otherwise true
  • 15.2 if 문과 같은 조건식은 ToBoolean 메소드에 의한 강제형변환으로 평가되어 항상 다음과 같은 심플한 룰을 따릅니다.

    • 오브젝트true 로 평가됩니다.
    • undefinedfalse 로 평가됩니다.
    • nullfalse 로 평가됩니다.
    • 부울값boolean형의 값 으로 평가됩니다.
    • 수치true 로 평가됩니다. 하지만 +0, -0, or NaN 의 경우는 false 입니다.
    • 문자열true 로 평가됩니다. 하지만 빈문자 '' 의 경우는 false 입니다.
    if ([0]) {
      // true
      // An array is an object, objects evaluate to true
      // 배열은 오브젝트이므로 true 로 평가됩니다.
    }
  • 15.3 Use shortcuts.

  • 15.3 단축형을 사용해 주십시오.

    // bad
    if (name !== '') {
      // ...stuff...
    }
    
    // good
    if (name) {
      // ...stuff...
    }
    
    // bad
    if (collection.length > 0) {
      // ...stuff...
    }
    
    // good
    if (collection.length) {
      // ...stuff...
    }
  • 15.4 For more information see Truth Equality and JavaScript by Angus Croll.

  • 15.4 더 자세한건 이쪽을 참고해 주십시오. Truth Equality and JavaScript by Angus Croll.

⬆ back to top

블록(Blocks)

  • 16.1 Use braces with all multi-line blocks.

  • 16.1 복수행의 블록에는 중괄호 ({}) 를 사용해 주십시오.

    // bad
    if (test)
      return false;
    
    // good
    if (test) return false;
    
    // good
    if (test) {
      return false;
    }
    
    // bad
    function() { return false; }
    
    // good
    function() {
      return false;
    }
  • 16.2 If you're using multi-line blocks with if and else, put else on the same line as your
    if block's closing brace.

  • 16.2 복수행 블록의 ifelse 를 이용하는 경우 elseif 블록 끝의 중괄호(})와 같은 행에 위치시켜 주십시오.

    // bad
    if (test) {
      thing1();
      thing2();
    }
    else {
      thing3();
    }
    
    // good
    if (test) {
      thing1();
      thing2();
    } else {
      thing3();
    }

⬆ back to top

코멘트(Comments)

  • 17.1 Use /** ... */ for multi-line comments. Include a description, specify types and values for all parameters and return values.

  • 17.1 복수행의 코멘트는 /** ... */ 을 사용해 주십시오. 그 안에는 설명과 모든 파라메터, 반환값에 대해 형이나 값을 기술해 주십시오.

    // bad
    // make() returns a new element
    // based on the passed in tag name
    //
    // @param {String} tag
    // @return {Element} element
    function make(tag) {
    
      // ...stuff...
    
      return element;
    }
    
    // good
    /**
     * make() returns a new element
     * based on the passed in tag name
     *
     * @param {String} tag
     * @return {Element} element
     */
    function make(tag) {
    
      // ...stuff...
    
      return element;
    }
  • 17.2 Use // for single line comments. Place single line comments on a newline above the subject of the comment. Put an empty line before the comment unless it's on the first line of a block.

  • 17.2 단일행 코멘트에는 // 을 사용해 주십시오. 코멘트를 추가하고 싶은 코드의 상부에 배치해 주십시오. 또한, 코멘트의 앞에 빈행을 넣어 주십시오.

    // bad
    const active = true;  // is current tab
    
    // good
    // is current tab
    const active = true;
    
    // bad
    function getType() {
      console.log('fetching type...');
      // set the default type to 'no type'
      const type = this._type || 'no type';
    
      return type;
    }
    
    // good
    function getType() {
      console.log('fetching type...');
    
      // set the default type to 'no type'
      const type = this._type || 'no type';
    
      return type;
    }
    
    // also good
    function getType() {
      // set the default type to 'no type'
      const type = this._type || 'no type';
    
      return type;
    }
  • 17.3 Prefixing your comments with FIXME or TODO helps other developers quickly understand if you're pointing out a problem that needs to be revisited, or if you're suggesting a solution to the problem that needs to be implemented. These are different than regular comments because they are actionable. The actions are FIXME -- need to figure this out or TODO -- need to implement.

  • 17.3 문제를 지적하고 재고를 촉구하는 경우나 문제의 해결책을 제안하는 경우 등, 코멘트의 앞에 FIXMETODO 를 붙이는 것으로 다른 개발자의 빠른 이해를 도울수 있습니다. 이런것들은 어떤 액션을 따른다는 의미로 통상의 코멘트와는 다릅니다. 액션이라는 것은 FIXME -- 해결이 필요 또는 TODO -- 구현이 필요 를 뜻합니다.

  • 17.4 Use // FIXME: to annotate problems.

  • 17.4 문제에 대한 주석으로써 // FIXME: 를 사용해 주십시오.

    class Calculator extends Abacus {
      constructor() {
        super();
    
        // FIXME: shouldn't use a global here
        // FIXME: 글로벌변수를 사용해서는 안됨.
        total = 0;
      }
    }
  • 17.5 Use // TODO: to annotate solutions to problems.

  • 17.5 문제의 해결책에 대한 주석으로 // TODO: 를 사용해 주십시오.

    class Calculator extends Abacus {
      constructor() {
        super();
    
        // TODO: total should be configurable by an options param
        // TODO: total 은 옵션 파라메터로 설정해야함.
        this.total = 0;
      }
    }

⬆ back to top

공백(Whitespace)

  • 18.1 Use soft tabs set to 2 spaces.

  • 18.1 탭에는 스페이스 2개를 설정해 주십시오.

    // bad
    function() {
    ∙∙∙∙const name;
    }
    
    // bad
    function() {
    ∙const name;
    }
    
    // good
    function() {
    ∙∙const name;
    }
  • 18.2 Place 1 space before the leading brace.

  • 18.2 주요 중괄호 ({}) 앞에는 스페이스를 1개 넣어 주십시오.

    // bad
    function test(){
      console.log('test');
    }
    
    // good
    function test() {
      console.log('test');
    }
    
    // bad
    dog.set('attr',{
      age: '1 year',
      breed: 'Bernese Mountain Dog',
    });
    
    // good
    dog.set('attr', {
      age: '1 year',
      breed: 'Bernese Mountain Dog',
    });
  • 18.3 Place 1 space before the opening parenthesis in control statements (if, while etc.). Place no space before the argument list in function calls and declarations.

  • 18.3 제어구문 (if 문이나 while 문 등) 의 소괄호 (()) 앞에는 스페이스를 1개 넣어 주십시오. 함수선언이나 함수호출시 인수리스트의 앞에는 스페이스를 넣지 마십시오.

    // bad
    if(isJedi) {
      fight ();
    }
    
    // good
    if (isJedi) {
      fight();
    }
    
    // bad
    function fight () {
      console.log ('Swooosh!');
    }
    
    // good
    function fight() {
      console.log('Swooosh!');
    }
  • 18.4 Set off operators with spaces.

  • 18.4 연산자 사이에는 스페이스를 넣어 주십시오.

    // bad
    const x=y+5;
    
    // good
    const x = y + 5;
  • 18.5 End files with a single newline character.

  • 18.5 파일 끝에는 개행문자를 1개 넣어 주십시오.

    // bad
    (function(global) {
      // ...stuff...
    })(this);
    // bad
    (function(global) {
      // ...stuff...
    })(this);↵
    ↵
    // good
    (function(global) {
      // ...stuff...
    })(this);↵
  • 18.6 Use indentation when making long method chains. Use a leading dot, which
    emphasizes that the line is a method call, not a new statement.

  • 18.6 길게 메소드를 채이닝하는 경우는 인덴트를 이용해 주십시오. 행이 새로운 문이 아닌 메소드 호출인 것을 강조하기 위해서 선두에 점 (.) 을 배치해 주십시오.

    // bad
    $('#items').find('.selected').highlight().end().find('.open').updateCount();
    
    // bad
    $('#items').
      find('.selected').
        highlight().
        end().
      find('.open').
        updateCount();
    
    // good
    $('#items')
      .find('.selected')
        .highlight()
        .end()
      .find('.open')
        .updateCount();
    
    // bad
    const leds = stage.selectAll('.led').data(data).enter().append('svg:svg').class('led', true)
        .attr('width', (radius + margin) * 2).append('svg:g')
        .attr('transform', 'translate(' + (radius + margin) + ',' + (radius + margin) + ')')
        .call(tron.led);
    
    // good
    const leds = stage.selectAll('.led')
        .data(data)
      .enter().append('svg:svg')
        .classed('led', true)
        .attr('width', (radius + margin) * 2)
      .append('svg:g')
        .attr('transform', 'translate(' + (radius + margin) + ',' + (radius + margin) + ')')
        .call(tron.led);
  • 18.7 Leave a blank line after blocks and before the next statement.

  • 18.7 문의 앞과 블록의 뒤에는 빈행을 남겨 주십시오.

    // bad
    if (foo) {
      return bar;
    }
    return baz;
    
    // good
    if (foo) {
      return bar;
    }
    
    return baz;
    
    // bad
    const obj = {
      foo() {
      },
      bar() {
      },
    };
    return obj;
    
    // good
    const obj = {
      foo() {
      },
    
      bar() {
      },
    };
    
    return obj;
    
    // bad
    const arr = [
      function foo() {
      },
      function bar() {
      },
    ];
    return arr;
    
    // good
    const arr = [
      function foo() {
      },
    
      function bar() {
      },
    ];
    
    return arr;
  • 18.8 Do not pad your blocks with blank lines.

  • 18.8 블록에 빈행을 끼워 넣지 마십시오.

    // bad
    function bar() {
    
      console.log(foo);
    
    }
    
    // also bad
    if (baz) {
    
      console.log(qux);
    } else {
      console.log(foo);
    
    }
    
    // good
    function bar() {
      console.log(foo);
    }
    
    // good
    if (baz) {
      console.log(qux);
    } else {
      console.log(foo);
    }
  • 18.9 Do not add spaces inside parentheses.

  • 18.9 소괄호()의 안쪽에 스페이스를 추가하지 마십시오.

    // bad
    function bar( foo ) {
      return foo;
    }
    
    // good
    function bar(foo) {
      return foo;
    }
    
    // bad
    if ( foo ) {
      console.log(foo);
    }
    
    // good
    if (foo) {
      console.log(foo);
    }
  • 18.10 Do not add spaces inside brackets.

  • 18.10 대괄호([])의 안쪽에 스페이스를 추가하지 마십시오.

    // bad
    const foo = [ 1, 2, 3 ];
    console.log(foo[ 0 ]);
    
    // good
    const foo = [1, 2, 3];
    console.log(foo[0]);
  • 18.11 Add spaces inside curly braces.

  • 18.11 중괄호({})의 안쪽에 스페이스를 추가해 주십시오.

    // bad
    const foo = {clark: 'kent'};
    
    // good
    const foo = { clark: 'kent' };

⬆ back to top

콤마(Commas)

  • 19.1 Leading commas: Nope.

  • 19.1 선두의 콤마 하지마요

    // bad
    const story = [
        once
      , upon
      , aTime
    ];
    
    // good
    const story = [
      once,
      upon,
      aTime,
    ];
    
    // bad
    const hero = {
        firstName: 'Ada'
      , lastName: 'Lovelace'
      , birthYear: 1815
      , superPower: 'computers'
    };
    
    // good
    const hero = {
      firstName: 'Ada',
      lastName: 'Lovelace',
      birthYear: 1815,
      superPower: 'computers',
    };
  • 19.2 Additional trailing comma: Yup.

  • 19.2 끝의 콤마 좋아요

    Why? This leads to cleaner git diffs. Also, transpilers like Babel will remove the additional trailing comma in the transpiled code which means you don't have to worry about the trailing comma problem in legacy browsers.

    왜? 이것은 깨끗한 git의 diffs 로 이어집니다. 또한 Babel과 같은 트랜스파일러는 transpile 하는 사이에 쓸데없는 끝의 콤마를 제거합니다. 이것은 레거시브라우저에서의 불필요한 콤마 문제를 고민할 필요가 없다는것을 의미합니다.

    // bad - git diff without trailing comma
    const hero = {
         firstName: 'Florence',
    -    lastName: 'Nightingale'
    +    lastName: 'Nightingale',
    +    inventorOf: ['coxcomb graph', 'modern nursing']
    };
    
    // good - git diff with trailing comma
    const hero = {
         firstName: 'Florence',
         lastName: 'Nightingale',
    +    inventorOf: ['coxcomb chart', 'modern nursing'],
    };
    
    // bad
    const hero = {
      firstName: 'Dana',
      lastName: 'Scully'
    };
    
    const heroes = [
      'Batman',
      'Superman'
    ];
    
    // good
    const hero = {
      firstName: 'Dana',
      lastName: 'Scully',
    };
    
    const heroes = [
      'Batman',
      'Superman',
    ];

⬆ back to top

세미콜론(Semicolons)

  • 20.1 Yup.

  • 20.1 씁시다

    // bad
    (function() {
      const name = 'Skywalker'
      return name
    })()
    
    // good
    (() => {
      const name = 'Skywalker';
      return name;
    })();
    
    // good (guards against the function becoming an argument when two files with IIFEs are concatenated)
    // good (즉시함수가 연결된 2개의 파일일때 인수가 되는 부분을 보호합니다.
    ;(() => {
      const name = 'Skywalker';
      return name;
    })();

    Read more.

⬆ back to top

형변환과 강제(Type Casting & Coercion)

  • 21.1 Perform type coercion at the beginning of the statement.

  • 21.1 문의 선두에서 형의 강제를 행합니다.

  • 21.2 Strings:

  • 21.2 문자열의 경우:

    //  => this.reviewScore = 9;
    
    // bad
    const totalScore = this.reviewScore + '';
    
    // good
    const totalScore = String(this.reviewScore);
  • 21.3 Numbers: Use Number for type casting and parseInt always with a radix for parsing strings.

  • 21.3 수치의 경우: Number 로 형변환하는 경우는 parseInt 를 이용하고, 항상 형변환을 위한 기수를 인수로 넘겨 주십시오.

    const inputValue = '4';
    
    // bad
    const val = new Number(inputValue);
    
    // bad
    const val = +inputValue;
    
    // bad
    const val = inputValue >> 0;
    
    // bad
    const val = parseInt(inputValue);
    
    // good
    const val = Number(inputValue);
    
    // good
    const val = parseInt(inputValue, 10);
  • 21.4 If for whatever reason you are doing something wild and parseInt is your bottleneck and need to use Bitshift for performance reasons, leave a comment explaining why and what you're doing.

  • 21.4 무언가의 이유로 인해 parseInt 가 bottleneck 이 되어, 성능적인 이유로 Bitshift를 사용할 필요가 있는 경우
    하려고 했던 것에 대해, 왜(why) 와 무엇(what)의 설명을 코멘트로 해서 남겨 주십시오.

    // good
    /**
     * parseInt was the reason my code was slow.
     * Bitshifting the String to coerce it to a
     * Number made it a lot faster.
     * parseInt 가 원인으로 느렸음.
     * Bitshift를 통한 수치로의 문자열 강제 형변환으로
     * 성능을 개선시킴.
     */
    const val = inputValue >> 0;
  • 21.5 Note: Be careful when using bitshift operations. Numbers are represented as 64-bit values, but Bitshift operations always return a 32-bit integer (source). Bitshift can lead to unexpected behavior for integer values larger than 32 bits. Discussion. Largest signed 32-bit Int is 2,147,483,647:

  • 21.5 주의: bitshift를 사용하는 경우의 주의사항. 수치는 64비트 값으로 표현되어 있으나 bitshift 연산한 경우는 항상 32비트 integer 로 넘겨집니다.(소스).
    32비트 이상의 int 를 bitshift 하는 경우 예상치 못한 현상을 야기할 수 있습니다.(토론) 부호가 포함된 32비트 정수의 최대치는 2,147,483,647 입니다.

    2147483647 >> 0 //=> 2147483647
    2147483648 >> 0 //=> -2147483648
    2147483649 >> 0 //=> -2147483647
  • 21.6 Booleans:

  • 21.6 부울값의 경우:

    const age = 0;
    
    // bad
    const hasAge = new Boolean(age);
    
    // good
    const hasAge = Boolean(age);
    
    // good
    const hasAge = !!age;

⬆ back to top

명명규칙(Naming Conventions)

  • 22.1 Avoid single letter names. Be descriptive with your naming.

  • 22.1 1문자의 이름은 피해 주십시오. 이름으로부터 의도가 읽혀질수 있게 해주십시오.

    // bad
    function q() {
      // ...stuff...
    }
    
    // good
    function query() {
      // ..stuff..
    }
  • 22.2 Use camelCase when naming objects, functions, and instances.

  • 22.2 오브젝트, 함수 그리고 인스턴스에는 camelCase를 사용해 주십시오.

    // bad
    const OBJEcttsssss = {};
    const this_is_my_object = {};
    function c() {}
    
    // good
    const thisIsMyObject = {};
    function thisIsMyFunction() {}
  • 22.3 Use PascalCase when naming constructors or classes.

  • 22.3 클래스나 constructor에는 PascalCase 를 사용해 주십시오.

    // bad
    function user(options) {
      this.name = options.name;
    }
    
    const bad = new user({
      name: 'nope',
    });
    
    // good
    class User {
      constructor(options) {
        this.name = options.name;
      }
    }
    
    const good = new User({
      name: 'yup',
    });
  • 22.4 Use a leading underscore _ when naming private properties.

  • 22.4 private 프로퍼티명은 선두에 언더스코어 _ 를사용해 주십시오.

    // bad
    this.__firstName__ = 'Panda';
    this.firstName_ = 'Panda';
    
    // good
    this._firstName = 'Panda';
  • 22.5 Don't save references to this. Use arrow functions or Function#bind.

  • 22.5 this 의 참조를 보존하는것은 피해주십시오. arrow함수나 Function#bind 를 이용해 주십시오.

    // bad
    function foo() {
      const self = this;
      return function() {
        console.log(self);
      };
    }
    
    // bad
    function foo() {
      const that = this;
      return function() {
        console.log(that);
      };
    }
    
    // good
    function foo() {
      return () => {
        console.log(this);
      };
    }
  • 22.6 If your file exports a single class, your filename should be exactly the name of the class.

  • 22.6 파일을 1개의 클래스로 export 하는 경우, 파일명은 클래스명과 완전히 일치시키지 않으면 안됩니다.

    // file contents
    class CheckBox {
      // ...
    }
    export default CheckBox;
    
    // in some other file
    // bad
    import CheckBox from './checkBox';
    
    // bad
    import CheckBox from './check_box';
    
    // good
    import CheckBox from './CheckBox';
  • 22.7 Use camelCase when you export-default a function. Your filename should be identical to your function's name.

  • 22.7 Default export가 함수일 경우, camelCase를 이용해 주십시오. 파일명은 함수명과 동일해야 합니다.

    function makeStyleGuide() {
    }
    
    export default makeStyleGuide;
  • 22.8 Use PascalCase when you export a singleton / function library / bare object.

  • 22.8 singleton / function library / 빈오브젝트를 export 하는 경우, PascalCase를 이용해 주십시오.

    const AirbnbStyleGuide = {
      es6: {
      }
    };
    
    export default AirbnbStyleGuide;

⬆ back to top

억세서(Accessors)

  • 23.1 Accessor functions for properties are not required.

  • 23.1 프로퍼티를 위한 억세서 (Accessor) 함수는 필수는 아닙니다.

  • 23.2 If you do make accessor functions use getVal() and setVal('hello').

  • 23.2 억세서 함수가 필요한 경우, getVal() 이나 setVal('hello') 로 해주십시오.

    // bad
    dragon.age();
    
    // good
    dragon.getAge();
    
    // bad
    dragon.age(25);
    
    // good
    dragon.setAge(25);
  • 23.3 If the property is a boolean, use isVal() or hasVal().

  • 23.3 프로퍼티가 boolean 인 경우, isVal() 이나 hasVal() 로 해주십시오.

    // bad
    if (!dragon.age()) {
      return false;
    }
    
    // good
    if (!dragon.hasAge()) {
      return false;
    }
  • 23.4 It's okay to create get() and set() functions, but be consistent.

  • 23.4 일관된 경우, get()set() 으로 함수를 작성해도 좋습니다.

    class Jedi {
      constructor(options = {}) {
        const lightsaber = options.lightsaber || 'blue';
        this.set('lightsaber', lightsaber);
      }
    
      set(key, val) {
        this[key] = val;
      }
    
      get(key) {
        return this[key];
      }
    }

⬆ back to top

이벤트(Events)

  • 24.1 When attaching data payloads to events (whether DOM events or something more proprietary like Backbone events), pass a hash instead of a raw value. This allows a subsequent contributor to add more data to the event payload without finding and updating every handler for the event. For example, instead of:

  • 24.1 (DOM이벤트나 Backbone events 와 같은 독자의) 이벤트로 payload의 값을 넘길 경우는 raw값 보다는 해시값을 넘겨 주십시오.
    이렇게 함으로써, 이후 기여자가 이벤트에 관련한 모든 핸들러를 찾아서 갱신하는 대신 이벤트 payload에 값을 추가하는 것이 가능합니다. 예를들면 아래와 같이

    // bad
    $(this).trigger('listingUpdated', listing.id);
    
    ...
    
    $(this).on('listingUpdated', function(e, listingId) {
      // do something with listingId
    });

    prefer:
    이쪽이 좋습니다:

    // good
    $(this).trigger('listingUpdated', { listingId: listing.id });
    
    ...
    
    $(this).on('listingUpdated', function(e, data) {
      // do something with data.listingId
    });
  • *⬆ back to top**

jQuery

  • 25.1 Prefix jQuery object variables with a $.

  • 25.1 jQuery오브젝트의 변수는 선두에 $ 를 부여해 주십시오.

    // bad
    const sidebar = $('.sidebar');
    
    // good
    const $sidebar = $('.sidebar');
    
    // good
    const $sidebarBtn = $('.sidebar-btn');
  • 25.2 Cache jQuery lookups.

  • 25.2 jQuery의 검색결과를 캐시해 주십시오.

    // bad
    function setSidebar() {
      $('.sidebar').hide();
    
      // ...stuff...
    
      $('.sidebar').css({
        'background-color': 'pink'
      });
    }
    
    // good
    function setSidebar() {
      const $sidebar = $('.sidebar');
      $sidebar.hide();
    
      // ...stuff...
    
      $sidebar.css({
        'background-color': 'pink'
      });
    }
  • 25.3 For DOM queries use Cascading $('.sidebar ul') or parent > child $('.sidebar > ul'). jsPerf

  • 25.3 DOM 검색에는 $('.sidebar ul') 이나 $('.sidebar > ul') 와 같은 Cascading 을 사용해 주십시오. jsPerf

  • 25.4 Use find with scoped jQuery object queries.

  • 25.4 한정된 jQuery 오브젝트 쿼리에는 find 를 사용해 주십시오.

    // bad
    $('ul', '.sidebar').hide();
    
    // bad
    $('.sidebar').find('ul').hide();
    
    // good
    $('.sidebar ul').hide();
    
    // good
    $('.sidebar > ul').hide();
    
    // good
    $sidebar.find('ul').hide();

⬆ back to top

ECMAScript 5 Compatibility

⬆ back to top

ECMAScript 6 Styles

  • 27.1 This is a collection of links to the various es6 features.
  1. Arrow Functions
  2. Classes
  3. Object Shorthand
  4. Object Concise
  5. Object Computed Properties
  6. Template Strings
  7. Destructuring
  8. Default Parameters
  9. Rest
  10. Array Spreads
  11. Let and Const
  12. Iterators and Generators
  13. Modules

⬆ back to top

Testing

  • 28.1 Yup.

    function () {
      return true;
    }
  • 28.2 No, but seriously:

    • Whichever testing framework you use, you should be writing tests!
    • Strive to write many small pure functions, and minimize where mutations occur.
    • Be cautious about stubs and mocks - they can make your tests more brittle.
    • We primarily use mocha at Airbnb. tape is also used occasionally for small, separate modules.
    • 100% test coverage is a good goal to strive for, even if it's not always practical to reach it.
    • Whenever you fix a bug, write a regression test. A bug fixed without a regression test is almost certainly going to break again in the future.

⬆ back to top

Performance

⬆ back to top

Resources

Learning ES6

Read This

Tools

Other Style Guides

Other Styles

Further Reading

Books

Blogs

Podcasts

⬆ back to top

In the Wild

This is a list of organizations that are using this style guide. Send us a pull request and we'll add you to the list.

⬆ back to top

Translation

This style guide is also available in other languages:

The JavaScript Style Guide Guide

Chat With Us About JavaScript

Contributors

License

(The MIT License)

Copyright (c) 2014 Airbnb

Permission is hereby granted, free of charge, to any person obtaining
a copy of this software and associated documentation files (the
'Software'), to deal in the Software without restriction, including
without limitation the rights to use, copy, modify, merge, publish,
distribute, sublicense, and/or sell copies of the Software, and to
permit persons to whom the Software is furnished to do so, subject to
the following conditions:

The above copyright notice and this permission notice shall be
included in all copies or substantial portions of the Software.

THE SOFTWARE IS PROVIDED 'AS IS', WITHOUT WARRANTY OF ANY KIND,
EXPRESS OR IMPLIED, INCLUDING BUT NOT LIMITED TO THE WARRANTIES OF
MERCHANTABILITY, FITNESS FOR A PARTICULAR PURPOSE AND NONINFRINGEMENT.
IN NO EVENT SHALL THE AUTHORS OR COPYRIGHT HOLDERS BE LIABLE FOR ANY
CLAIM, DAMAGES OR OTHER LIABILITY, WHETHER IN AN ACTION OF CONTRACT,
TORT OR OTHERWISE, ARISING FROM, OUT OF OR IN CONNECTION WITH THE
SOFTWARE OR THE USE OR OTHER DEALINGS IN THE SOFTWARE.

⬆ back to top

Amendments

We encourage you to fork this guide and change the rules to fit your team's style guide. Below, you may list some amendments to the style guide. This allows you to periodically update your style guide without having to deal with merge conflicts.

};

https://poiemaweb.com/js-immutability


Immutability(변경불가성)는 객체가 생성된 이후 그 상태를 변경할 수 없는 디자인 패턴을 의미한다. Immutability은 함수형 프로그래밍의 핵심 원리이다.

객체는 참조(reference) 형태로 전달하고 전달 받는다. 객체가 참조를 통해 공유되어 있다면 그 상태가 언제든지 변경될 수 있기 때문에 문제가 될 가능성도 커지게 된다. 이는 객체의 참조를 가지고 있는 어떤 장소에서 객체를 변경하면 참조를 공유하는 모든 장소에서 그 영향을 받기 때문인데 이것이 의도한 동작이 아니라면 참조를 가지고 있는 다른 장소에 변경 사실을 통지하고 대처하는 추가 대응이 필요하다.

의도하지 않은 객체의 변경이 발생하는 원인의 대다수는 “레퍼런스를 참조한 다른 객체에서 객체를 변경”하기 때문이다. 이 문제의 해결 방법은 비용은 조금 들지만 객체를 불변객체로 만들어 프로퍼티의 변경을 방지하며 객체의 변경이 필요한 경우에는 참조가 아닌 객체의 방어적 복사(defensive copy)를 통해 새로운 객체를 생성한 후 변경한다. 또는 Observer 패턴으로 객체의 변경에 대처할 수도 있다.

불변 객체를 사용하면 복제나 비교를 위한 조작을 단순화 할 수 있고 성능 개선에도 도움이 된다. 하지만 객체가 변경 가능한 데이터를 많이 가지고 있는 경우 오히려 부적절한 경우가 있다.

ES6에서는 불변 데이터 패턴(immutable data pattern)을 쉽게 구현할 수 있는 새로운 기능이 추가되었다.

#1. immutable value vs. mutable value

Javascript의 원시 타입(primitive data type)은 변경 불가능한 값(immutable value)이다.

  • Boolean
  • null
  • undefined
  • Number
  • String
  • Symbol (New in ECMAScript 6)

원시 타입 이외의 모든 값은 객체(Object) 타입이며 객체 타입은 변경 가능한 값(mutable value)이다. 즉, 객체는 새로운 값을 다시 만들 필요없이 직접 변경이 가능하다는 것이다.

예를 들어 살펴보자. C 언어와는 다르게 Javascript의 문자열은 변경 불가능한 값(immutable value) 이다. 이런 값을 “primitive values” 라 한다. (변경이 불가능하다는 뜻은 메모리 영역에서의 변경이 불가능하다는 뜻이다. 재할당은 가능하다)

아래의 코드를 살펴보자.

var str = 'Hello';
str = 'world';

첫번째 구문이 실행되면 메모리에 문자열 ‘Hello’가 생성되고 식별자 str은 메모리에 생성된 문자열 ‘Hello’의 메모리 주소를 가리킨다. 그리고 두번째 구문이 실행되면 이전에 생성된 문자열 ‘Hello’을 수정하는 것이 아니라 새로운 문자열 ‘world’를 메모리에 생성하고 식별자 str은 이것을 가리킨다. 이때 문자열 ‘Hello’와 ‘world’는 모두 메모리에 존재하고 있다. 변수 str은 문자열 ‘Hello’를 가리키고 있다가 문자열 ‘world’를 가리키도록 변경되었을 뿐이다.

var statement = 'I am an immutable value'; // string은 immutable value

var otherStr = statement.slice(8, 17);

console.log(otherStr);   // 'immutable'
console.log(statement);  // 'I am an immutable value'

2행에서 Stirng 객체의 slice() 메소드는 statement 변수에 저장된 문자열을 변경하는 것이 아니라 사실은 새로운 문자열을 생성하여 반환하고 있다. 그 이유는 문자열은 변경할 수 없는 immutable value이기 때문이다.

var arr = [];
console.log(arr.length); // 0

var v2 = arr.push(2);    // arr.push()는 메소드 실행 후 arr의 length를 반환
console.log(arr.length); // 1

상기 예제에서 v2의 값은 무엇인가? 문자열의 예와 같이 배열이 동작한다면 v2는 새로운 배열(하나의 요소를 가지고 그 값은 2인)을 가지게 될 것이다. 그러나 객체인 arr은 push 메소드에 의해 update되고 v2에는 배열의 새로운 length 값이 반환된다.

처리 후 결과의 복사본을 리턴하는 문자열의 메소드 slice()와는 달리 배열(객체)의 메소드 push()는 직접 대상 배열을 변경한다. 그 이유는 배열은 객체이고 객체는 immutable value가 아닌 변경 가능한 값이기 때문이다.

다른 예를 알아보자.

var user = {
  name: 'Lee',
  address: {
    city: 'Seoul'
  }
};

var myName = user.name; // 변수 myName은 string 타입이다.

user.name = 'Kim';
console.log(myName); // Lee

myName = user.name;  // 재할당
console.log(myName); // Kim

user.name의 값을 변경했지만 변수 myName의 값은 변경되지 않았다. 이는 변수 myName에 user.name을 할당했을 때 user.name의 참조를 할당하는 것이 아니라 immutable한 값 ‘Lee’가 메모리에 새로 생성되고 myName은 이것을 참조하기 때문이다. 따라서 user.name의 값이 변경된다 하더라도 변수 myName이 참조하고 있는 ‘Lee’는 변함이 없다.

var user1 = {
  name: 'Lee',
  address: {
    city: 'Seoul'
  }
};

var user2 = user1; // 변수 user2는 객체 타입이다.

user2.name = 'Kim';

console.log(user1.name); // Kim
console.log(user2.name); // Kim

위의 경우 객체 user2의 name 프로퍼티에 새로운 값을 할당하면 객체는 변경 불가능한 값이 아니므로 객체 user2는 변경된다. 그런데 변경하지도 않은 객체 user1도 동시에 변경된다. 이는 user1과 user2가 같은 어드레스를 참조하고 있기 때문이다.

immutability

Pass-by-reference

이것이 의도한 동작이 아니라면 참조를 가지고 있는 다른 장소에 변경 사실을 통지하고 대처하는 추가 대응이 필요하다.

#2. 불변 데이터 패턴(immutable data pattern)

의도하지 않은 객체의 변경이 발생하는 원인의 대다수는 “레퍼런스를 참조한 다른 객체에서 객체를 변경”하기 때문이다. 이 문제의 해결 방법은 비용은 조금 들지만 객체를 불변객체로 만들어 프로퍼티의 변경을 방지하며 객체의 변경이 필요한 경우에는 참조가 아닌 객체의 방어적 복사(defensive copy)를 통해 새로운 객체를 생성한 후 변경한다.

이를 정리하면 아래와 같다.

  • 객체의 방어적 복사(defensive copy)
    Object.assign
  • 불변객체화를 통한 객체 변경 방지
    Object.freeze

#2.1 Object.assign

Object.assign은 타킷 객체로 소스 객체의 프로퍼티를 복사한다. 이때 소스 객체의 프로퍼티와 동일한 프로퍼티를 가진 타켓 객체의 프로퍼티들은 소스 객체의 프로퍼티로 덮어쓰기된다. 리턴값으로 타킷 객체를 반환한다. ES6에서 추가된 메소드이며 Internet Explorer는 지원하지 않는다.

// Syntax
Object.assign(target, ...sources)
// Copy
const obj = { a: 1 };
const copy = Object.assign({}, obj);
console.log(copy); // { a: 1 }
console.log(obj == copy); // false

// Merge
const o1 = { a: 1 };
const o2 = { b: 2 };
const o3 = { c: 3 };

const merge1 = Object.assign(o1, o2, o3);

console.log(merge1); // { a: 1, b: 2, c: 3 }
console.log(o1);     // { a: 1, b: 2, c: 3 }, 타겟 객체가 변경된다!

// Merge
const o4 = { a: 1 };
const o5 = { b: 2 };
const o6 = { c: 3 };

const merge2 = Object.assign({}, o4, o5, o6);

console.log(merge2); // { a: 1, b: 2, c: 3 }
console.log(o4);     // { a: 1 }

Object.assign을 사용하여 기존 객체를 변경하지 않고 객체를 복사하여 사용할 수 있다. Object.assign은 완전한 deep copy를 지원하지 않는다. 객체 내부의 객체(Nested Object)는 Shallow copy된다.

const user1 = {
  name: 'Lee',
  address: {
    city: 'Seoul'
  }
};

// 새로운 빈 객체에 user1을 copy한다.
const user2 = Object.assign({}, user1);
// user1과 user2는 참조값이 다르다.
console.log(user1 === user2); // false

user2.name = 'Kim';
console.log(user1.name); // Lee
console.log(user2.name); // Kim

// 객체 내부의 객체(Nested Object)는 Shallow copy된다.
console.log(user1.address === user2.address); // true

user1.address.city = 'Busan';
console.log(user1.address.city); // Busan
console.log(user2.address.city); // Busan

user1 객체를 빈객체에 복사하여 새로운 객체 user2를 생성하였다. user1과 user2는 어드레스를 공유하지 않으므로 한 객체를 변경하여도 다른 객체에 아무런 영향을 주지 않는다.

주의할 것은 user1 객체는 const로 선언되어 재할당은 할 수 없지만 객체의 프로퍼티는 보호되지 않는다. 다시 말하자면 객체의 내용은 변경할 수 있다.

#2.2 Object.freeze

Object.freeze()를 사용하여 불변(immutable) 객체로 만들수 있다.

const user1 = {
  name: 'Lee',
  address: {
    city: 'Seoul'
  }
};

// Object.assign은 완전한 deep copy를 지원하지 않는다.
const user2 = Object.assign({}, user1, {name: 'Kim'});

console.log(user1.name); // Lee
console.log(user2.name); // Kim

Object.freeze(user1);

user1.name = 'Kim'; // 무시된다!

console.log(user1); // { name: 'Lee', address: { city: 'Seoul' } }

console.log(Object.isFrozen(user1)); // true

하지만 객체 내부의 객체(Nested Object)는 변경가능하다.

const user = {
  name: 'Lee',
  address: {
    city: 'Seoul'
  }
};

Object.freeze(user);

user.address.city = 'Busan'; // 변경된다!
console.log(user); // { name: 'Lee', address: { city: 'Busan' } }

내부 객체까지 변경 불가능하게 만들려면 Deep freeze를 하여야 한다.

function deepFreeze(obj) {
  const props = Object.getOwnPropertyNames(obj);

  props.forEach((name) => {
    const prop = obj[name];
    if(typeof prop === 'object' && prop !== null) {
      deepFreeze(prop);
    }
  });
  return Object.freeze(obj);
}

const user = {
  name: 'Lee',
  address: {
    city: 'Seoul'
  }
};

deepFreeze(user);

user.name = 'Kim';           // 무시된다
user.address.city = 'Busan'; // 무시된다

console.log(user); // { name: 'Lee', address: { city: 'Seoul' } }

#2.3 Immutable.js

Object.assign과 Object.freeze을 사용하여 불변 객체를 만드는 방법은 번거러울 뿐더러 성능상 이슈가 있어서 큰 객체에는 사용하지 않는 것이 좋다.

또 다른 대안으로 Facebook이 제공하는 Immutable.js를 사용하는 방법이 있다.

Immutable.js는 List, Stack, Map, OrderedMap, Set, OrderedSet, Record와 같은 영구 불변 (Permit Immutable) 데이터 구조를 제공한다.

npm을 사용하여 Immutable.js를 설치한다.

$ npm install immutable

Immutable.js의 Map 모듈을 임포트하여 사용한다.

const { Map } = require('immutable')
const map1 = Map({ a: 1, b: 2, c: 3 })
const map2 = map1.set('b', 50)
map1.get('b') // 2
map2.get('b') // 50

map1.set(‘b’, 50)의 실행에도 불구하고 map1은 불변하였다. map1.set()은 결과를 반영한 새로운 객체를 반환한다.

#Reference


https://medium.com/dailyjs/named-and-optional-arguments-in-javascript-using-es6-destructuring-292a683d5b4e


Named and Optional Arguments in JavaScript

Parse your arguments more cleanly using ES6 destructuring

Jim Rottinger
Oct 17, 2016 · 4 min read

Destructuring is perhaps the biggest syntactical change that came to JavaScript in the ES6 specification. While the new syntax may seem weird to many long-time JavaScript programmers, once you are able to wrap your head around it, using it can be very powerful.

If you are not yet familiar with destructuring, it is the ability to map an object literal or array literal to multiple assignment statements at the same time. For example:

Destructuring can be used with array syntax to assign each value in the array to the variable name in the corresponding position of the left-hand side array.

More commonly, however, it can be used with object literals to pull out the properties of the object you want to use as variables.

Note — In the above object literal example, the property names must be the same. Position does not matter here unlike the array example.

If you want to rename something during destructuring, you can use the keyName:newKeyName syntax on the left hand side of your destructuring.

At first, this may just seem like some syntactic sugar on assignment statements, but what makes it much more than that is the ability to assign default values to the variables at the time of destructuring.

This is pretty significant. Say that the right-hand side of the assignment expression is not an object literal but a call to function in the other part of your application. One day, a developer comes along and implements a short-circuiting return statement in that other function and now your call isn’t getting the expected response. Being able to set up defaults at the time of the assignment makes safeguarding your code much easier.

Destructuring Function Parameters

When you pass an argument to a function, before that function begins executing, it assigns the argument you passed in to the corresponding parameter in its function signature. Since it is an assignment statement, that means we can use destructuring to do assign parameters values in a function!

Just as was shown before, we can also rename our keys during destructuring.

Lastly, we can assign default values to both the individual keys in our destructuring statement and the entire block itself.

While this seems a bit tedious to type out, it prevents us from having to check for the existence of every single argument we pass in.

Named and Optional Arguments

If you recall the first example of assigning default values during destructuring and combine that with what we learned in the last section, you might know where I’m going with this. If you can destructure function parameters, and you can assign default values during destructuring, AND the object literal names have to match during the destructuring process, this means that you can have named and optional parameters in your function signature! (so long as you use destructuring). Here is an example:

Conclusion

Hopefully the title of this article was not too misleading. While we do not yet have true named and optional arguments in Javascript in the same way C# does, I have just demonstrated a way to get functionally equivalent behavior using ES6 destructuring. While I do not foresee this pattern replacing positional arguments, it is very nice for situations such as receiving an object in a callback to a promise when making a network call to the server. Instead of hoping the network call returns exactly what you are expecting it to, you can use the pattern described in this post to explicitly define what you are expecting to receive and set up defaults for those values.

Let me know what you think in the comments below!

'C Lang > JS Technic' 카테고리의 다른 글
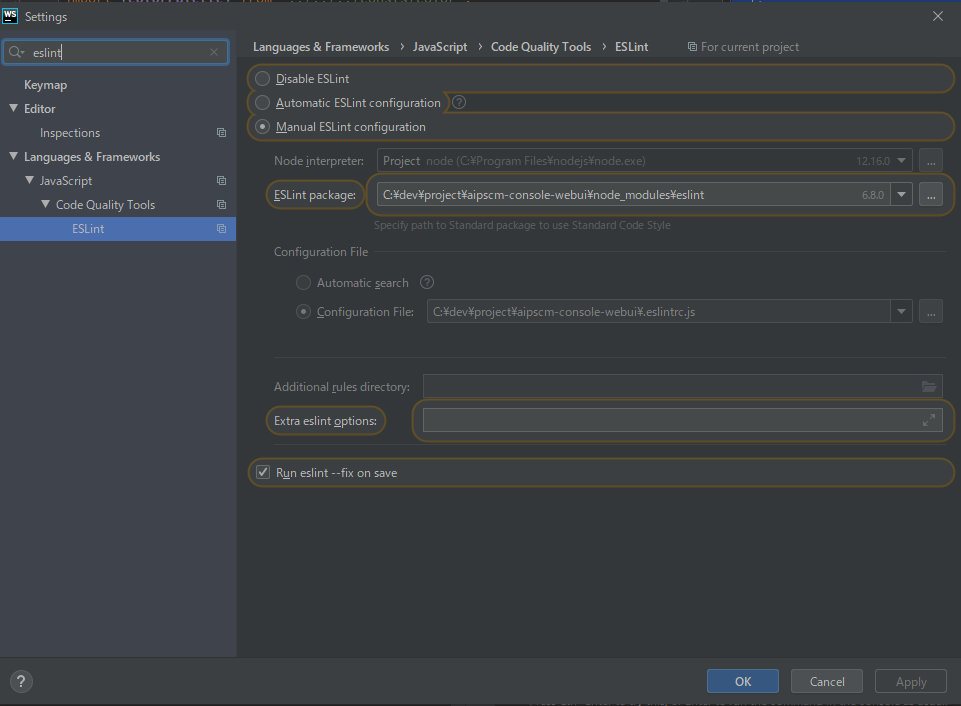
Airbnb JavaScript 스타일 가이드() {  (0) 2019.10.28
객체와 변경불가성(Immutability)  (0) 2019.10.28
React란 무엇인가  (0) 2019.06.26
삽입정렬, 합병정렬, 선택정렬, 퀵정렬 시간비교  (0) 2019.06.18
MVC패턴  (0) 2019.06.04

리액트(React)란 무엇인가

목차 

1.React란 무엇인가
  1.1 왜 React를 사용하는가?
  1.2 React의 작동방식
  1.3 왜 Virtual DOM인가?
2. React의 특징
  2.1 Flux 패턴과 단방향 데이터 바인딩
  2.2 Component 기반 구조
  2.3 Virtual DOM
  2.4 JSX 문법
3. 언제 React를 써야 하는가
마치며
출처

1.React란 무엇인가

React는 페이스북에서 제공하는 자바스크립트 UI 라이브러리다. 즉 React 프론트엔드 라이브러리다. Angular가 프레임워크인 데 반해 React는 라이브러리다. 즉, 웹을 만드는 데 꼭 필요한 도구들이 전부 기본적으로 제공되지 않는다. 그런만큼 가볍고, 선택의 폭이 넓다.

React는 컴포넌트 기반이다. 컴포넌트에 데이터를 흘려보내면 설계된 대로 UI가 조립되어 사용자에게 보여진다.

1.1 왜 React를 사용하는가?

웹페이지를 만들기 위해서 굳이 프론트엔드 라이브러리를 사용해야 할 필요는 없다. HTML과 CSS, 그리고 순수 자바스크립트 만으로도 웹페이지를 얼마든지 제작할 수 있다. 특히 단순한 정적 페이지를 만드는 것이 목적이라면 React와 같은 프론트엔드 라이브러리는 큰 이득이 되지 못한다.

하지만 요즘의 웹은 정적이고 단순한 페이지가 아니다. 웹앱 혹은 웹 어플리케이션이라 불릴 정도로 복잡하고 동적이다. 이런 웹 어플리케이션에서 UI를 동적으로 나타내기 위해서는 복잡하고 많은 상태를 관리해야 하는 부담이 생긴다.

만약 프로젝트 규모가 크고 다양한 UI와 상호작용이 필요하다면 DOM 요소 하나하나를 직접 관리하는 것은 힘든 일이다. 또, 복잡하게 늘어진 코드를 리팩토링 하는 것도 점점 힘들게 된다.

React를 사용하면 사용자와 상호작용할 수 있는 interactive한 UI를 쉽게 만들 수 있다. React를 사용하면 기능과 UI 구현에 집중하고 불필요한 주의력 분산을 줄일 수 있게 된다.

또, React를 사용하면 브라우저 전체를 새로고침 하지 않고도 컨텐츠를 빠르게 변경할 수 있다.

1.2 React의 작동방식

React는 이벤트로 인해 데이터를 관리하는 Model에 변화가 생기면 Virtual DOM을 생성한다. 이후 Virtual DOM과 실제 DOM을 비교하고, 변화가 발생한 부분만 업데이트 한다.

1.3 왜 Virtual DOM인가?

복잡한 SPA에서는 DOM 조작이 많이 발생한다. 그 때마다 브라우저가 연산을 해야 하므로 전체적인 프로세스가 비효율적으로 되기 쉽다.

하지만 Virtual DOM을 사용하면, 실제 DOM에 적용시키기 전 가상의 DOM을 만들어 적용시키고, 최종 완성된 결과만을 실제 DOM으로 전달한다. 이를 통해 브라우저가 진행하는 연산의 양을 줄일 수 있어 성능이 개선된다. Virtual DOM은 렌더링도 되지 않기 때문에 연산 비용이 적다. 모든 변화를 Virtual DOM을 통해 묶고 이를 실제 DOM으로 전달한다.

2. React의 특징

2.1 Flux 패턴과 단방향 데이터 바인딩

React는 양방향 바인딩이 전제되는 MVC 패턴과는 다른 특징을 보인다. 페이스북에서 Flux라고 부르는 패턴이 적용되어 있는데, 단방향 바인딩이 특징이다.

위 도표는 MVC 패턴과 Flux 패턴의 차이를 보여준다. Flux 패턴은 일방통행이다. 따라서 단방향 바인딩이라고 한다.

그렇다면 React에서는 왜 MVC 패턴을 사용하지 않고 Flux 패턴을 사용하는 것일까? 다음 인용문을 읽어보면 답을 알 수 있다.

문제는 페이스북과 같은 대규모 애플리케이션에서는 MVC가 너무 빠르게, 너무 복잡해진다는 것이다. 페이스북 개발팀에 따르면 구조가 너무 복잡해진 탓에 새 기능을 추가할 때마다 크고 작은 문제가 생겼으며 코드의 예측이나 테스트가 어려워졌으며 새로운 개발자가 오면 적응하는데만 한참이 걸려서 빠르게 개발할 수가 없었다. 소프트웨어의 품질을 담보하기가 힘들어졌다는 뜻이다. 이 같은 문제의 대표적인 사례가 바로 페이스북의 안 읽은 글 갯수(unread count) 표시이다. 사용자가 읽지 않았던 글을 읽으면 읽지 않은 글 갯수에서 읽은 글 수만큼 빼면 되는 일견 단순해보이는 기능인데도, 페이스북 서비스에서 이를 MVC로 구현하기는 어려웠다고 한다. 어떤 글을 ‘읽음’ 상태로 두면, 먼저 글을 다루는 thread 모델을 업데이트 해야하고 동시에 unread ​count 모델도 업데이트 해야한다. 대규모 MVC 애플리케이션에서 이 같은 의존성과 순차적 업데이트는 종종 데이터의 흐름을 꼬이게 하여 예기치 못한 결과를 불러일으킨다. (출처: Flux와 Redux, Webframeworks.kr )

페이스북에서는 Flux라는 새로운 패턴을 만들어냈다. 이를 통해 복잡한 앱에서도 데이터 흐름에서 일어나는 변화가 보다 더 예측가능해지게 되었다.

React의 아키텍쳐는 기존 MVC 패턴에서 View에 집중한 형태이다. 여기서 View는 스토어에서 데이터를 가져오는 한편, 자식 뷰로 데이터를 전달하기도 하므로 단순 View라기 보다는 View-controller에 가깝다.

React에서는 State가 View를 업데이트 한다. 그러나 View는 State를 직접 업데이트 할 수 없다. View가 State의 정보를 업데이트하기 위해서는 callback을 통해 state를 바꿔야 하며, 이렇게 바뀐 Staterk View를 업데이트해 새롭게 정의한다. 실제로는 setState()를 통해 state를 업데이트 하며, State가 업데이트 되면 View는 다시 렌더링된다.

2.2 Component 기반 구조

React는 UI(혹은 View)를 여러 컴포넌트(Component) 쪼개서 만든다. 한 페이지 안에서도 Header, Footer 등 각 부분을 독립된 컴포넌트(Component)로 만들고, 컴포넌트들을 조립해 화면을 구성한다.

컴포넌트 기반이라는 점은 React의 큰 장점이다. 여러 화면에서 재사용되는 코드를 반복해 입력할 필요 없이 컴포넌트만 임포트해 사용하면 된다. 또, 기능단위, UI단위로 쪼개어 코드를 관리하므로, 어플리케이션이 복잡해져도 코드의 유지보수가 용이하다.

<html>
  <head>
    <title>블로그</title>
  </head>
  <body>
    <header>
       <!-- 헤더 내용 -->
    </header>
    <div class="post-list">
       <!-- 콘텐츠 리스트 -->
    </div>
    <footer>
      <!-- 푸터 내용 -->
    </footer>
  </body>
</html>

위와 같은 어플리케이션이 있다고 하자. 이를 React로 만들게 되면 대략 다음과 같다.

import React, { Component } from "react";
import Header from "./component/Header";
import Footer from "./component/Footer";
import PostList from "./component/PostList";

class App extends Component {
  render() {
    return(
      <div>
        <Header />
        <PostList />
        <Footer />
      </div>
    )
  }
}

export default App;

Header나 Footer PostList 등은 컴포넌트로 만들고, 이를 조립해서 루트 컴포넌트를 만드는 방식이다.

2.3 Virtual DOM

DOM은 Document Object Model의 약자이다. DOM은 html, xml, CSS 등을 트리 구조로 인식하고 데이터를 객체로 간주해 관리한다. html 코드를 브라우저에서 열게 되면 DOM이 브라우저에서 보이는 View를 만드는 식이다.

JavaScript는 DOM을 조작할 수 있다. 이를 통해 눈에 보이는 값을 변경하는 등 웹을 동적으로 만든다.

앞서 살펴보았듯이, 이벤트가 발생할 때마다 Virtual DOM을 만들고 실제 DOM과 비교하여 변경사항만 실제 DOM에 반영하여 앱의 효율성을 개선하게 된다. React가 여러 Component로 View를 쪼갠 이유도 이런 부분 업데이트를 원활하게 하기 위함이다.

Virtual DOM과 실제 DOM의 차이는 Tree Diff Algorithm을 통해 계산된다. 일반적으로 트리를 다른 트리로 바꾸는 알고리즘은 O(n^3)의 시간복잡도를 가지게 된다. React는 그들만의 휴리스틱한 알고리즘을 만듦으로써 시간복잡도를 O(n)으로 개선하였다.

React Diff Algorithm

React DOM diff 알고리즘

2.4 JSX 문법

JSX는 과거 페이스북이 PHP를 개량해 만들었던 XHP에 기원을 두고 있는 새로운 자바스크립트 문법이다. React는 JSX로 짜여진다. JavaScript가 아니다.

JSX의 특징은 기본적으로 html과 유사하다. 다만 약간의 원칙이 더 존재한다.

a. 두개 이상의 엘리먼트는 무조건 하나의 엘리먼트로 감싸져 있어야 한다.

<div>
  <p>first line</p>
  <p>second line</p>
</div>
<div>
  <p>second block</p>
</div>

위 태그처럼 두개의 div가 병렬로 존재한다면 새로운 div 태그로 감싸거나 fragment를 React를 임포트 하는 라인에서 같이 임포트해서 fragment 태그로 감싸줘야 한다. fragment 태그는 React에서 div를 추가해 감싸고 싶지는 않지만 다른 태그를 감쌀 필요성이 있을 때 사용할 수 있도록 React에서 제공하는 태그이다.

b. class 대신 className을 사용한다.

c. 스타일 속성은 중괄호({}) 안에 객체 형태로 표시하며 단어 사이의 ‘-‘를 없애는 대신 카멜케이스(Camel Case)를 사용해 CSS 프로퍼티를 나타낸다.

<div className="container" style={{backgroundColor: "red", fontSize: 16}} />

d. 모든 태그는 반드시 닫혀 있어야 한다. 인풋 태그의 경우 html에서는 닫지 않고 사용하는 경우도 있으나, JSX에서는 단축문법으로라도 반드시 닫아야 한다.

<input />

e. JSX 안에서 JavaScript 값을 사용할 때엔 중괄호를 사용한다. 중괄호 안에 변수명을 입력하거나 JavaScript 계산식, 값 등을 넣을 수 있다.

<div>
{name}
</div>

f. 주석은 {/**/}로 내용을 감싼다.

3. 언제 React를 써야 하는가

웹 기반 계산기를 만든다고 가정하자. 2+2의 답을 사용자에게 알려주는 데에는 굳이 서버를 거쳐야 할 이유가 없다. 브라우저도 충분히 연산을 해낼 수 있다. 따라서 계산의 내용을 서버로 보내고, 서버가 이를 기록한 후 계산 결과를 반환하는 방식은 비효율적이게 된다.

한편, 블로그처럼 순수하게 정적인 사이트를 만든다면 서버에서 html을 일괄 생성하고 이를 클라이언트에게 전달하는 것이 단순하고, 로딩 속도를 개선할 수 있다.

React는 정적인 사이트보다는 동적인 사이트에 필요하고 어울린다. 정적인 사이트에서도 React를 사용할 수 있지만 보일러 플레이트 코드를 구현하고, 서버 사이드 렌더링을 통한 SEO나 라우팅 등을 구현하는 것은 몸에 맞지 않는 큰 머리처럼 비효율적이다.

반면, 사이트의 규모가 커지고 동적인 요소가 많아지면 단순 JavaScript나 jQuery로 상태(state)를 모두 관리하는 것은 거의 불가능에 가까워 진다. 예를들어, Netflix는 수많은 영상을 가지고 있고, 각 영상별로 특정 사용자의 취향과 일치할 확률을 계산한다. 이를 바탕으로 사용자가 선호할 영상들을 우선적으로 리스트업(list-up) 해 보여준다. 즉, 사용자마다 전부 다른 ‘개인화된’ 페이지를 가지게 된다. A와 B가 취향이 다르다면 메인페이지에서, 카테고리별 페이지에서, 심지어 영화 검색시에도 보여지는 결과물이 각각 다르다. 이로 인한 복잡한 상태들을 jQuery로 전부 관리한다는 것은 불가능하지는 않지만 엄청나게 비효율적이다. 유지보수가 어렵고 버그를 야기한다. 반면 React를 사용하면 Redux 등의 상태관리 도구를 이용해 상태를 모아 관리할 수 있다. 또, Component에 data가 흘러들어가 개인화된 웹페이지를 생성하게 되는 방식으로 플로우가 이해하기 쉽고 직관적이다. 유지보수에도 용이하다. 따라서 React는 프로젝트가 복잡하고 동적일수록 빛을 발한다.

아쉽게도, 대부분의 웹은 계산기와 블로그의 어쩡쩡한 중간에 위치해 있을 것이다. 따라서 선택은 개발자 개개인의 몫이다. 완벽하게 정적인 웹도 완벽하게 동적인 앱도 존재하지 않으니 말이다. 다만, React는 웹 어플리케이션을 구축하는 접근방법을 새롭게 하고, 더 많은 생각할거리를 제공한다. React와 함께하는 웹개발은 더 역동적이고, 더 많은 즐거움을 준다(지극히 개인적인 감정이다).

마치며

React가 2018년에도 가장 핫한 프론트엔드 라이브러리/프레임워크에 등극했다. stateofjs.com 설문 결과에 따르면 64.8%가 React를 사용했고, 다시 사용할 것이라고 응답했다. Vue.js에서 같은 질문에 28.8%, Angular.js에서 23.9%가 같은 응답을 한 것으로 본다면 매우 강력한 호감이다. Angular의 경우 사용해봤지만 다시는 사용하지 않겠다는 응답이 33.8%였다.

출처: stateofjs.com

React는 단연컨데 가장 인기 있는 프론트엔드 라이브러리다. Vue가 가파르게 성장하고 있긴 하지만. Angular에 비해 러닝커브도 낮고, Vue에 비해 사용하는 곳도 많다. React와 함께하는 프론트엔드 개발은 편리하고 즐겁다. JSX 문법은 우아하고 직관적이며, Redux를 활용한 상태 관리는 예술에 가깝다.

React를 시작하면 React를 사랑하게 될 것이다.

+ Recent posts