https://maker.pro/raspberry-pi/tutorial/how-to-connect-a-raspberry-pi-to-a-laptop-display
The below image shows entire structure we gonna do.
How Does It Work?
To connect a Raspberry Pi to a laptop display, you can simply use an ethernet cable. The Raspberry Pi’s desktop GUI (Graphical User Interface) can be viewed through the laptop display using a 100Mbps ethernet connection between the two. There are many software programs available that can establish a connection between a Raspberry Pi and your laptop. We used VNC server software to Connect the Pi to our laptop.
Installing the VNC server on your Pi allows you to see the Raspberry Pi’s desktop remotely, using the mouse and keyboard as if you were sitting right in front of your Pi. It also means that you can put your Pi anywhere else in your home and still control it. Also, the internet can be shared from your laptop’s WiFi over Ethernet. This also lets you access the internet on the Pi and connect it to your laptop display.
Sharing Internet Over Ethernet
This step explains how you can share your laptop internet with the Raspberry Pi via Ethernet cable.
In Windows: To share internet with multiple users over Ethernet, go to Network and Sharing Center. Then click on the WiFi network:
If you make a command, "ifconfig" on the command line you can see the ips you are connected. the IP assigned to my laptop is 192.168.137.1. To check the IP assigned to the connected ethernet device, do the following. Considering that the IP assigned to your Laptop is 192.168.137.1 and subnet mask is 255.255.255.0: It means that the devices such as raspberry pi which connects to your ethernet gonna has IP address between 192.168.137.1 ~ 192.168.137.255 that assigned by your labtop.
- Open command prompt
- Ping the broadcast address of your IP. (Type) Eg: ping 192.168.137.255
- Stop the ping after 5 seconds.
- Check the reply from device: arp –a
Set up your raspberry pi
This step explains how you can share your laptop internet with the Raspberry Pi via Ethernet cable.
First. go to terminal with below cmd
> sudo raspi-config
and go to Interfacting option. Next VNC enabled.

Starting VNC Server on Pi:
To start VNC, enter the following command in the SSH terminal:
$ vncserver :1
You will be prompted to enter and confirm a password. This will be asked only once, during first time setup. Enter an 8 digit password. Note that this is the password you will need to use to connect to your Raspberry Pi remotely. You will also be asked if you want to create a separate “read-only” password – say no (n).
Yippeee!….The VNC server is now running on your Pi and we can now attempt to connect to it. First, we must switch to the laptop, from which we want to control the Pi. Then set up a VNC client to connect to the Pi.
ALSO, you can kill the vncserver with below cmd
$ vncserver -kill :1
Setting Up the Client Side (Laptop)
Download VNC client and install it. When you first run VNC viewer, you will see following:
Enter the IP address of your Raspberry Pi given dynamically by your laptop (you got the address from the earlier step) and append with :1 (denoting port number) and press connect. You will get a warning message, press ‘Continue’:
This is how to check IP addresses connected with your labtop
https://alselectro.wordpress.com/2017/02/17/raspberry-pi-3-how-to-connect-with-your-laptop/
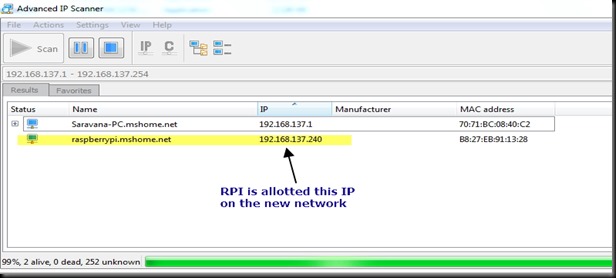
To know the IP of RPI we make use of ADVANCED IP SCANNER
Download from here & install the scanner
http://filehippo.com/download_advanced_ip_scanner/download/a518016bdff73f05b5f25826e519a493/
Open the IP Scanner program & type in the Range to scan as 192.168.137.1 to 192.168.137.254
Click on the scan button.
The IP scanner will detect the Raspberry PI & displays its IP along with host name & MAC address.
The host name is
raspberrypi.mshome.net & the IP is
192.168.137.240
Enter the 8 digit password which was entered in the VNC server installation on your Raspberry Pi:
Finally, the Raspberry Pi desktop should appear as a VNC window. You will be able to access the GUI and do everything as if you were using the Pi’s keyboard, mouse, and monitor directly. As with SSH, since this is working over your network, your Pi can be situated anywhere as long as it is connected to your network.
'Server > Raspberry pi' 카테고리의 다른 글
| DHT11으로 기온 습도 취득하기! (0) | 2019.09.30 |
|---|---|
| raspberry pi program diary (0) | 2019.07.20 |
| Raspberry Pi に Python 3.7.0 をインストールする (0) | 2019.07.20 |
| Check ip of raspbian linux (0) | 2019.07.20 |
| 한글 키보드 및 언어설정 하기 (0) | 2019.07.20 |


